Getting started with CRM
DataKnowl CRM helps you to manage all interactions with customers and potential customers in an organized way. It allows you to have
one tool for managing the entire life cycle of the customer, from marketing to sales
to customer service.
Having a global vision of all the interactions of the company, it becomes possible to optimize the processes of acquiring new customers to the maximum and offer high-quality assistance.
The goal is to have a CRM that allows your company to make marketing more effective, improve sales performance, and better meet the needs of acquired customers to create a solid and stable relationship with them.
Let's see the basic concepts.
In DataKnowl CRM, any person or organization with whom you interact or may interact is called an Entity.
An entity defines and maintains business data related to it. It is characterized by attributes and types, which depend on the life cycle phase.
In DataKnowl CRM, we have the following types of entities:
SUSPECT | LEAD | PROSPECT | PERSON | TARGET | ORGANIZATION
More details are here: Entities
In this article, we will focus on People and Organizations. Similarly, it is possible to work with other entities.
Let's see the basic concepts:
A Person can belong to an Organization. An Organization is made up of People.
Once the basic concepts have been defined, let's discover the functions of CRM.
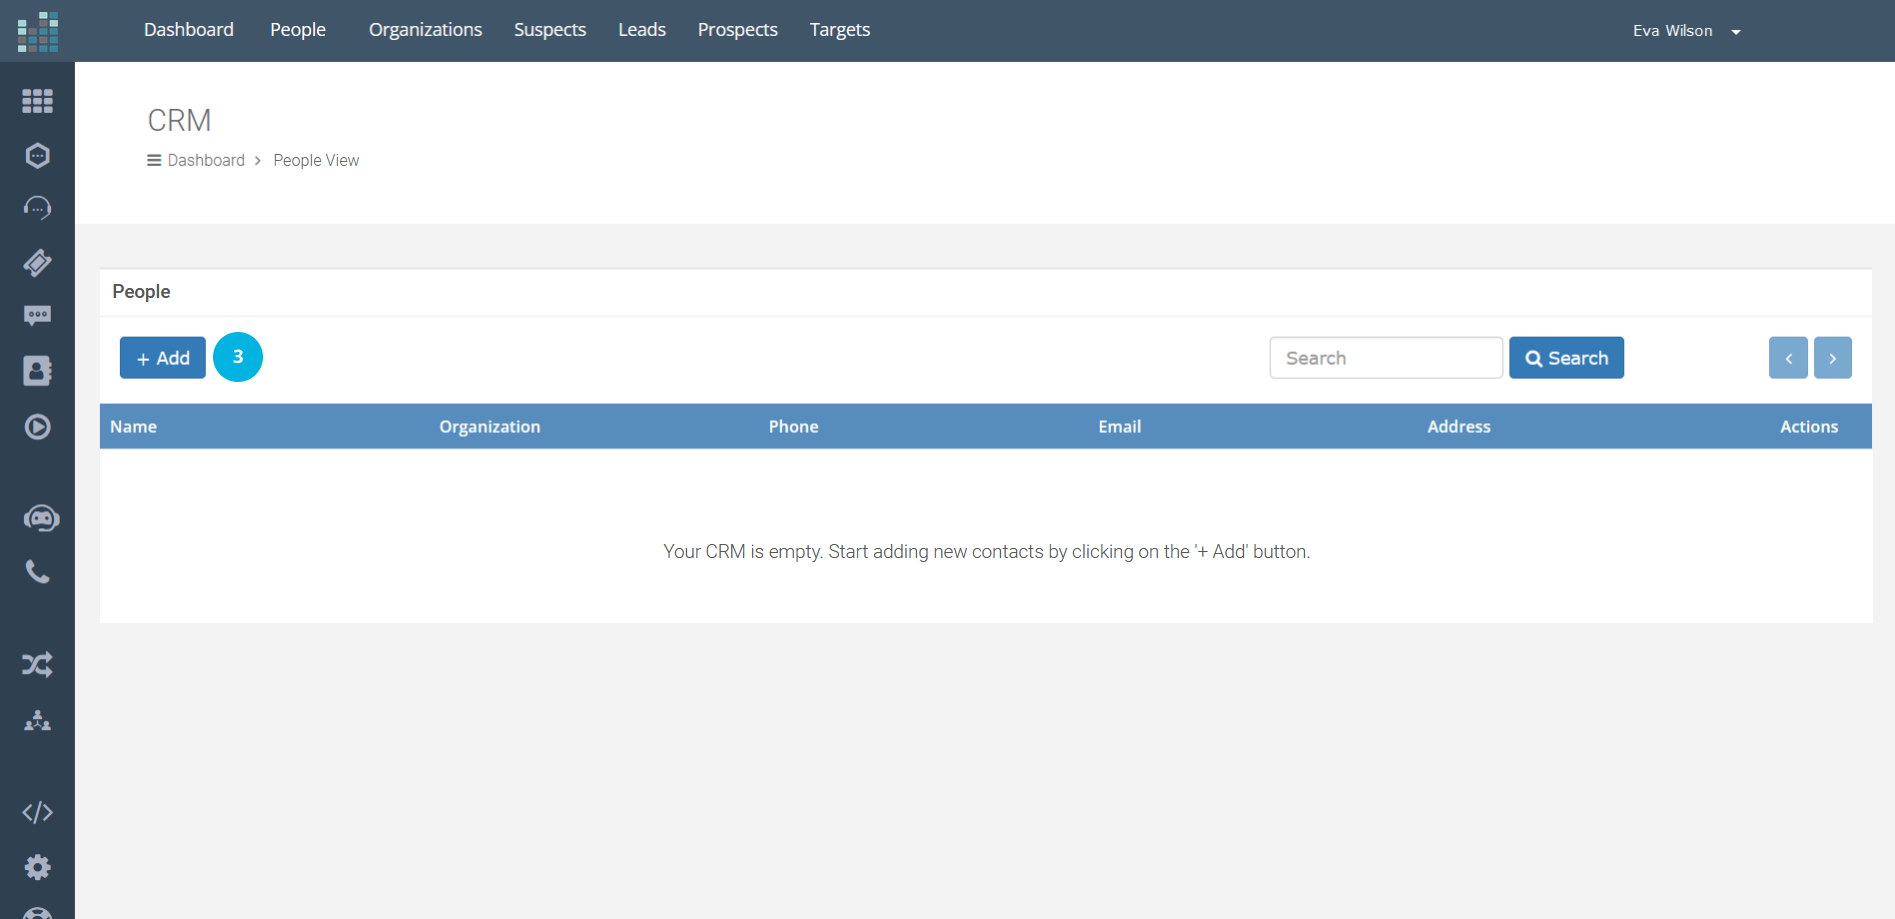
First, click on the CRM icon in the side menu of your dashboard.
Initially, the CRM is empty and does not contain any entities [1].

To start adding contacts, click on "People" [2] in the menu at the top and then click on the +Add button [3].
The following form will be displayed, which allows you to enter the data of the new Person.
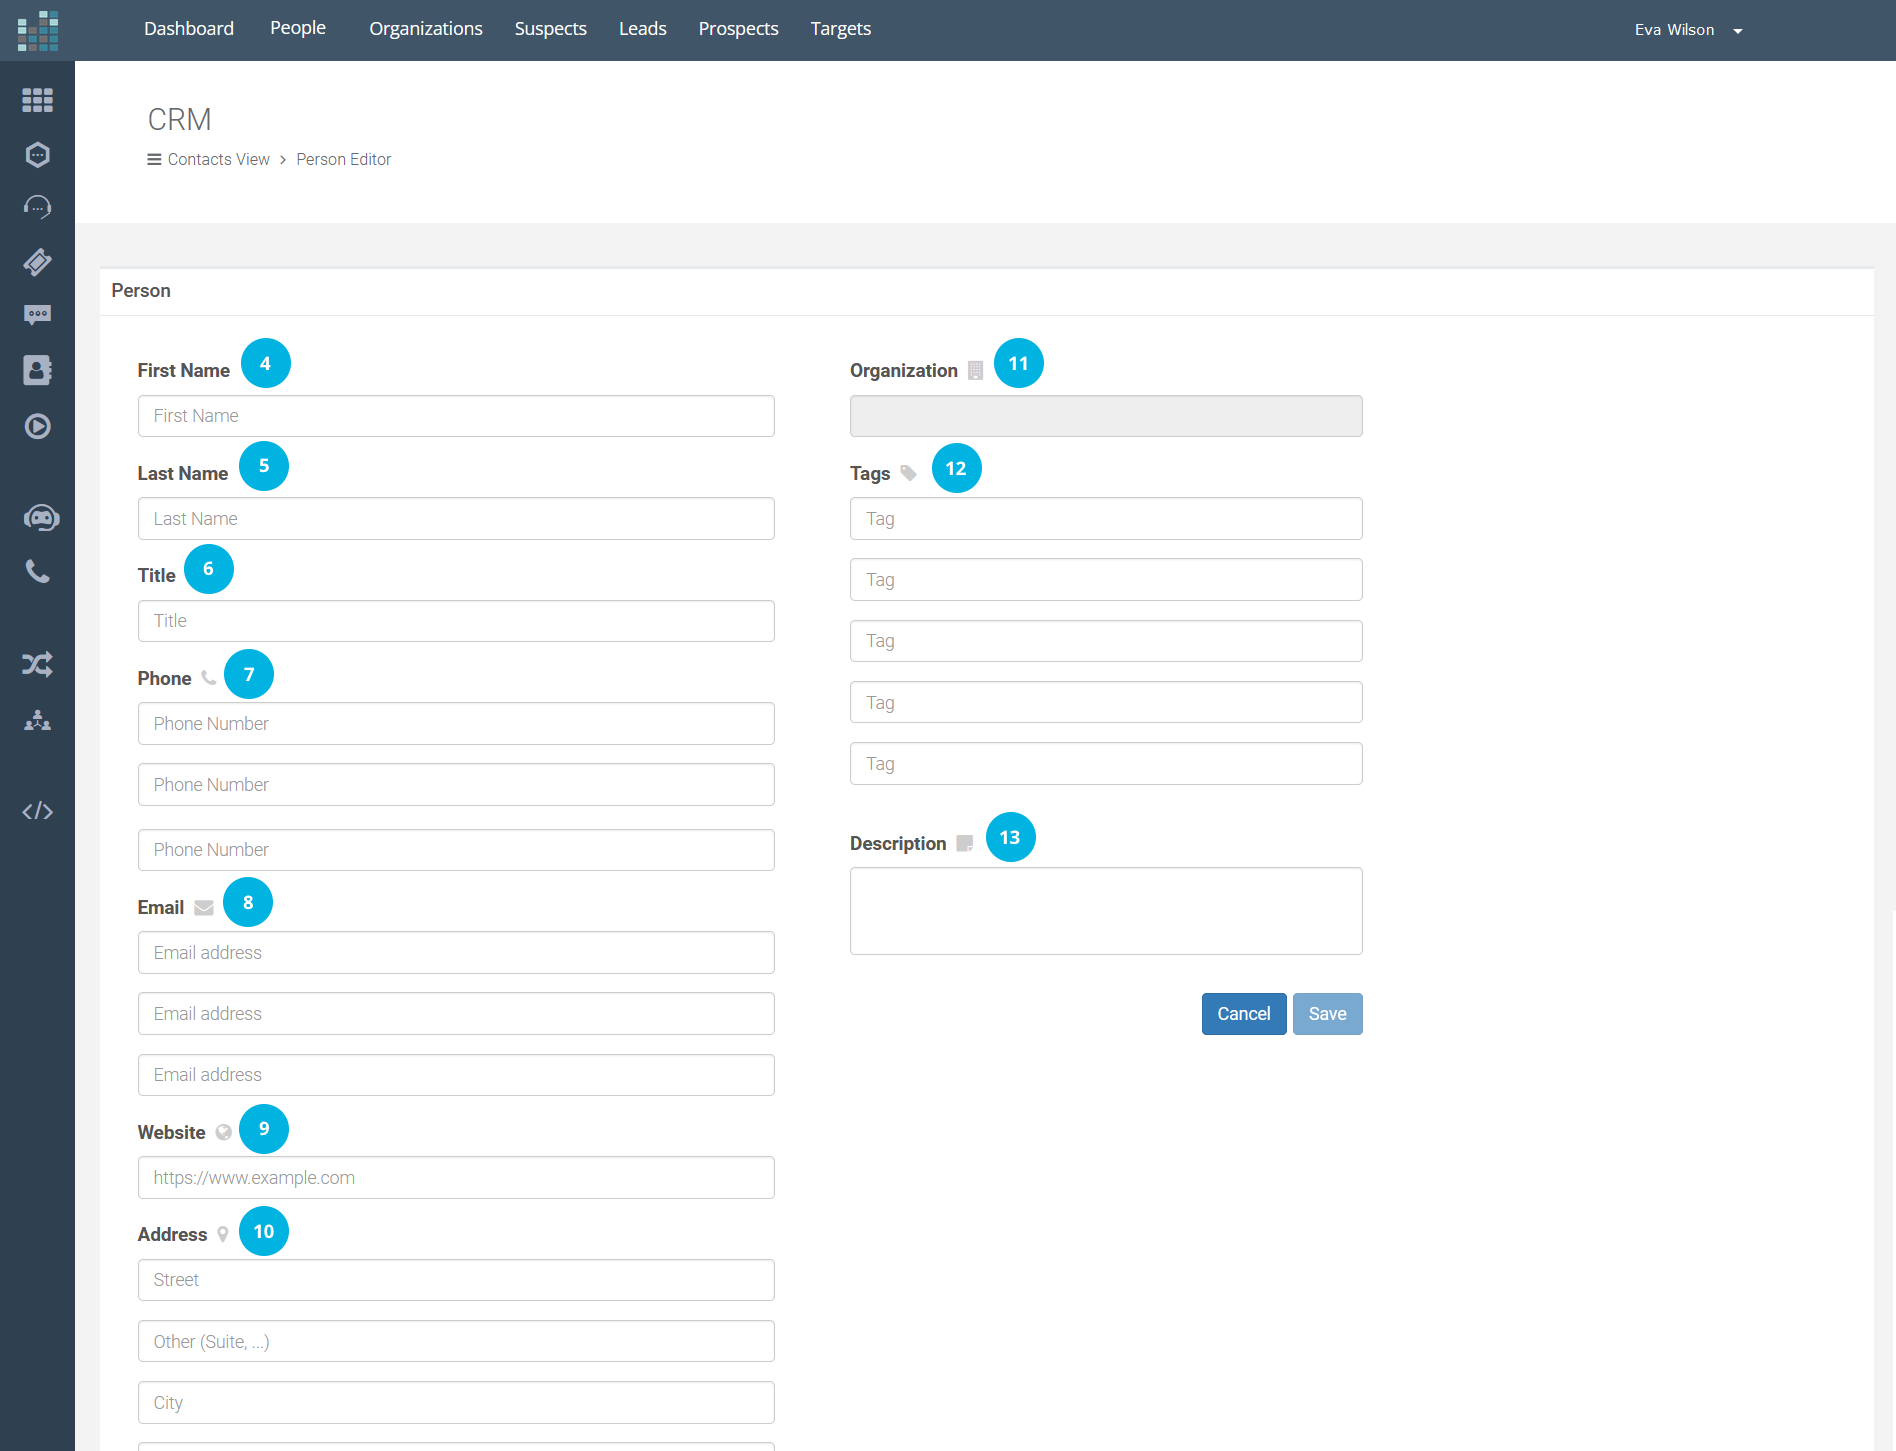
Fill in the form fields like this:
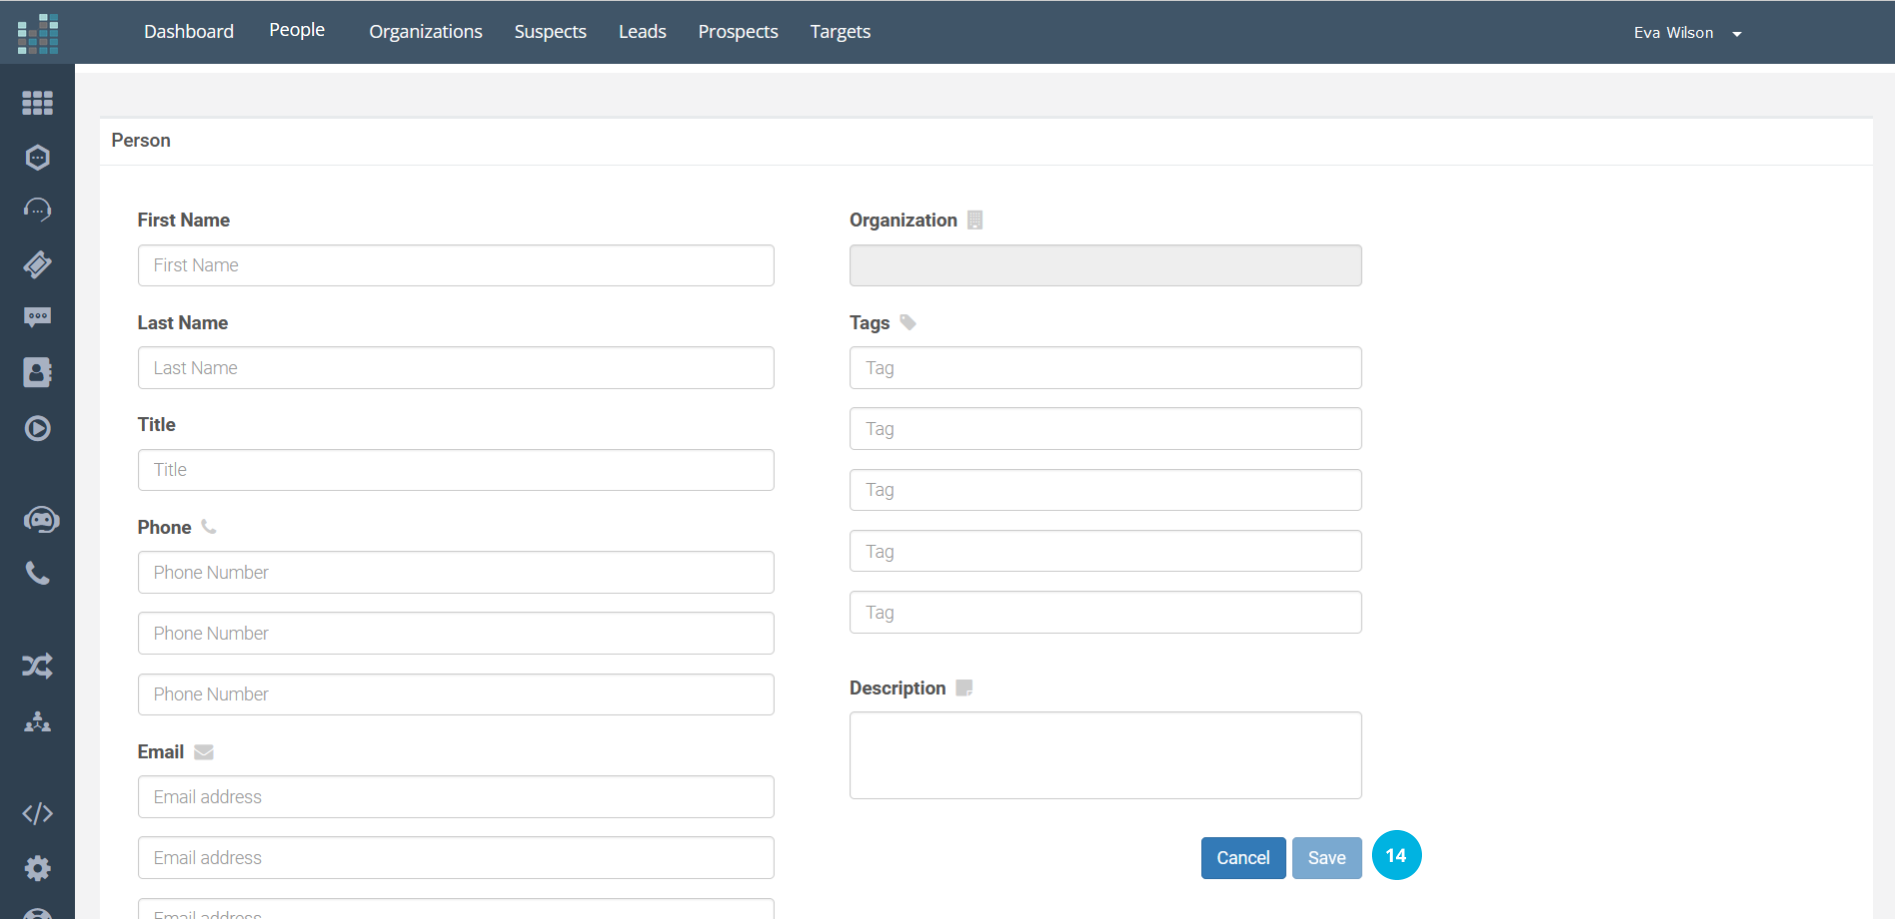
Once the data has been entered, click the Save button [14] to save.
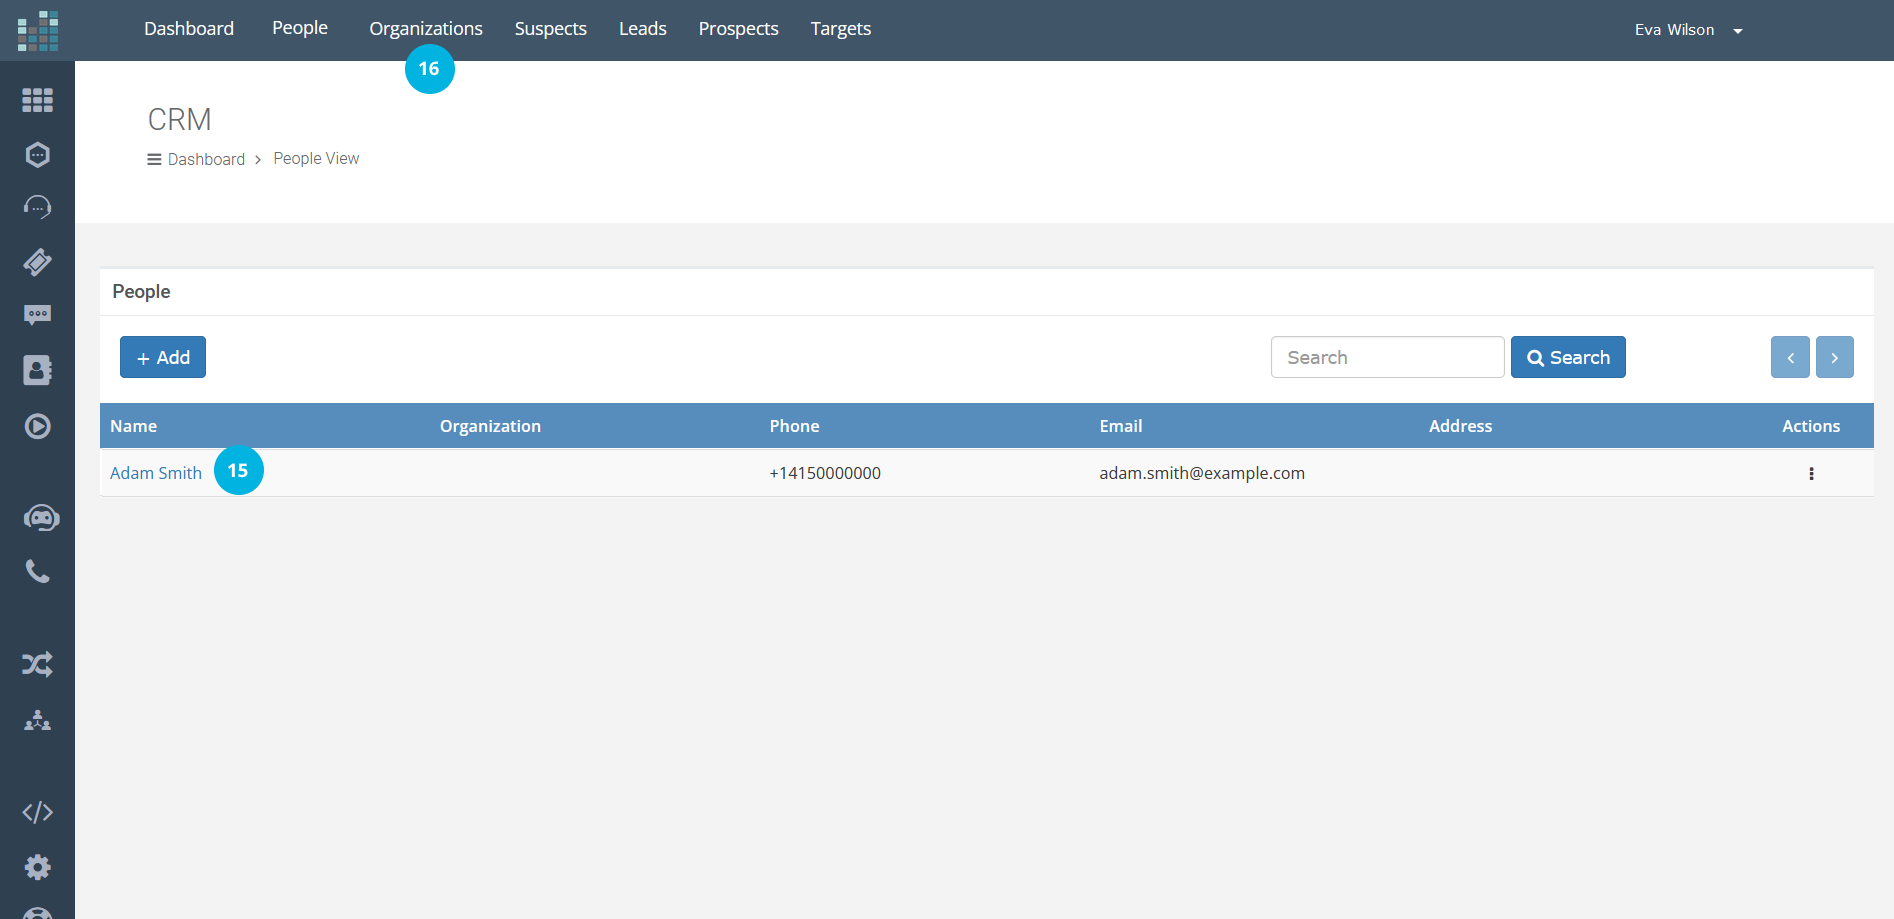
The new Person will be displayed in the People View [15] (e.g., Smith Adam).
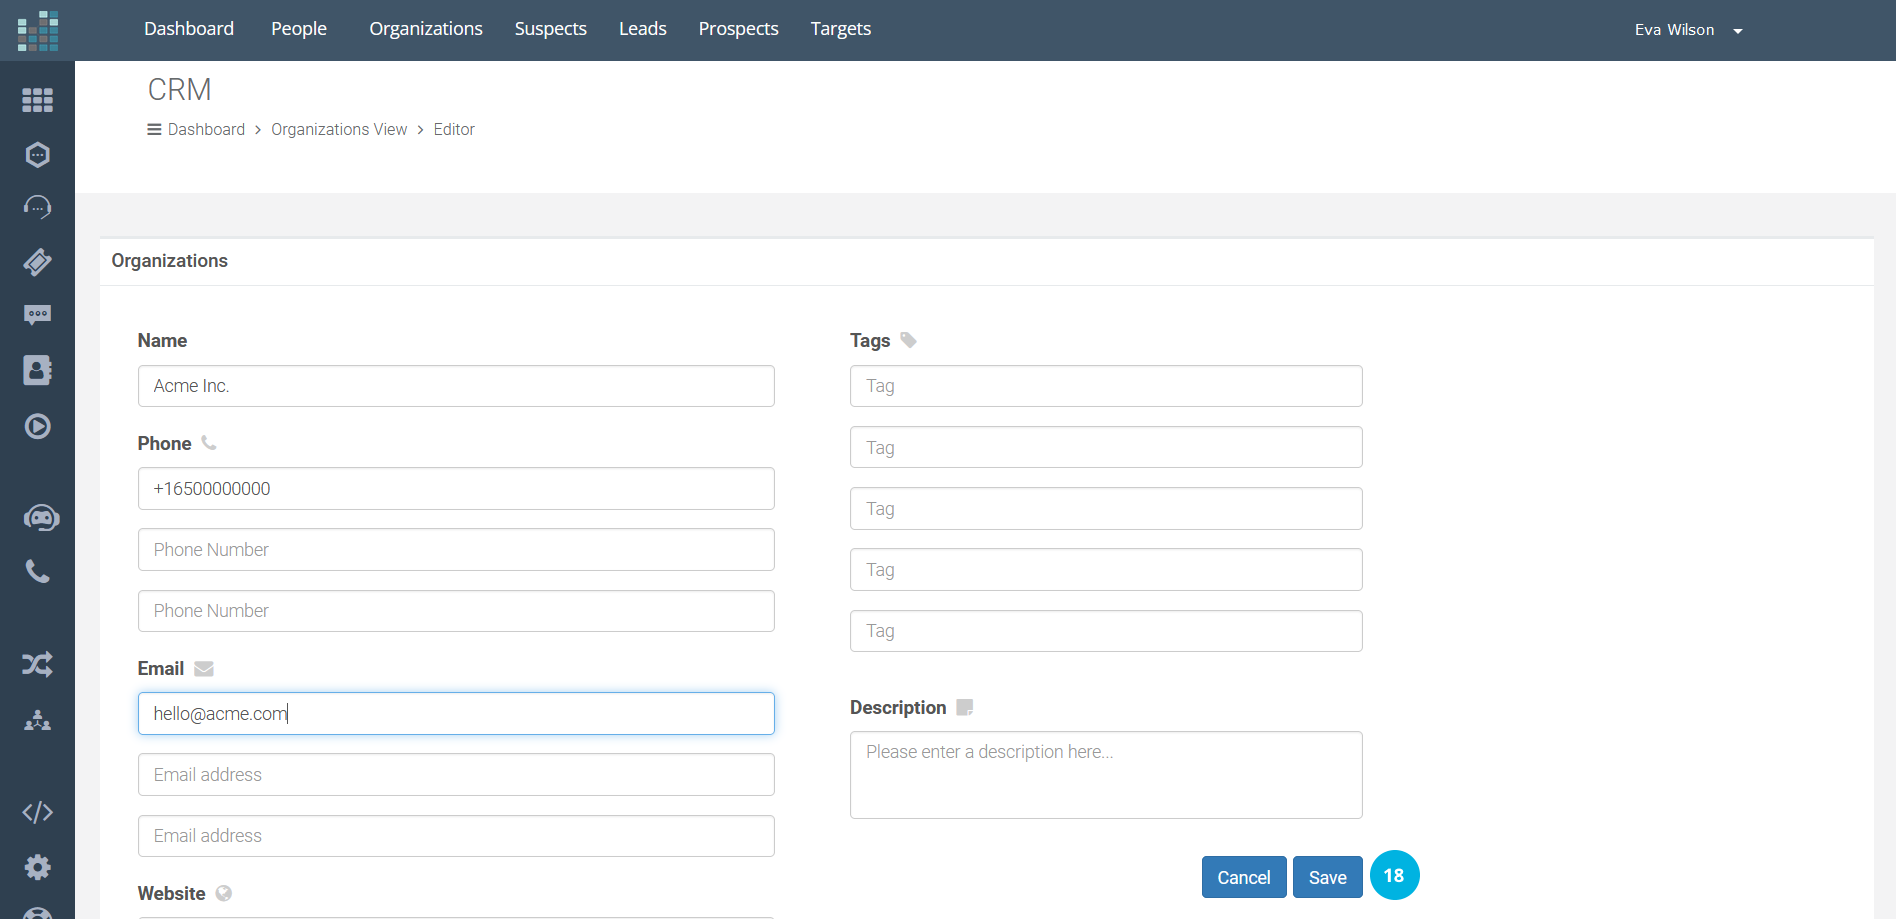
On the other hand, if you wish to add a new Organization, for example, a company, the path is similar. Click on "Organizations" [16] in the menu at the top and then click on the +Add button [17].
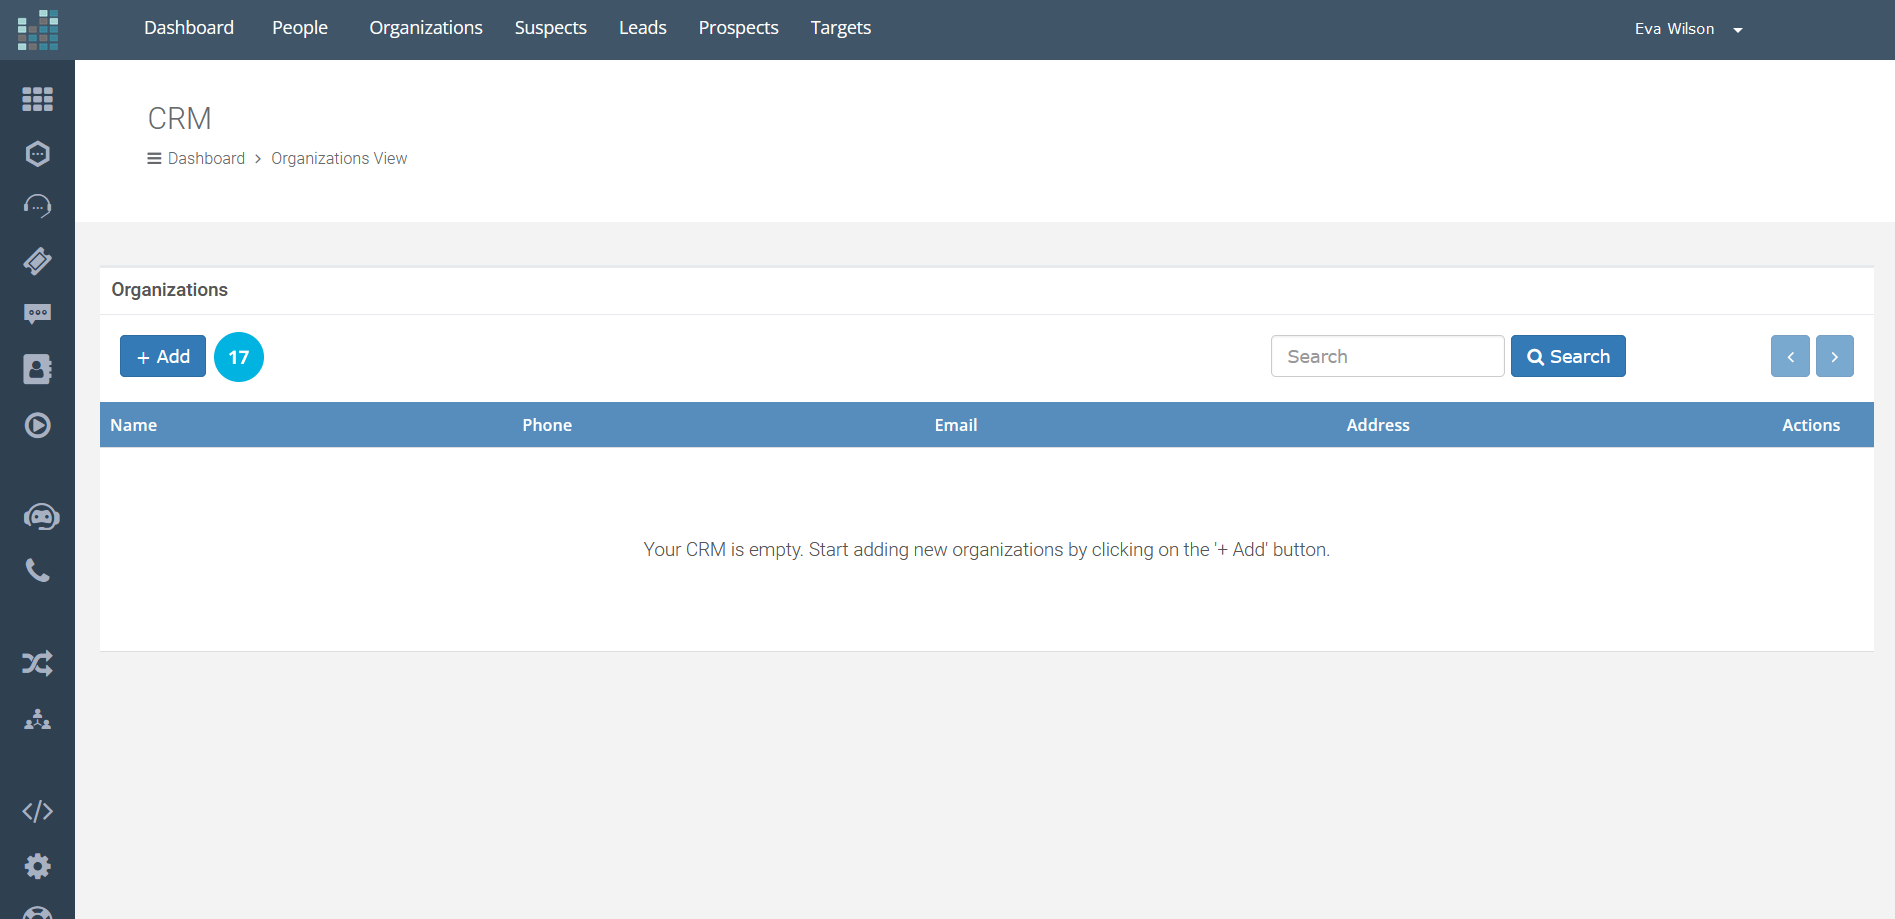
Fill in the company details and click on the Save button [18].
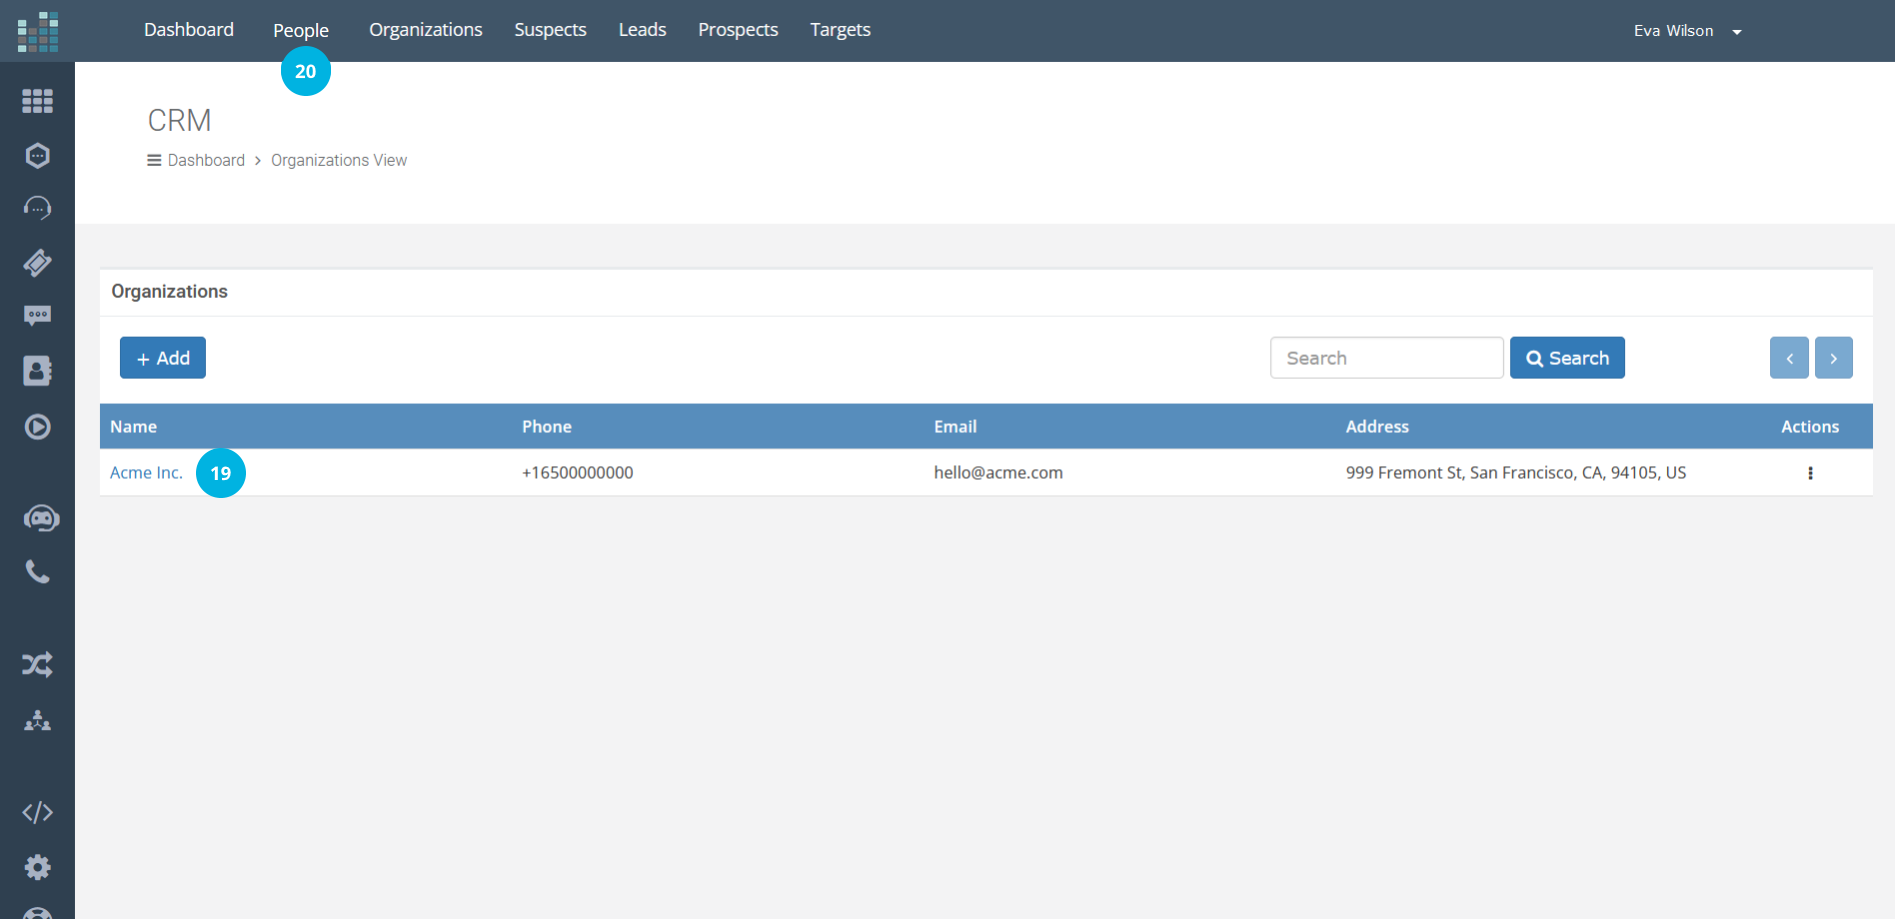
The Organization (e.g. Acme Inc.) will be displayed in the Organizations View [19].
Let us now explain how to associate a Person with an Organization.
NOTE: to associate a Person with an Organization, you must add the organization first, as the organization must already be present in your CRM to have a person associated with it.
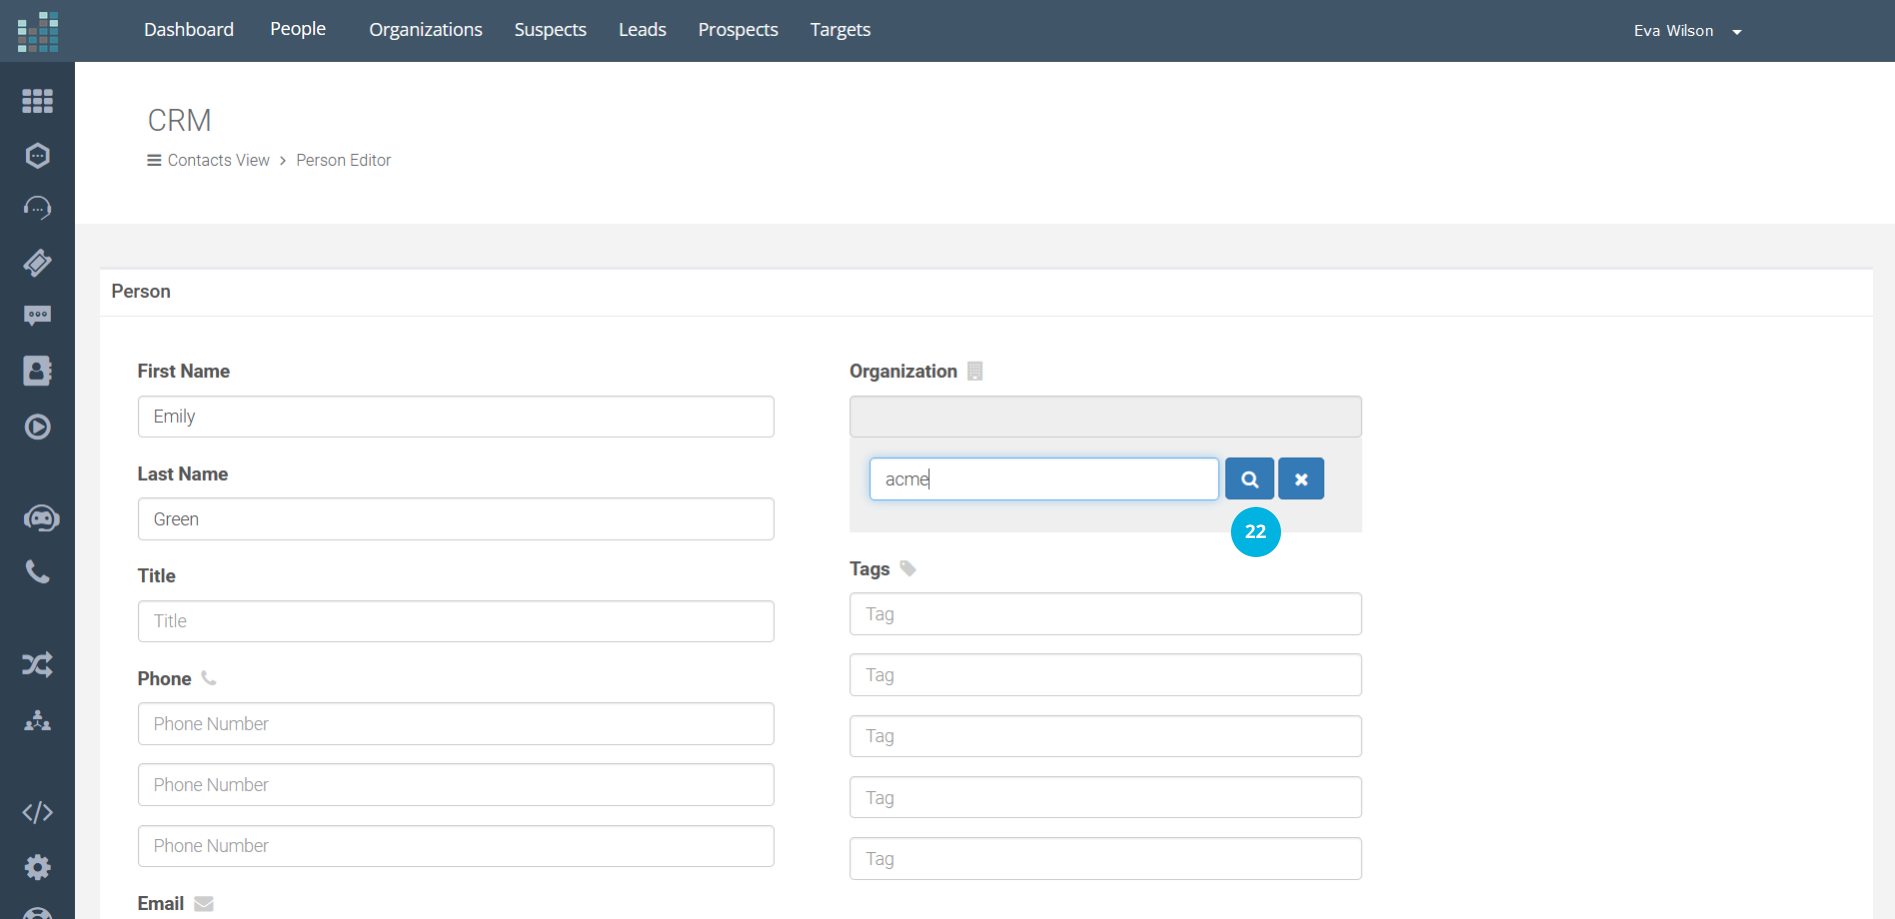
In our example, we added the Acme Inc. organization and now want to associate the Person "Emily Green" with this organization. Click on "People" [20] at the top, click on the +Add button, and enter the data. In the Organization field, a small form will open where you can enter the company name.
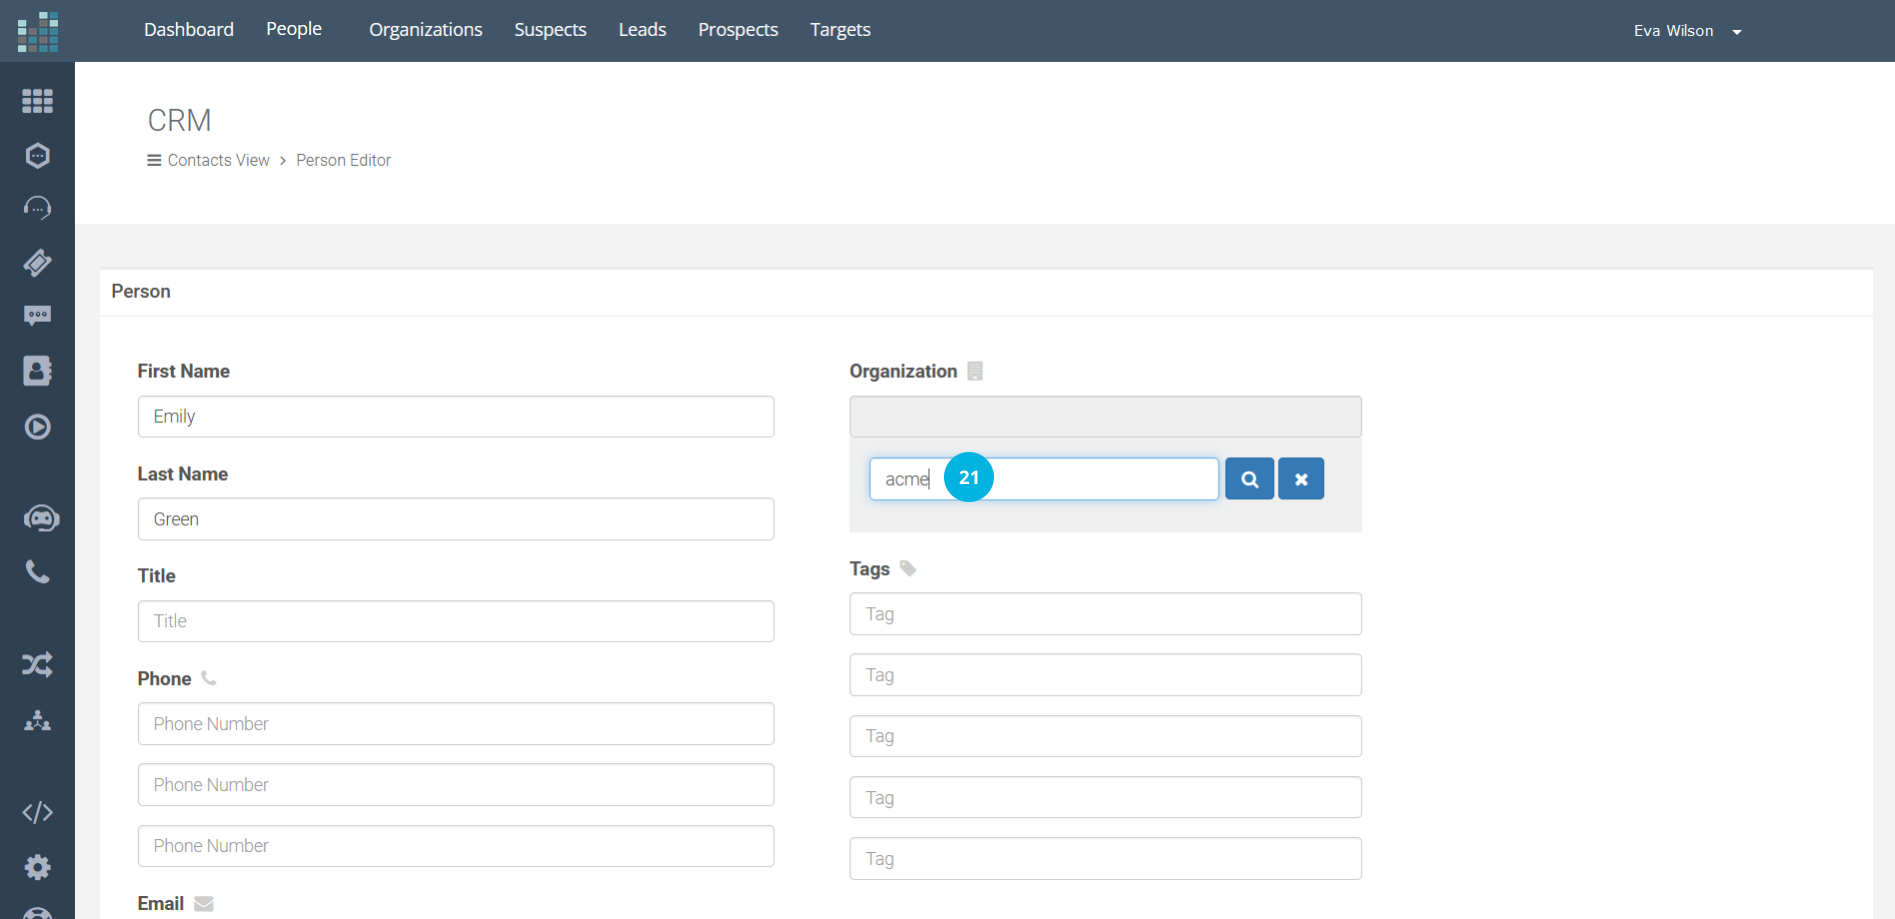
Enter the organization name (e.g., Acme Inc., we can also insert part of the name) [21] and click on the search icon [22].
The list of companies will be displayed. Select the company to which we want to associate the person and click on the check mark [23] to confirm the association.
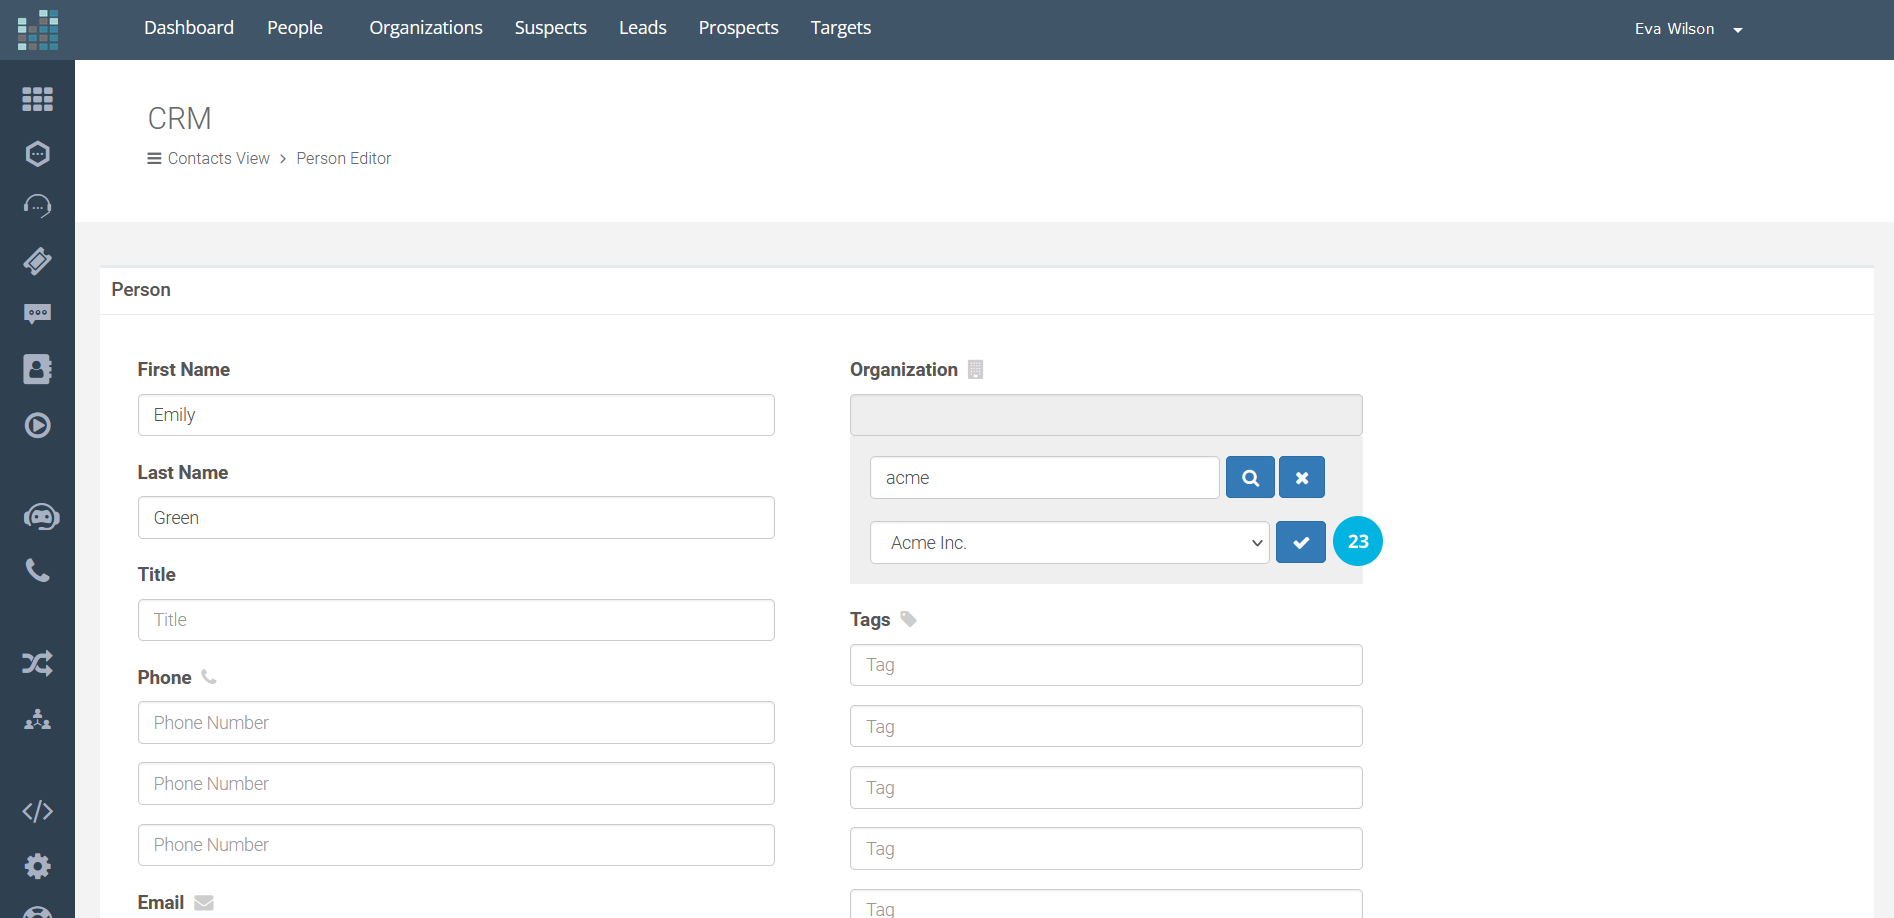
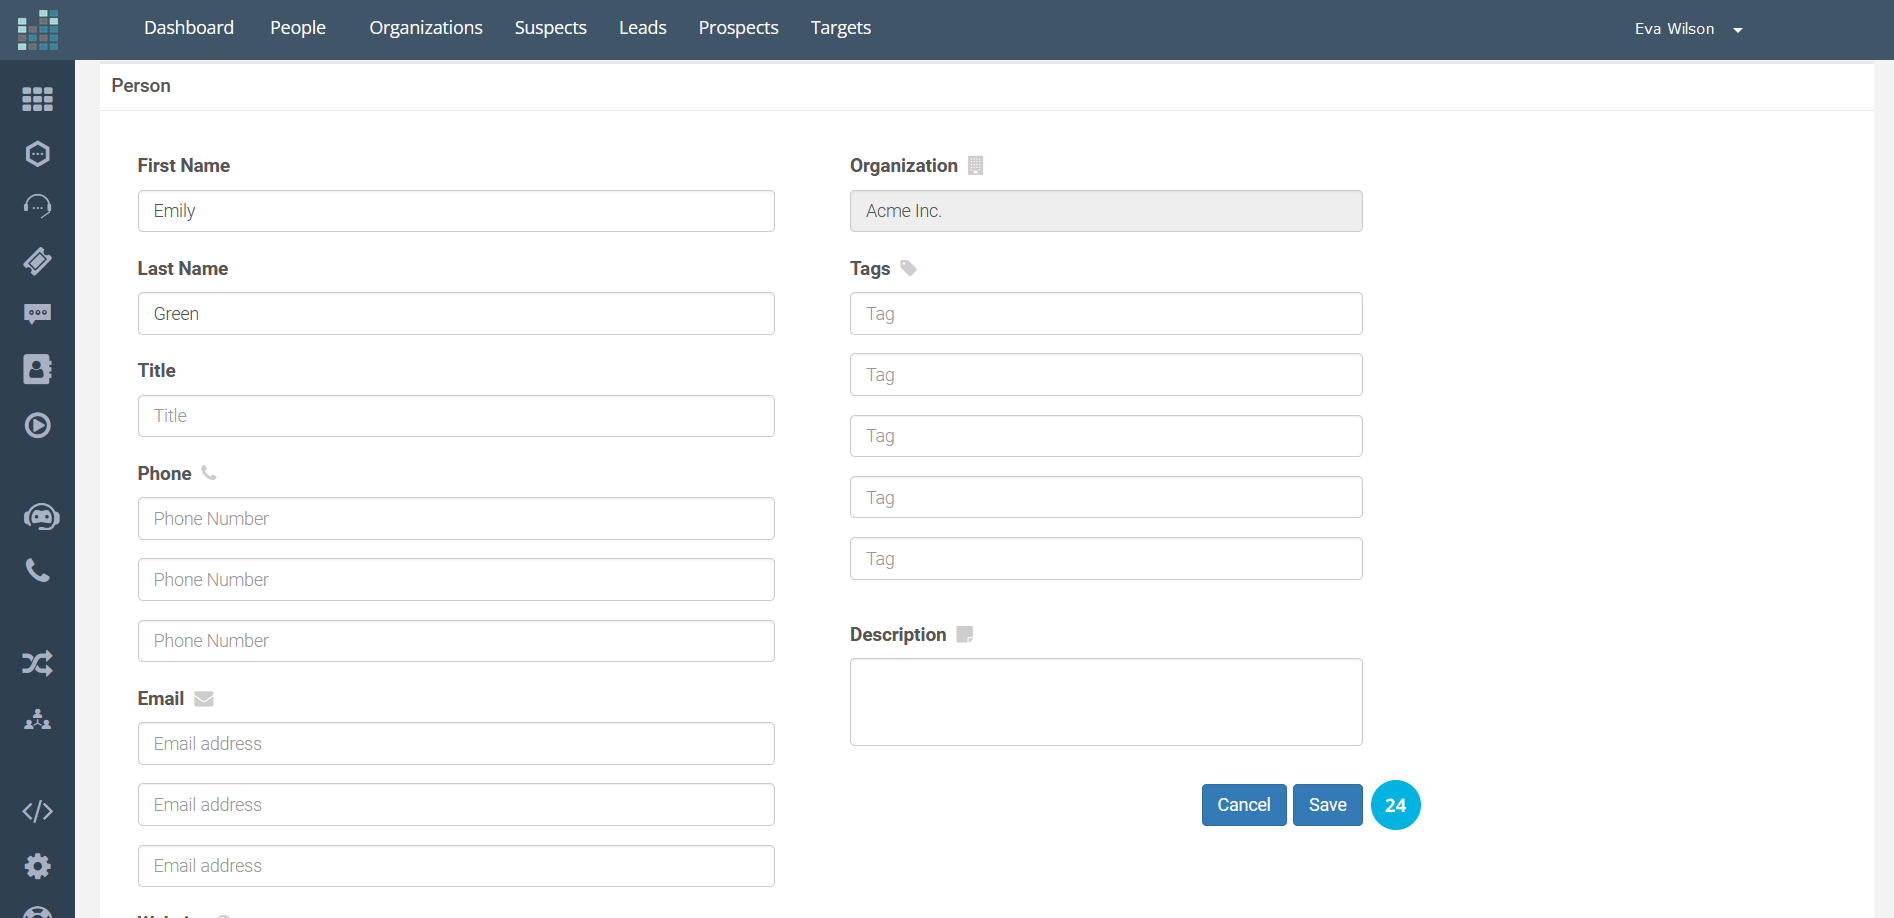
This way, the "Organization" field will contain the company's name associated with the Person. Once the remaining fields have been filled in, click on the Save button [24].
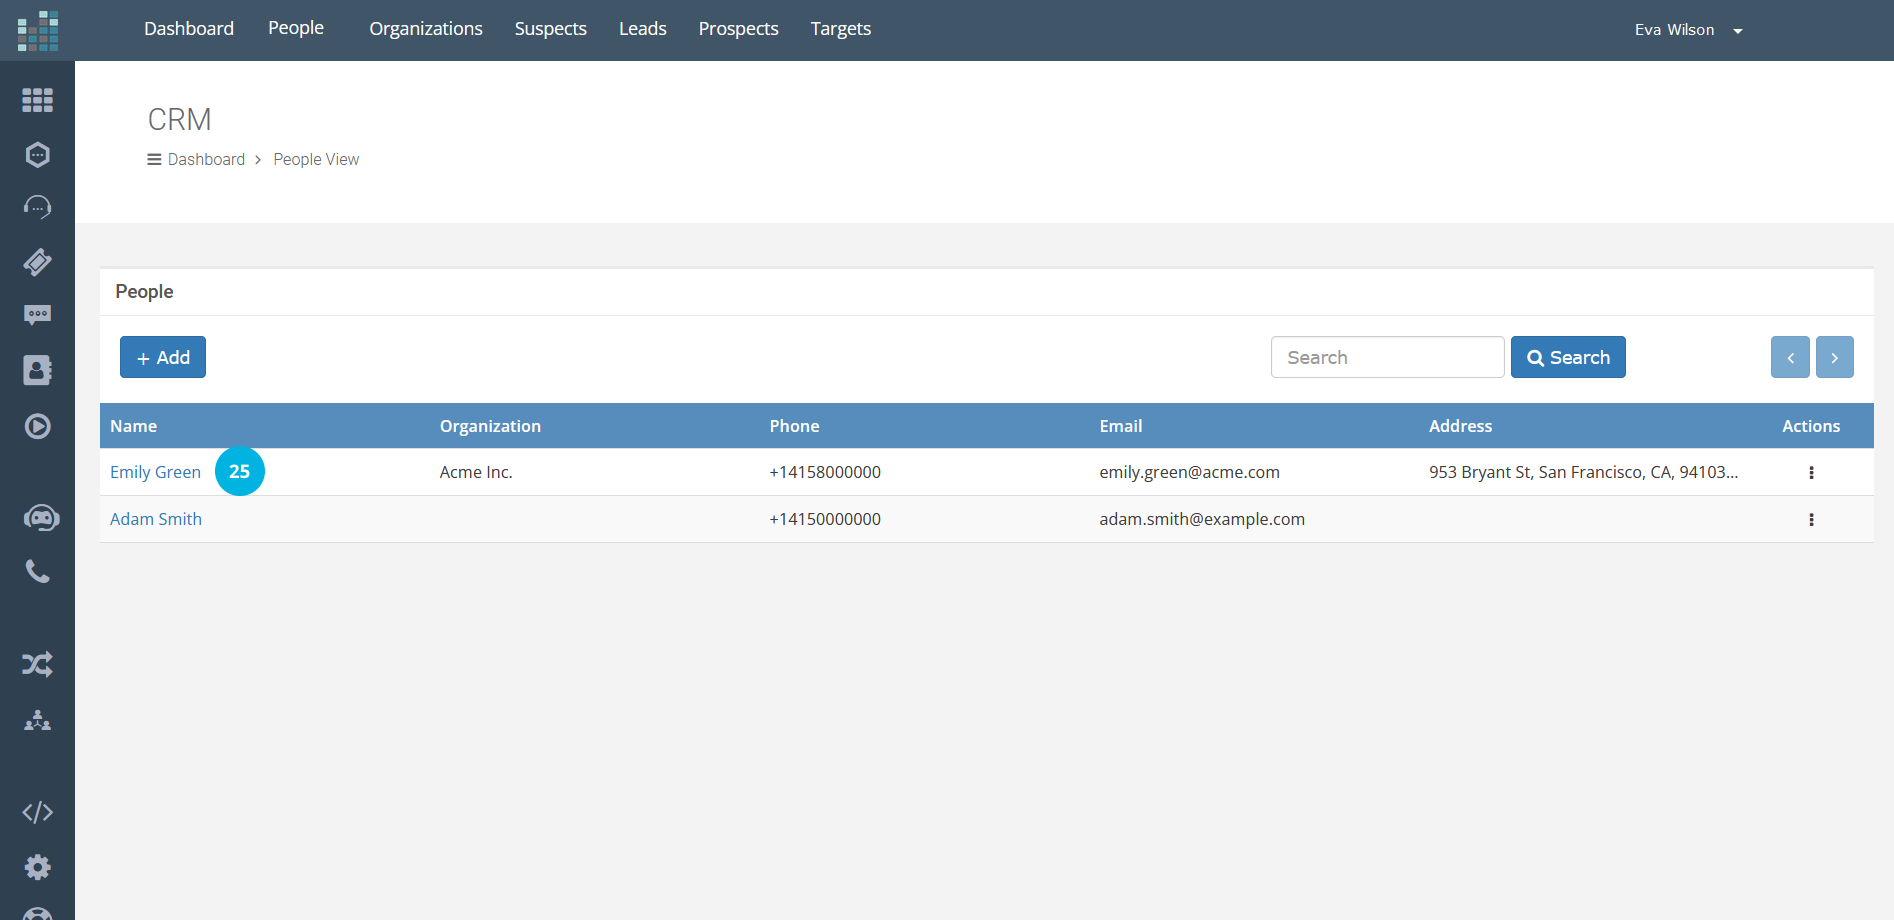
The Person "Green Emily" associated with the company "Acme Inc." will be displayed in the People View of our CRM [25].
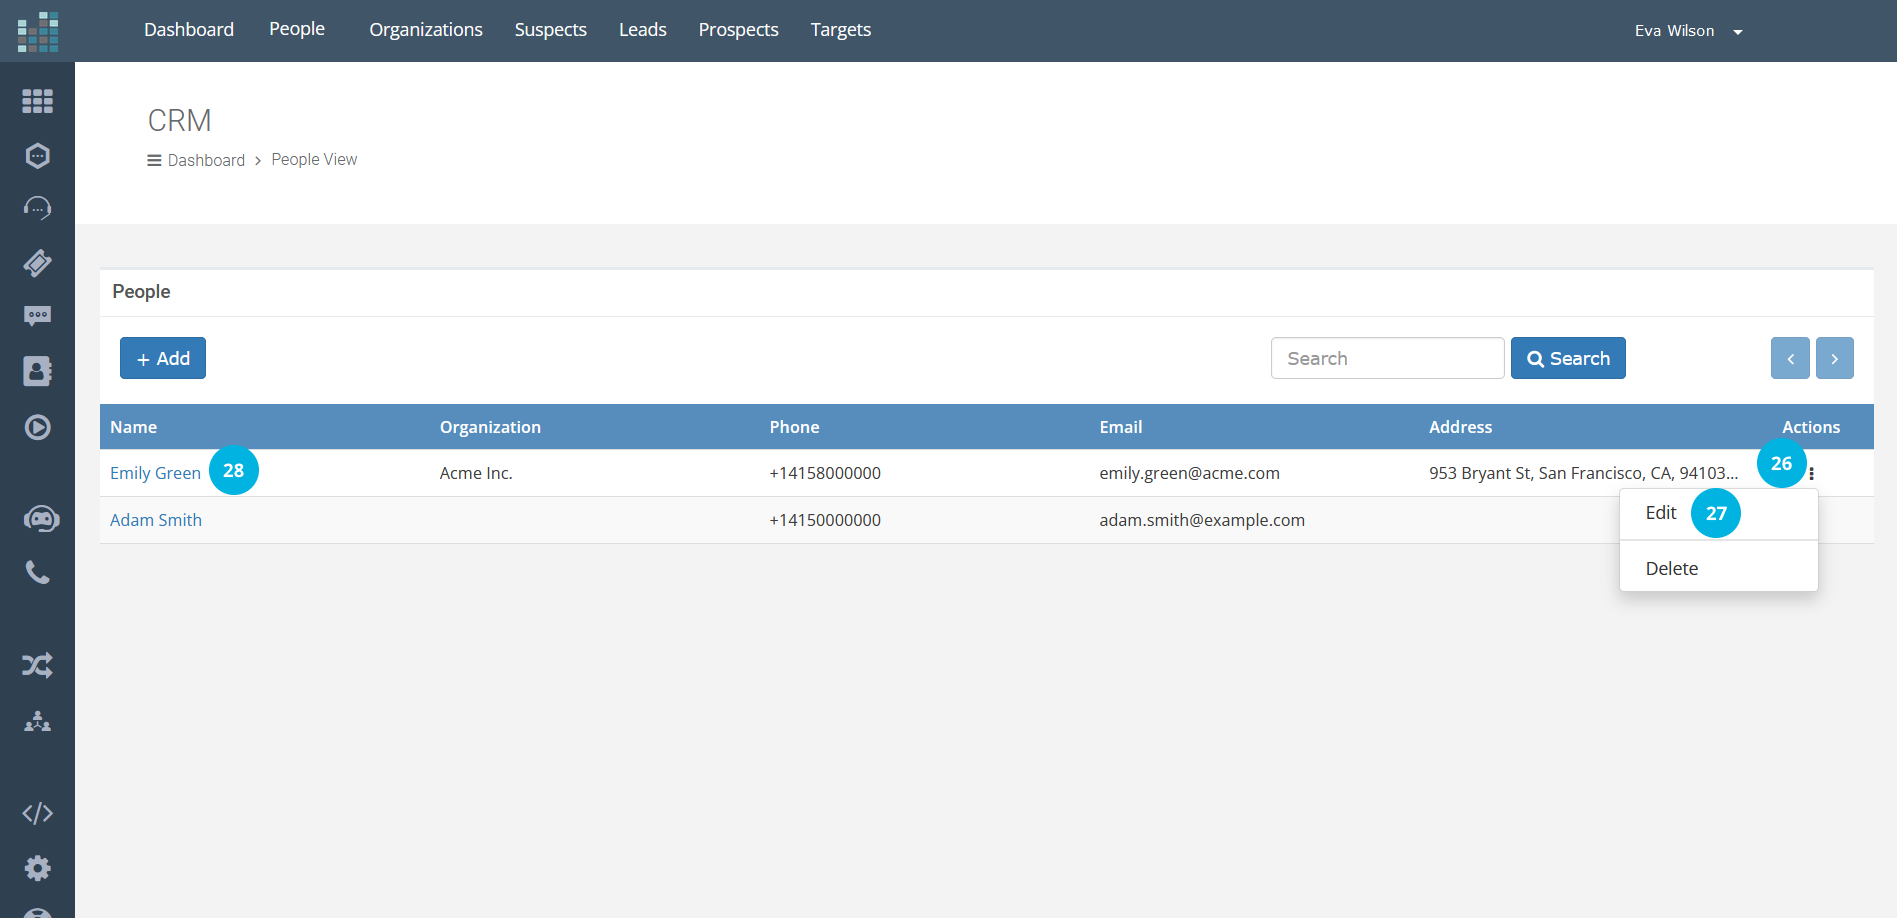
To perform actions on a contact, click on the icon with three vertical dots (ellipsis) in the Actions column [26]. A drop-down menu will open, containing the following actions: Edit and Delete. To edit a Person's data, click on Edit [27] or click directly on the Person's name [28].
The form will be displayed that will allow you to edit and save the Person details.
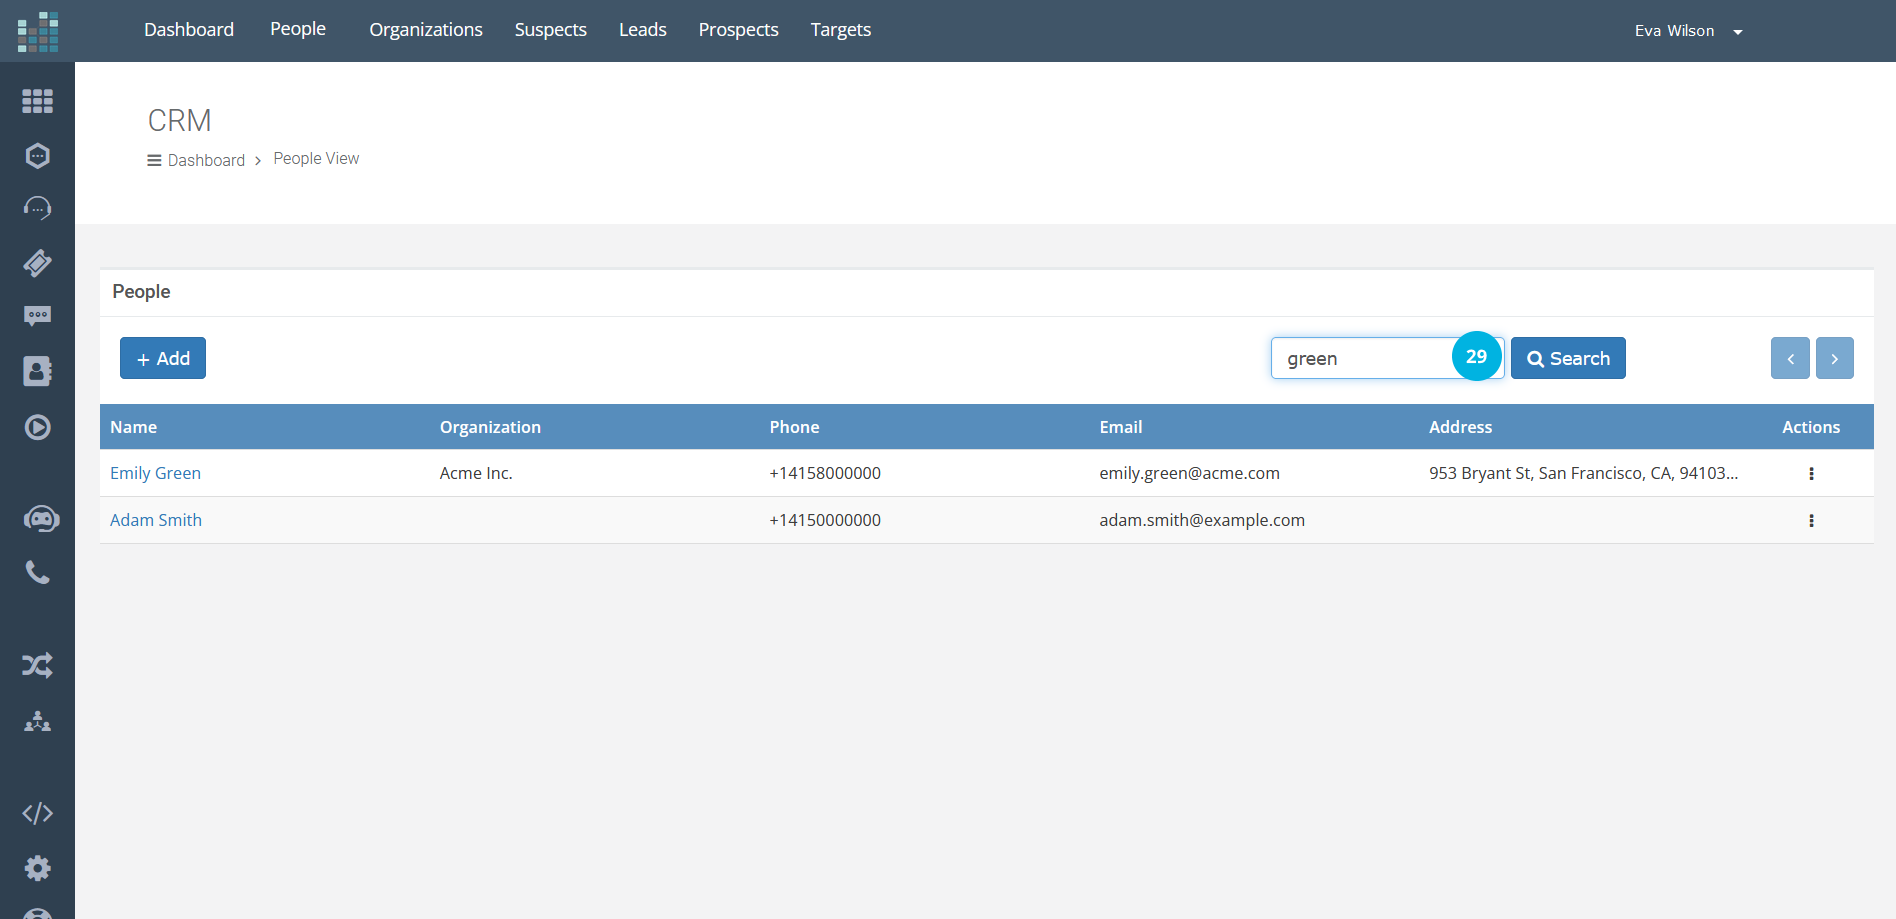
To search for a contact, enter the search term in the "search" box and click on the Search button [29]. In our example, we look for a Person named "Green."
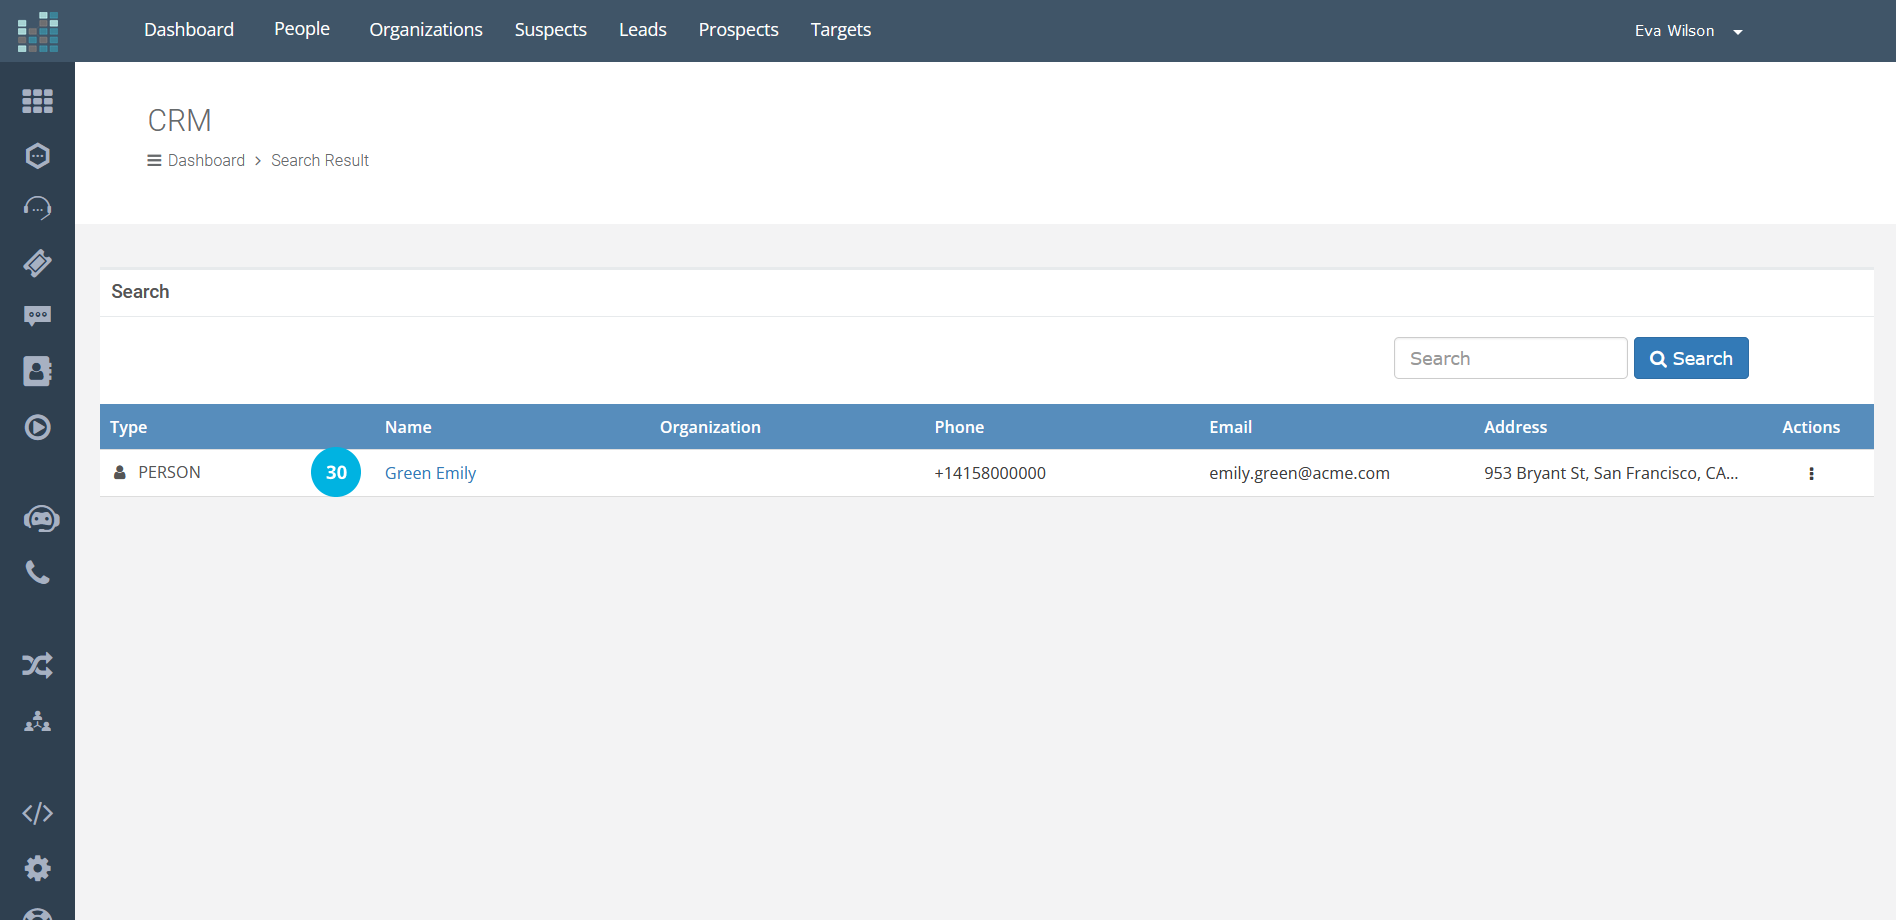
We will get the list of results [30].
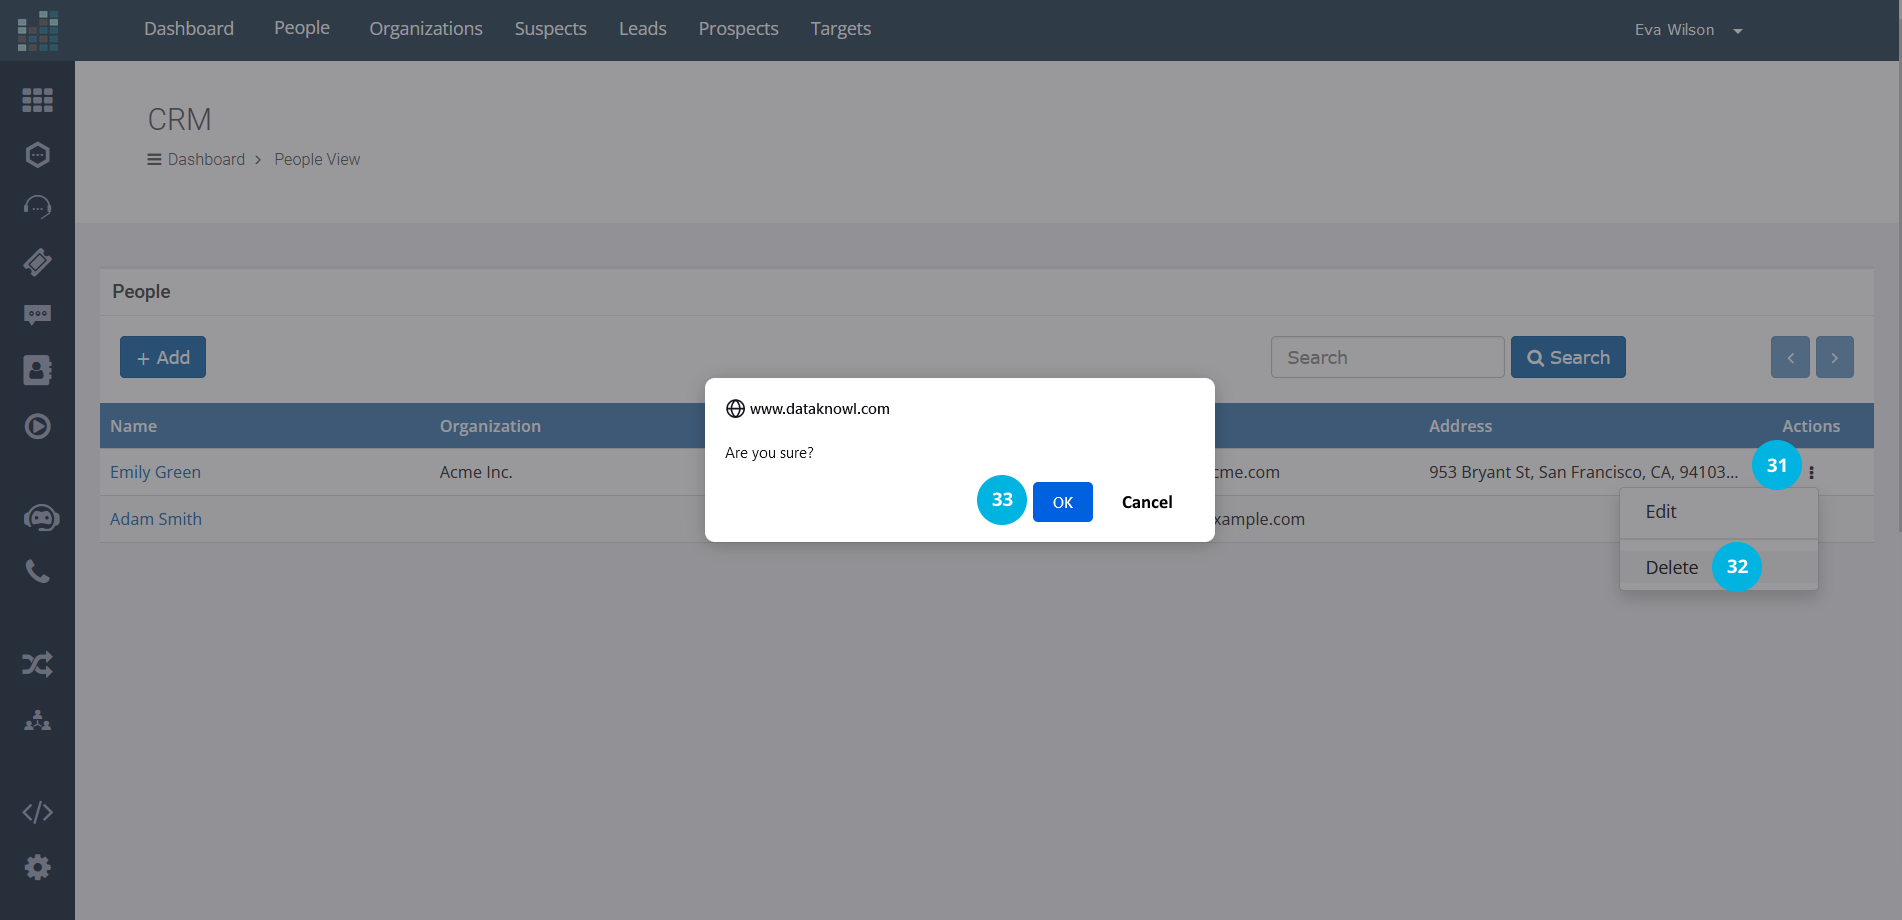
To delete a Person from the CRM, click on the icon with three vertical dots in the Actions column [31] and select the Delete action [32]. The system will ask you for confirmation of the action. Click on the OK button [33] to proceed with the deletion.
This tutorial showed you how to add, edit, and delete entities in DataKnowl's CRM.
Creating your CRM with complete and updated data will be very useful in managing relationships with your customers and improving engagement and customer experience.
Related Questions:
How does CRM work ?
How do I edit a contact in CRM ?
How to add contacts in CRM
How do you remove a person or organization from CRM ?
Which entities can I add in the CRM? ?
Having a global vision of all the interactions of the company, it becomes possible to optimize the processes of acquiring new customers to the maximum and offer high-quality assistance.
The goal is to have a CRM that allows your company to make marketing more effective, improve sales performance, and better meet the needs of acquired customers to create a solid and stable relationship with them.
Let's see the basic concepts.
In DataKnowl CRM, any person or organization with whom you interact or may interact is called an Entity.
An entity defines and maintains business data related to it. It is characterized by attributes and types, which depend on the life cycle phase.
In DataKnowl CRM, we have the following types of entities:
SUSPECT | LEAD | PROSPECT | PERSON | TARGET | ORGANIZATION
More details are here: Entities
In this article, we will focus on People and Organizations. Similarly, it is possible to work with other entities.
Let's see the basic concepts:
- A Person represents someone who has already purchased a product or used a service offered by your company. A Person is a customer. A Person can be part of an Organization. It, therefore, represents the physical person with whom you interact and who will have associated a set of properties such as name, last name, title, one or more telephone contacts, email, etc.
- An Organization is a customer like a business or a government department. They have already purchased a product or used a service from your company. One Person or more People can be associated with an Organization.
A Person can belong to an Organization. An Organization is made up of People.
Once the basic concepts have been defined, let's discover the functions of CRM.
First, click on the CRM icon
Initially, the CRM is empty and does not contain any entities [1].
To start adding contacts, click on "People" [2] in the menu at the top and then click on the +Add button [3].

The following form will be displayed, which allows you to enter the data of the new Person.

Fill in the form fields like this:
- First Name [4]: enter in the field only the first name of the new person (e.g., Michael or Rose Mary if the contact has a middle name).
- Last Name [5]: enter in the field only the last name of the new person (e.g., Wilson).
- Title [6]: it is possible to insert the person's role in the company/organization (e.g., Sales Manager, CEO) or the qualification achieved (Engineer, Ph.D.).
- Phone [7]: it is possible to insert a maximum of three phone numbers (landline, mobile). Please, enter the phone number in E.164 format, so the number must start with the international prefix (e.g., +1 for the US).
- Email [8]: you can enter a maximum of three email addresses associated with the new person.
- Website [9]: if applicable, you can enter the person's website.
- Address [10]: the address consists of several fields. In the first, enter the street name (e.g., 511 Palm St); the second field (optional) allows you to specify the location and the area (e.g., Bay Area); in the third, you will enter the city (e.g., San Francisco); in the fourth, the initials of the state (e.g., CA); in the fifth, the postal code (e.g., 90000); in the sixth, select the country from the drop-down menu (e.g., the United States).
- Organization [11]: it is possible to associate a person with a specific organization (as we will see later).
- Tag [12]: you can write a maximum of 5 tags for each person. The tags will be handy for classifying, identifying contacts, and searching for them based on the tags inserted (e.g., customer, supplier, partner, etc.)
- Description [13]: in the description field, you can enter notes, comments, or additional information.
Once the data has been entered, click the Save button [14] to save.

The new Person will be displayed in the People View [15] (e.g., Smith Adam).

On the other hand, if you wish to add a new Organization, for example, a company, the path is similar. Click on "Organizations" [16] in the menu at the top and then click on the +Add button [17].

Fill in the company details and click on the Save button [18].

The Organization (e.g. Acme Inc.) will be displayed in the Organizations View [19].

Let us now explain how to associate a Person with an Organization.
NOTE: to associate a Person with an Organization, you must add the organization first, as the organization must already be present in your CRM to have a person associated with it.
In our example, we added the Acme Inc. organization and now want to associate the Person "Emily Green" with this organization. Click on "People" [20] at the top, click on the +Add button, and enter the data. In the Organization field, a small form will open where you can enter the company name.

Enter the organization name (e.g., Acme Inc., we can also insert part of the name) [21] and click on the search icon [22].
The list of companies will be displayed. Select the company to which we want to associate the person and click on the check mark [23] to confirm the association.

This way, the "Organization" field will contain the company's name associated with the Person. Once the remaining fields have been filled in, click on the Save button [24].

The Person "Green Emily" associated with the company "Acme Inc." will be displayed in the People View of our CRM [25].

To perform actions on a contact, click on the icon with three vertical dots (ellipsis) in the Actions column [26]. A drop-down menu will open, containing the following actions: Edit and Delete. To edit a Person's data, click on Edit [27] or click directly on the Person's name [28].

The form will be displayed that will allow you to edit and save the Person details.
To search for a contact, enter the search term in the "search" box and click on the Search button [29]. In our example, we look for a Person named "Green."

We will get the list of results [30].

To delete a Person from the CRM, click on the icon with three vertical dots in the Actions column [31] and select the Delete action [32]. The system will ask you for confirmation of the action. Click on the OK button [33] to proceed with the deletion.

This tutorial showed you how to add, edit, and delete entities in DataKnowl's CRM.
Creating your CRM with complete and updated data will be very useful in managing relationships with your customers and improving engagement and customer experience.
Related Questions:
How does CRM work ?
How do I edit a contact in CRM ?
How to add contacts in CRM
How do you remove a person or organization from CRM ?
Which entities can I add in the CRM? ?
© 2024 Complexity Intelligence, LLC