How to set up a business phone number and IVR with DataKnowl
A phone number with an IVR is a powerful tool for a large business that has many employees, to direct calls to the the proper department or individual,
without the expense of 24-hour coverage of human telephone receptionists. But a dedicated
phone number with an IVR plays a crucial role even in a startup, with just one employee.
A personal mobile phone is often a sign of a startup that’s just taking off, and this might send out the wrong signals to customers. A dedicated phone number with IVR looks much more professional, provides a warm welcome, and also helps build the company’s brand image.
Perhaps at the beginning, the different departments (Sales, Accounting, Customer Service, ...) extension numbers can be directed to the same individual, but later, those different extension numbers can be reassigned to go to independent ones without having to change the front-facing part of the system.
A dedicated phone number with IVR (Interactive Voice Response) helps your company:
With DataKnowl Contact you can have a dedicated phone number with IVR with ease and at exceptional price!
If you do not have an account, create it in a few minutes. Follow the guide here Create a DataKnowl Account .
After creating your account, proceed with the configuration of DataKnowl Contact. Click on Contact [1].

You will be asked to enter a name for your Contact instance [2], the name of your company or organization [3], and the time zone [4]. Click on the Next button.

Next, you need to choose a domain. This step is not necessary for this guide, as the domain name is used for other features. Enter the name of your company or organization as a domain [5]. Click on the Next button.

With this step, DataKnowl Contact setup has been successfully completed. Now, to start receiving calls, you need to get a phone number. Click on the third link Click here to manage your channels [6].

Phone Numbers are part of DataKnowl Channels. Click on Phone Numbers [7] to start managing them.

As this is the first time you are using Contact, you don't have phone numbers, so you need to buy the first one. Click on the Buy new number button [8].

Choose the country [9] and phone number capabilities [10]. Click on the Search button.

Now, select the area code [11]. If you want to provide any additional information, please write them there [12]. Click on the Order button.

Your phone order is now completed. A phone number will be available as soon as possible. You will receive a confirmation email [13].

When the phone number is ready, you'll receive a confirmation email. As soon as you receive the confirmation email, you can start configuring your number.Your new number will appear in the Phone Numbers view [14].
To go to the "Phone Numbers View", click on theChannels icon and then on Phone Numbers.

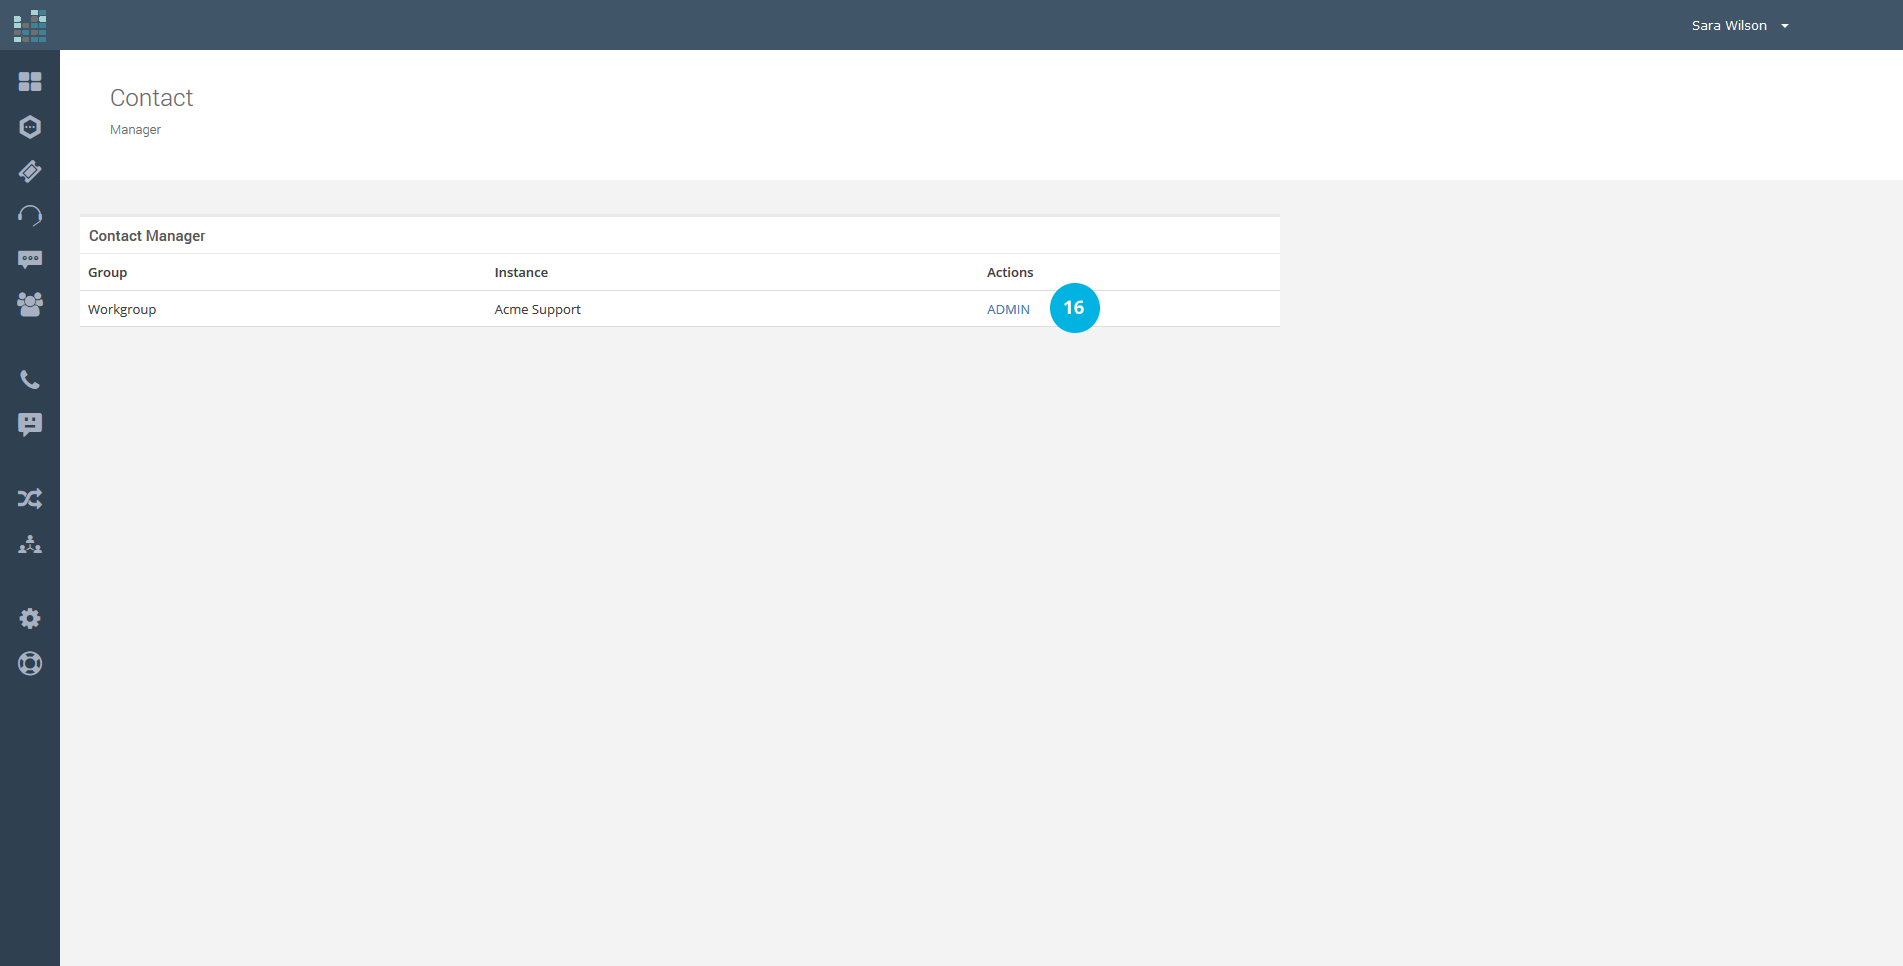
Now, click on DataKnowl Contact icon on left bar [15], and click Admin [16] to access your Contact dashboard.
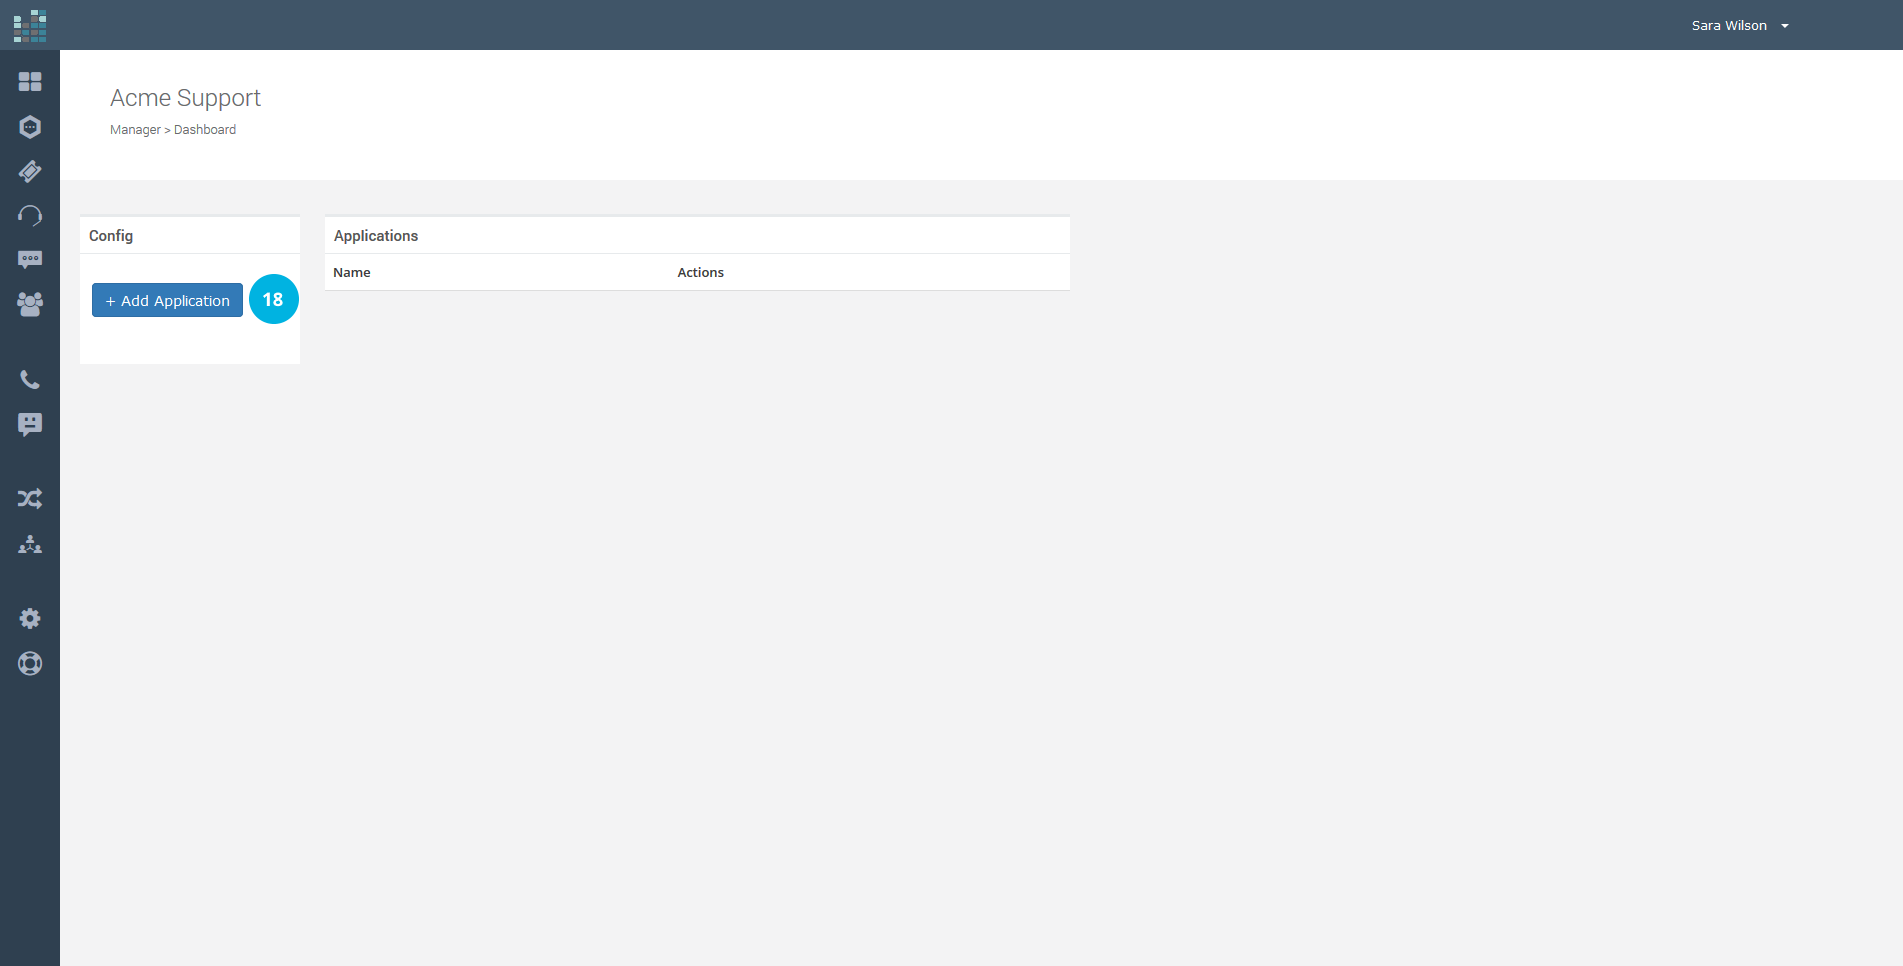
If you want to add an application (IVR), click on the applications list on the left menu [17].

Since you don't have active application, the list is empty. Click on + Add Application button on the left [18].
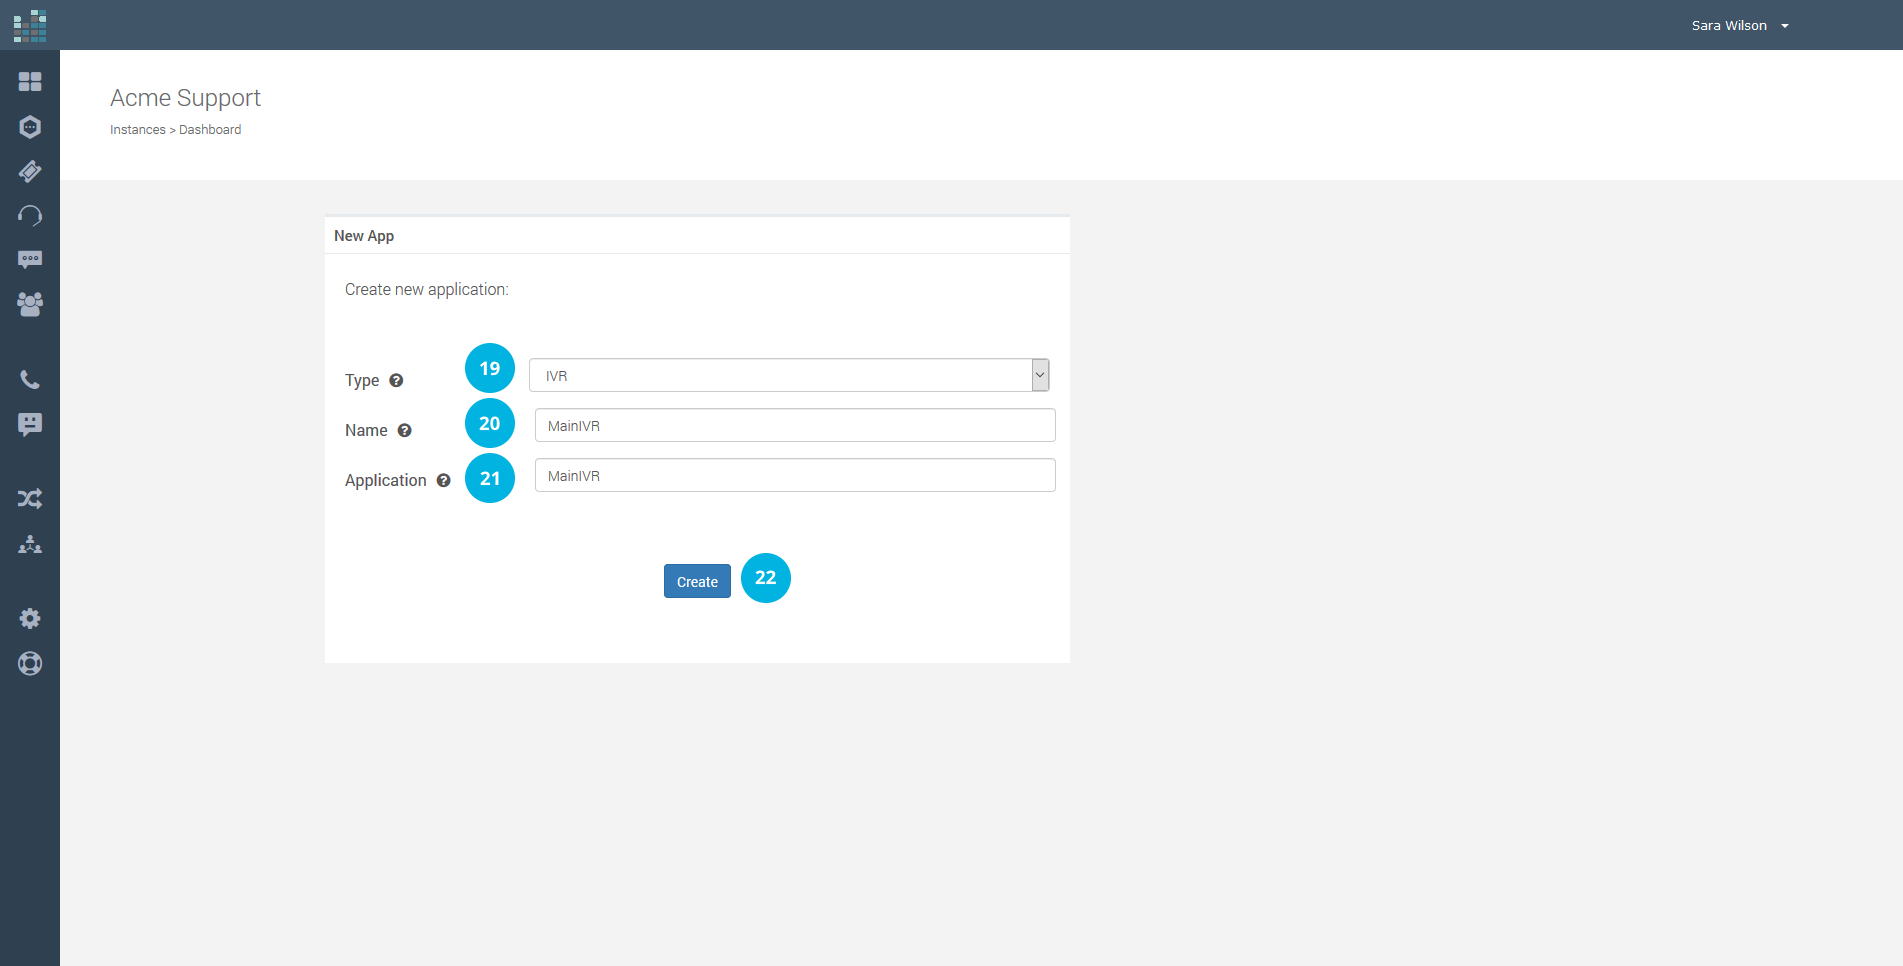
For your new IVR, choose IVR as Type [19]. For Name [20] and Application description [21], simply enter "MainIVR" or your preference. Click on Create button [22].
Now, let's start configuring the new IVR application. Select the language to use [23], and enter the welcome message [24].

Click on + Add Option [25] to add option for Sales and key 1, like in the example. If you want to forward calls, select Forward [26] under Action, and then enter the number [27] where you want to forward your calls.

Repeat the step, for option 2, 3, 4, ... [28]. When finished, click on Save [29].

Congratulations! Your IVR is ready [30].

Next, you need to point your new phone number to your brand new IVR, in order to start receiving calls. Go to the Contact dashboard [31], click on ADMIN [32] and choose Phone Numbers [33].


For your Phone Number, click on Edit button. Since App Type and App Name are blank, incoming calls are not served by any application. In order to route them to your new IVR, click EDIT [34].

Now for Application select your new IVR application, like "MainIVR" [35] in the example. To save the new configuration, choose Update Config [36] .

When you receive a new call on your number, the MainIVR application [37] will be activated and the call will be forwarded according to your setup.

Enjoy your new IVR, and welcome your customers in a professional fashion.
Don't forget that this is only the basic feature. You can also avail of advanced features like queueing customers, answering calls from your browser, etc.
Questions:
How to set up a phone number and IVR with DataKnowl ?
A personal mobile phone is often a sign of a startup that’s just taking off, and this might send out the wrong signals to customers. A dedicated phone number with IVR looks much more professional, provides a warm welcome, and also helps build the company’s brand image.
Perhaps at the beginning, the different departments (Sales, Accounting, Customer Service, ...) extension numbers can be directed to the same individual, but later, those different extension numbers can be reassigned to go to independent ones without having to change the front-facing part of the system.
A dedicated phone number with IVR (Interactive Voice Response) helps your company:
- Have a professional image, thanks to warm welcome and call routing based on real need and to the right person;
- Maintain a Single Point of Contact (SPOC). Customers have one number to call, without the nightmare of multiple phone numbers to remember, difficult to know which of these numbers to call, and even worse, mixing business and personal numbers (for example to provide 24h support);
- Track all calls, including answered calls, routed calls missed and so on. You will have your phone point of contact always under control;
- Easily extend the IVR, add new routing options, change destination numbers, and lets evolve your system in a transparent way without impacting your customers. You are free to grow as you scale;
- Save money, with one system that have all your phone needs under control. No need of human receptionist with huge save on this expense;
- Build a complete Customer Service Platform with an IVR and dedicated phone numbers. Even if you don't need the other features, they will be available when you need them, without changing or extending your system. DataKnowl grows with you, always in a easy manner.
With DataKnowl Contact you can have a dedicated phone number with IVR with ease and at exceptional price!
If you do not have an account, create it in a few minutes. Follow the guide here Create a DataKnowl Account .
After creating your account, proceed with the configuration of DataKnowl Contact. Click on Contact [1].

You will be asked to enter a name for your Contact instance [2], the name of your company or organization [3], and the time zone [4]. Click on the Next button.

Next, you need to choose a domain. This step is not necessary for this guide, as the domain name is used for other features. Enter the name of your company or organization as a domain [5]. Click on the Next button.

With this step, DataKnowl Contact setup has been successfully completed. Now, to start receiving calls, you need to get a phone number. Click on the third link Click here to manage your channels [6].

Phone Numbers are part of DataKnowl Channels. Click on Phone Numbers [7] to start managing them.

As this is the first time you are using Contact, you don't have phone numbers, so you need to buy the first one. Click on the Buy new number button [8].

Choose the country [9] and phone number capabilities [10]. Click on the Search button.

Now, select the area code [11]. If you want to provide any additional information, please write them there [12]. Click on the Order button.

Your phone order is now completed. A phone number will be available as soon as possible. You will receive a confirmation email [13].

When the phone number is ready, you'll receive a confirmation email. As soon as you receive the confirmation email, you can start configuring your number.Your new number will appear in the Phone Numbers view [14].
To go to the "Phone Numbers View", click on theChannels icon

Now, click on DataKnowl Contact icon on left bar [15], and click Admin [16] to access your Contact dashboard.

If you want to add an application (IVR), click on the applications list on the left menu [17].

Since you don't have active application, the list is empty. Click on + Add Application button on the left [18].

For your new IVR, choose IVR as Type [19]. For Name [20] and Application description [21], simply enter "MainIVR" or your preference. Click on Create button [22].

Now, let's start configuring the new IVR application. Select the language to use [23], and enter the welcome message [24].

Click on + Add Option [25] to add option for Sales and key 1, like in the example. If you want to forward calls, select Forward [26] under Action, and then enter the number [27] where you want to forward your calls.

Repeat the step, for option 2, 3, 4, ... [28]. When finished, click on Save [29].

Congratulations! Your IVR is ready [30].

Next, you need to point your new phone number to your brand new IVR, in order to start receiving calls. Go to the Contact dashboard [31], click on ADMIN [32] and choose Phone Numbers [33].


For your Phone Number, click on Edit button. Since App Type and App Name are blank, incoming calls are not served by any application. In order to route them to your new IVR, click EDIT [34].

Now for Application select your new IVR application, like "MainIVR" [35] in the example. To save the new configuration, choose Update Config [36] .

When you receive a new call on your number, the MainIVR application [37] will be activated and the call will be forwarded according to your setup.

Enjoy your new IVR, and welcome your customers in a professional fashion.
Don't forget that this is only the basic feature. You can also avail of advanced features like queueing customers, answering calls from your browser, etc.
Questions:
How to set up a phone number and IVR with DataKnowl ?
© 2024 Complexity Intelligence, LLC