How to create a simple but intelligent chatbot for your website
Creating a chatbot for your business website is crucial for providing information
to potential buyers, offering pre-sale details, generating leads, and supporting existing
customers.
DataKnowl V-Agent, an Artificial Intelligence-based tool, is designed specifically for this purpose. It is part of DataKnowl, a platform dedicated to managing customer relationships.
This tutorial will guide you through creating a simple yet intelligent chatbot for your website, easily and quickly.
Create Your Account
If you don't have a DataKnowl account yet, create one—it's quick and easy.
Create a New V-Agent
- Click on the V-Agent icon to start creating a new V-Agent.
- Press the "+ Add new" button.
- Fill in the required fields to complete your new V-Agent setup, as in the following image
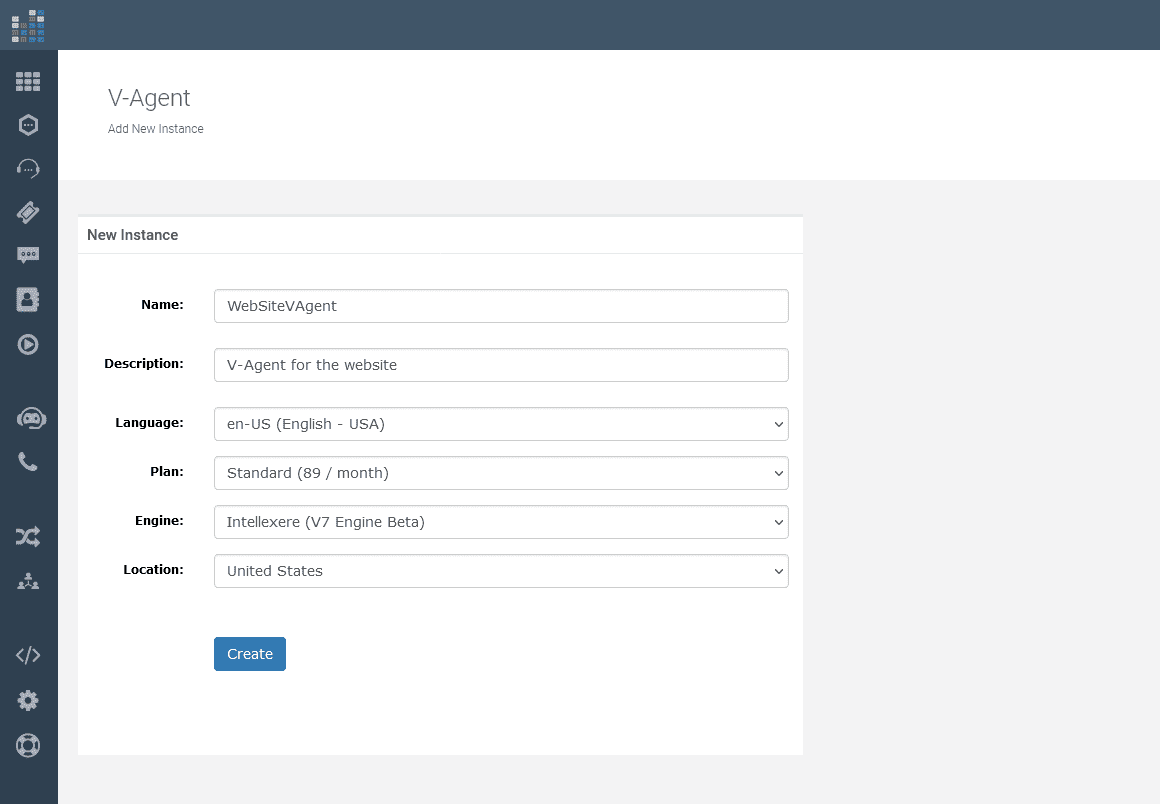
It's very simple to set up. Just provide:
- Name for Identification: Choose a unique name that easily identifies your V-Agent.
- Brief Description: Provide a concise description of your V-Agent's purpose or functionality.
- Default Language Selection: Select the primary language your V-Agent will operate in.
- Plan Selection: Choose a subscription plan that best fits your needs.
- AI Engine Preference: Indicate your preferred AI engine, such as Intellexere.
- Data Processing Location: Specify the data processing location, important for GDPR compliance.
After providing the required information, simply click on the 'Create' button to finalize your new V-Agent.
Dashboard Overview
Now that your V-Agent is set up, let's take a closer look at the dashboard. The dashboard provides a comprehensive view of your V-Agent's settings, performance metrics, and more. It's designed to help you manage and optimize your chatbot efficiently.

Knowledge Base
In DataKnowl, each "Knowl" represents a unit of knowledge, embodying specific objects, products, or services relevant to your business.
For instance, if your business operates as a Web Agency, you'll create various Knowls that encapsulate the different aspects of your services.
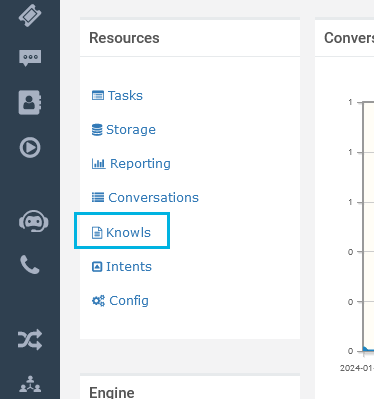
To begin, navigate to the Dashboard and select "Knowls" to start creating these knowledge units for your business.
Now, you have accessed the Knowls Manager. As depicted in the image below, the Knowledge Base is currently empty, without any Knowls.
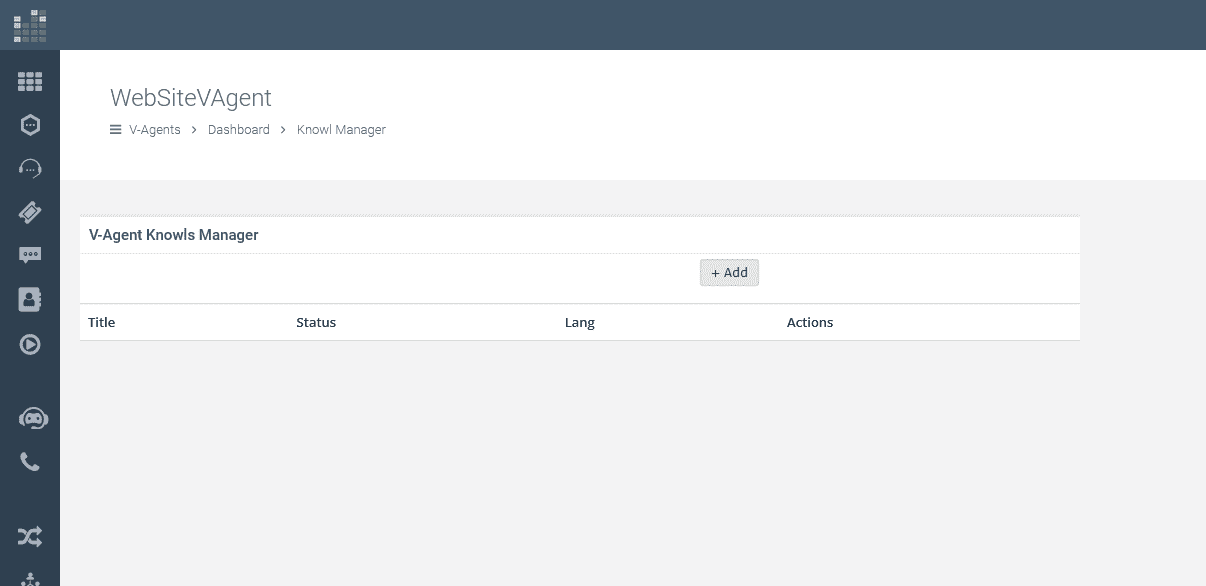
To add a new Knowl, click the "+ Add" button.

Enter a Title for your Knowl, such as "Web Design Services," provide a summary, choose the status, and input detailed content about your web design services.
After filling in all the details, click "Insert".
Your new Knowl, titled "Web Design," will now be listed in the Knowls Manager, enriching your Knowledge Base.

Repeat this process to incorporate additional Knowls for other services you offer, like SEO, advertising, and hosting.
When you've finished populating your Knowledge Base, use the breadcrumb navigation (located just below the V-Agent's name) and click on "Dashboard" to return to the main dashboard view.
Tasks
Now, we've to implement the logic. In DataKnowl V-Agent, this is accomplished through Tasks.
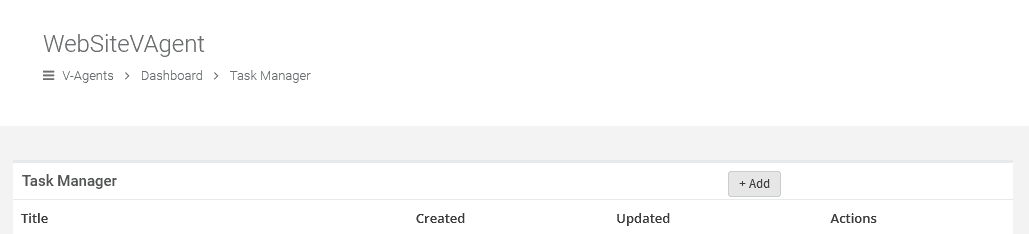
Click on "Tasks" to access the Task Manager.
Here, the 'main' task is always present, as it is automatically created with your V-Agent. This task is executed first by default.
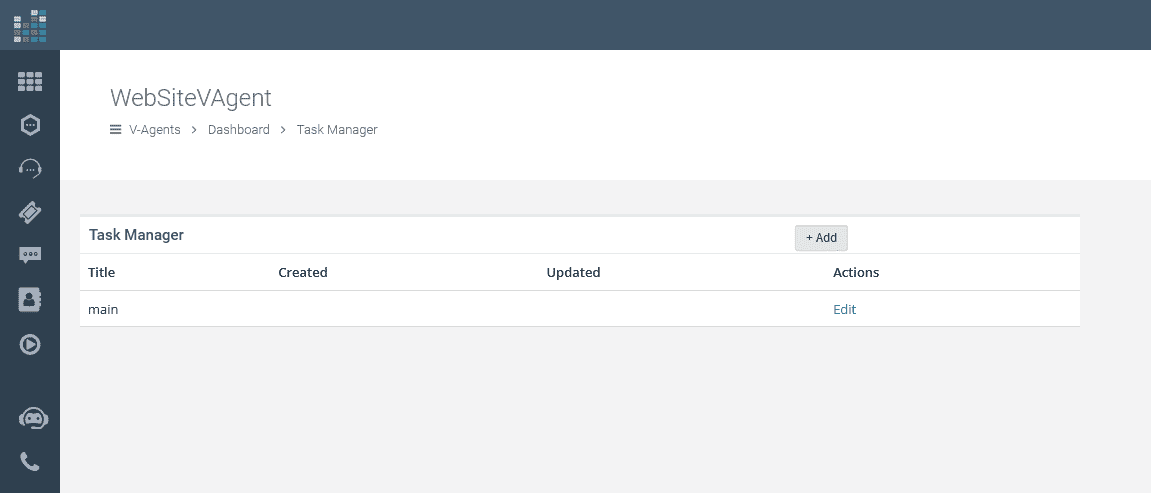
Simply click on "Edit" to open the Task Editor.
You will see the default content.
Before we modify the default DML, let's see how the V-Agent operates within the Web Widget.
Setting Up the Web Widget
Click on the "Channels" icon on the left bar.
Select "Widget".
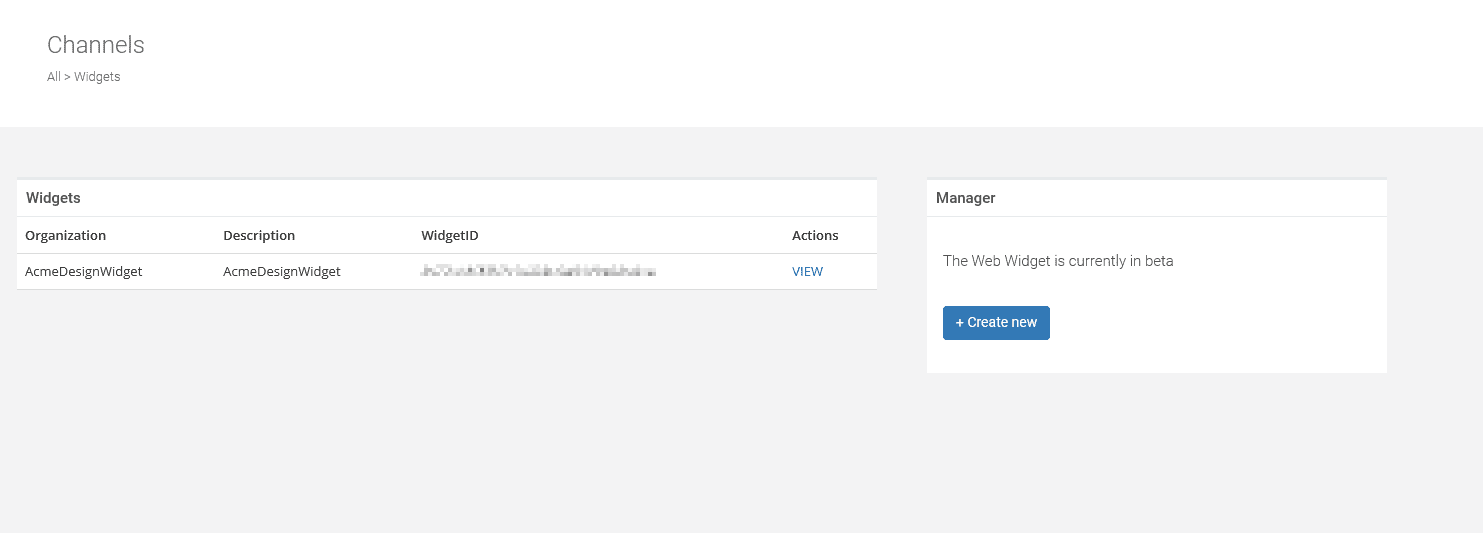
and click on "Widgets".
Here you have all your "Widgets".
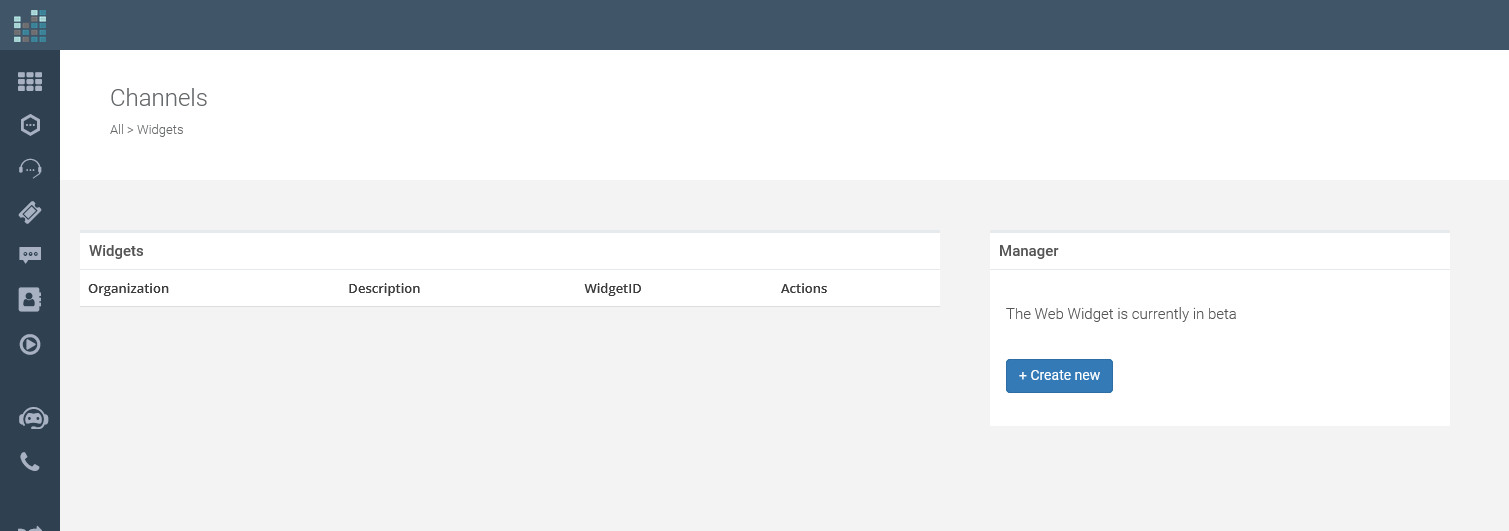
Click on the "+ Create new" button.
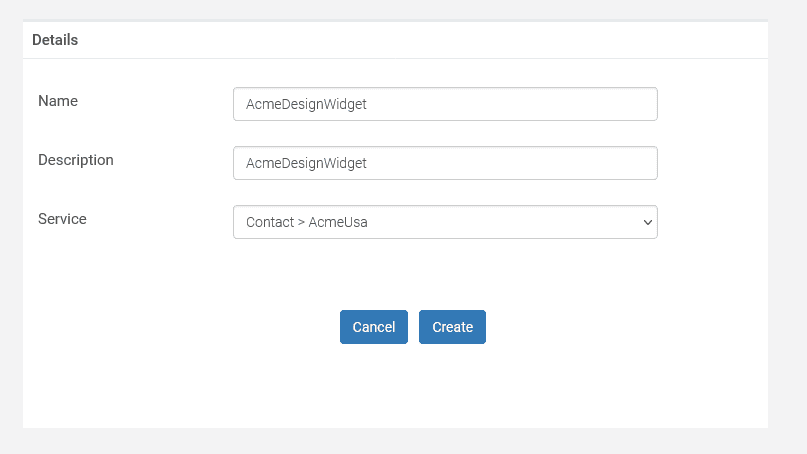
Provide a simple name and a brief description, as shown in the following image:
Click on "Create". The Widget is now created, and a WidgetID will be assignedto identify such widget. You'll have your Widget listed, as shown in the image below:
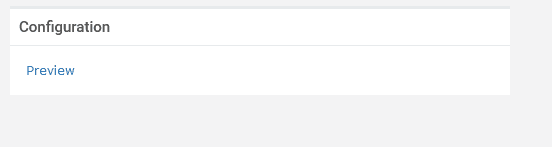
Now, click on the "VIEW" action in the row for the Widget we've just created.You can now edit the Widget configuration and preview how it behavesbefore installing it on your website.
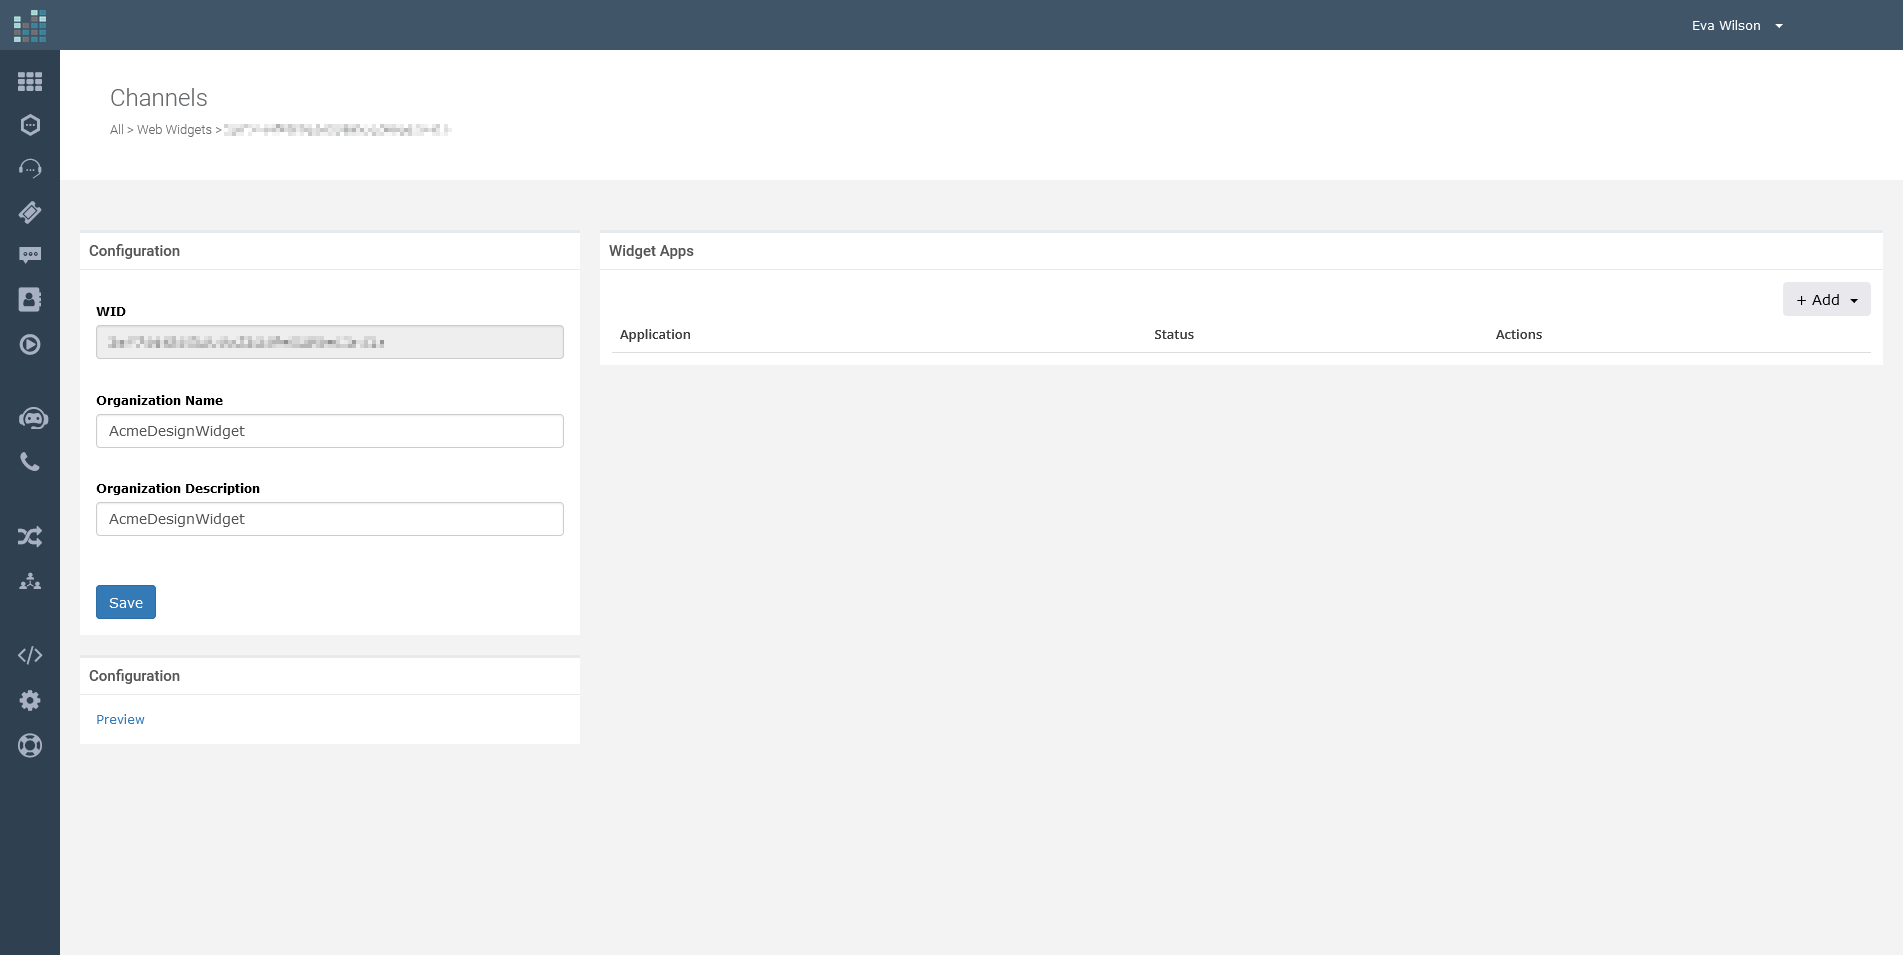
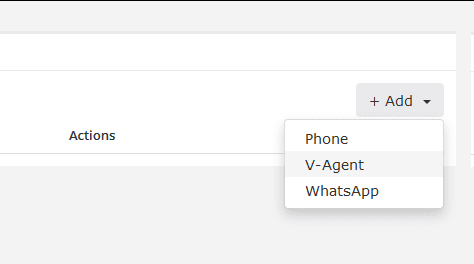
In DataKnowl, a single web widget can host multiple applications. This time, we've to add a "V-Agent" application.Click on "+ Add" and select "V-Agent".
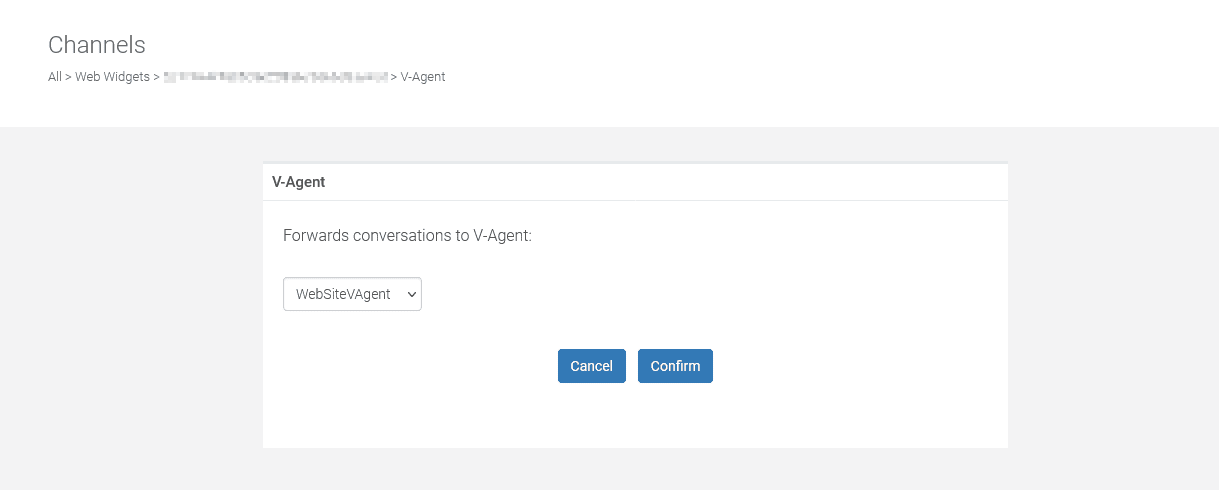
Select the V-Agent option. Then select which V-Agent you want to connect to the Widget. In this tutorial, we have only one V-Agent, so it is straightforward: just select the only V-Agent you have on the list and click "Confirm".
The 'V-Agent' application has been added to your Widget. By default, it is not enabled, so click on 'ENABLE' to activate it.

The V-Agent application is now enabled and linked to your V-Agent.

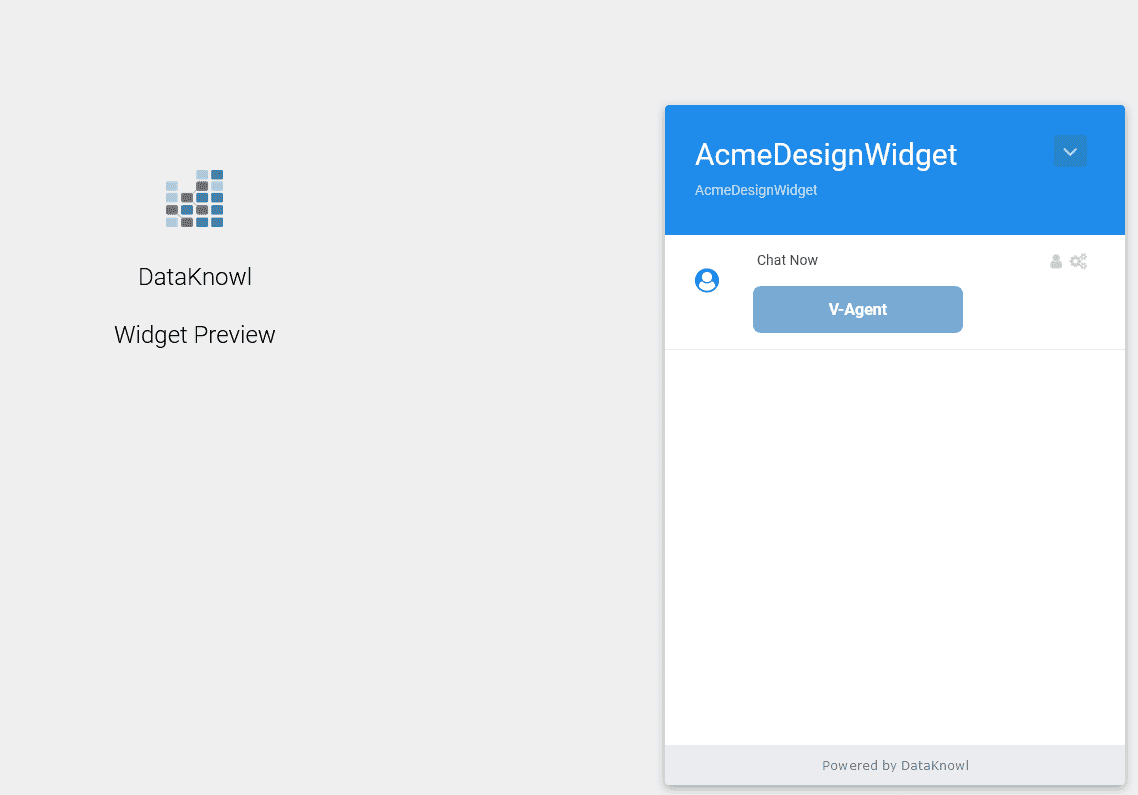
Previewing the Widget is very easy; just click on the Preview button.
A new tab will open, displaying a microsite with the widget enabled, allowing you to test your widget before actually adding it to your website.
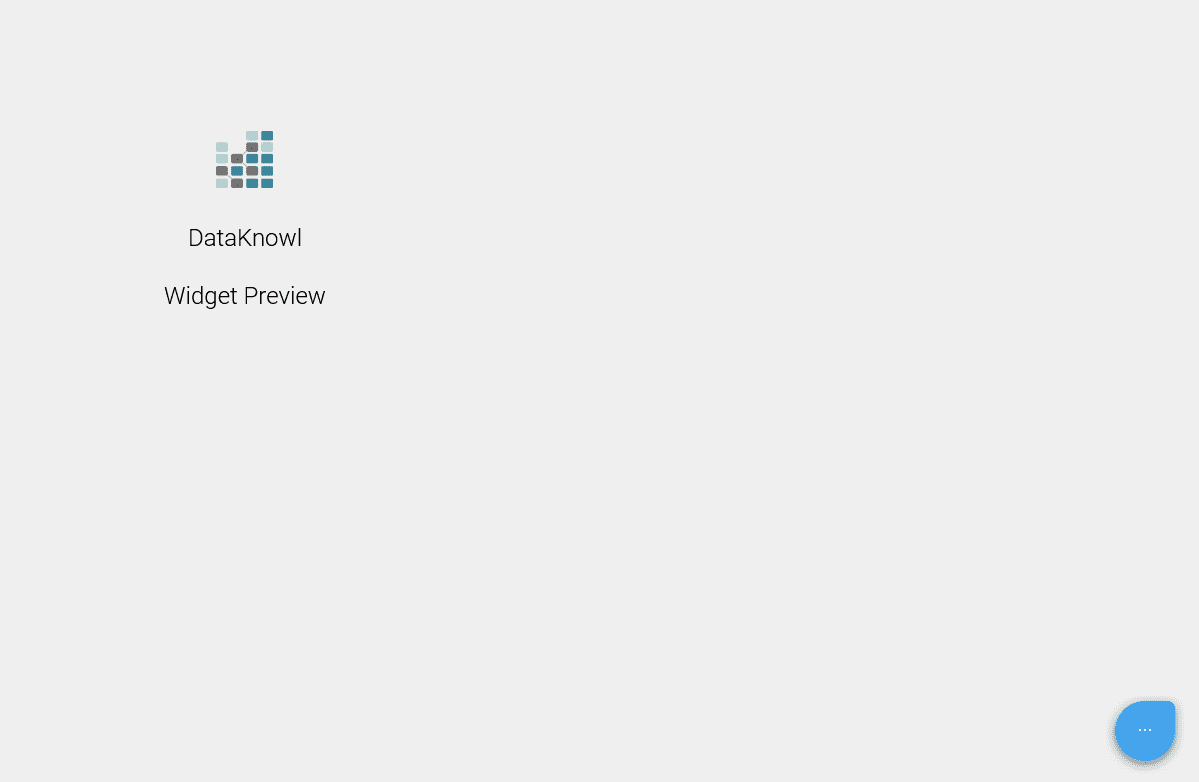
Here is your Widget in action:
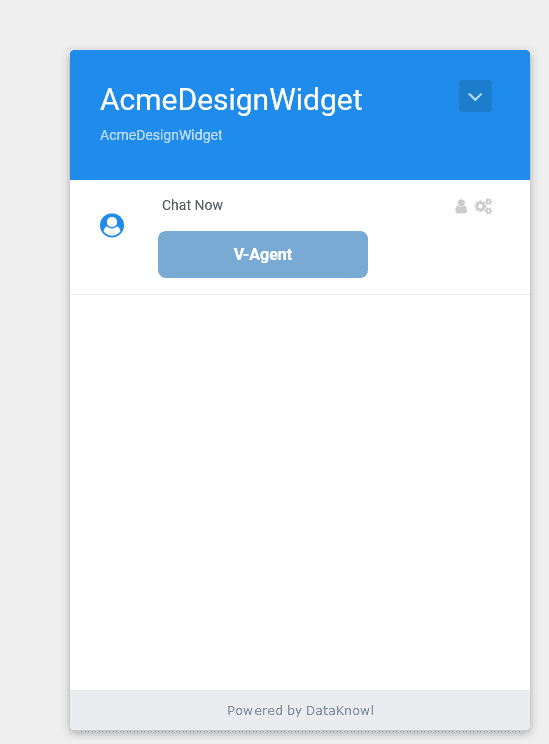
Click on the V-Agent to start the conversation.
As it stands, the conversation is quite basic, with the V-Agent executing the 'main'task that simply says "Hello World".
But now we've configured the Widget, associated the V-Agent to it, and learnedhow to preview it.
Feel free to leave the preview tab open while you return to Tasks tomake our V-Agent smarter.
Customize DML
Return to Tasks by clicking on "Tasks" from your V-Agent Dashboard.
This is the most crucial part of the tutorial. Previously, we saw how to interact with the V-Agent interface to manage Knowls and Tasks.
Now, let's define the DML, which is the logic of the V-Agent.
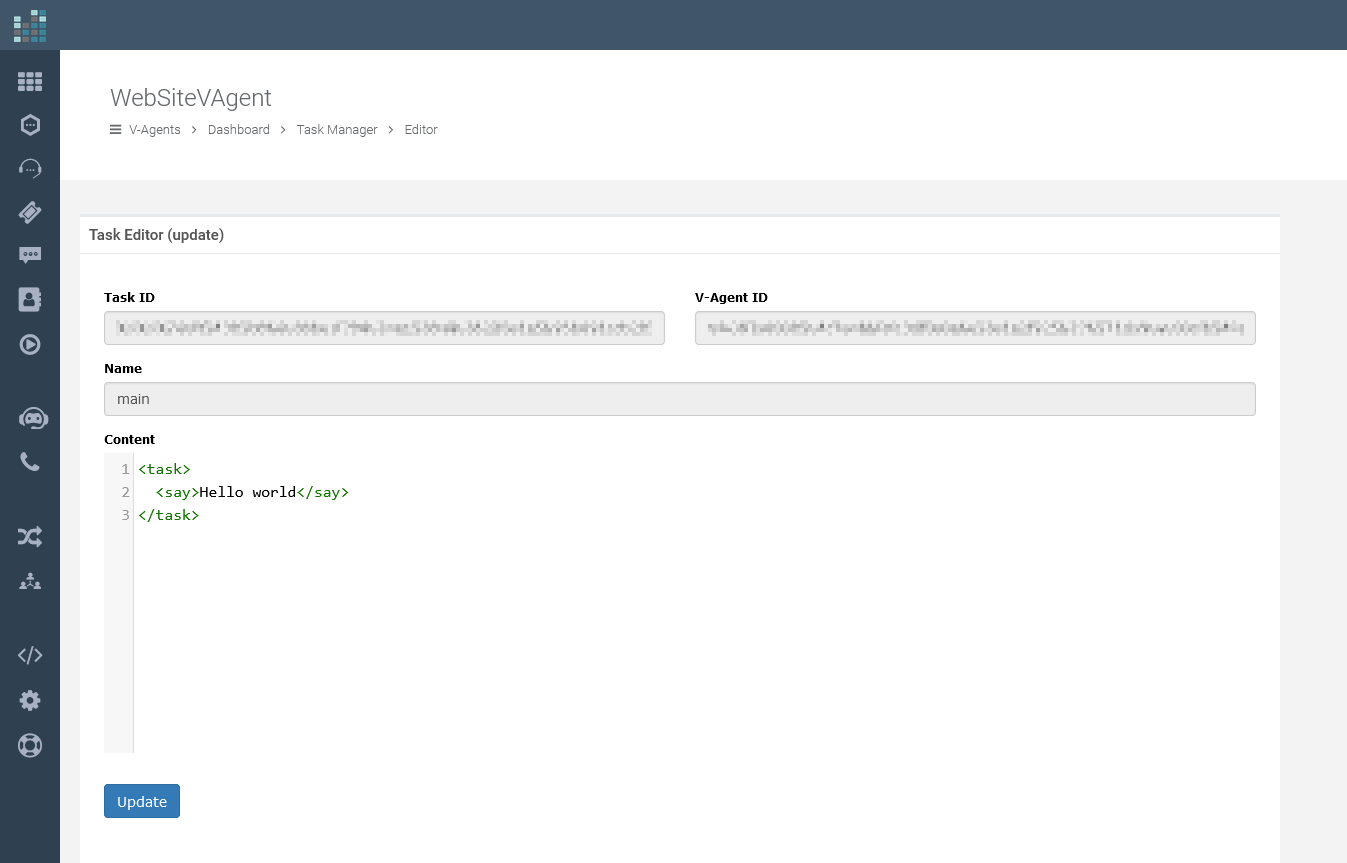
First, edit the 'main' task as we did before.
Replace the default content with the following DML code:
Once done, click on "Update" to save the changes to the 'main' task.
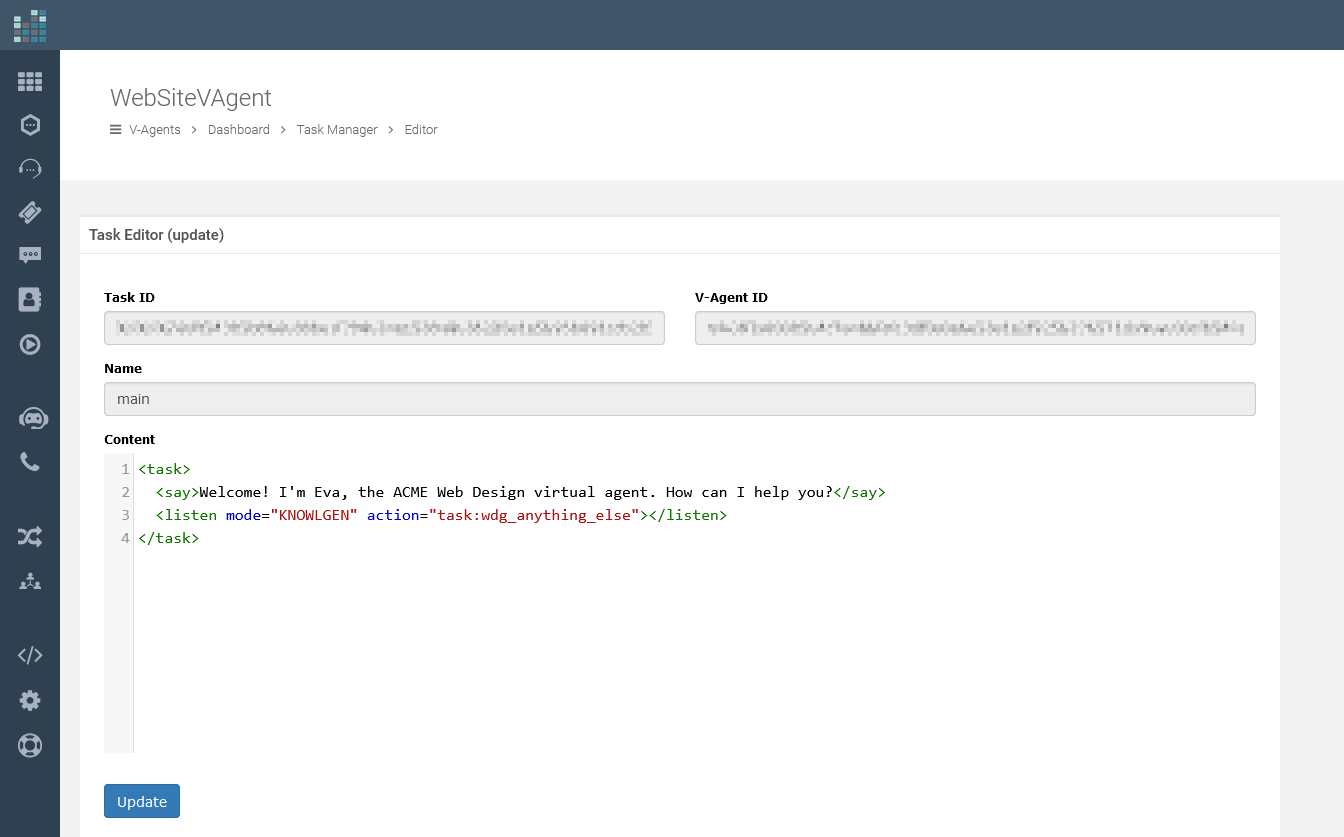
Every task should start with the <task> tag and end with the </task> tag, as shown in the example.
The say verb instructs the V-Agent to communicate something to the user, which can be on the web or via phone. The listen verb prompts the V-Agent to await user input and to process this input according to the 'mode' attribute.
Here, mode="KNOWLGEN" tells the V-Agent to use Knowls and generative AI to formulate an appropriate response.
Lastly, action="task:wdg_anything_else" directs the V-Agent to execute this task after responding.
Now, create a new task named 'wdg_anything_else' by clicking the '+ Add' button in the Task Manager.
In the name field, type 'wdg_anything_else', which is the new task we're creating.
In the Content field, input the following DML code:
Then click the "Insert" button. Your setup should now look like this:
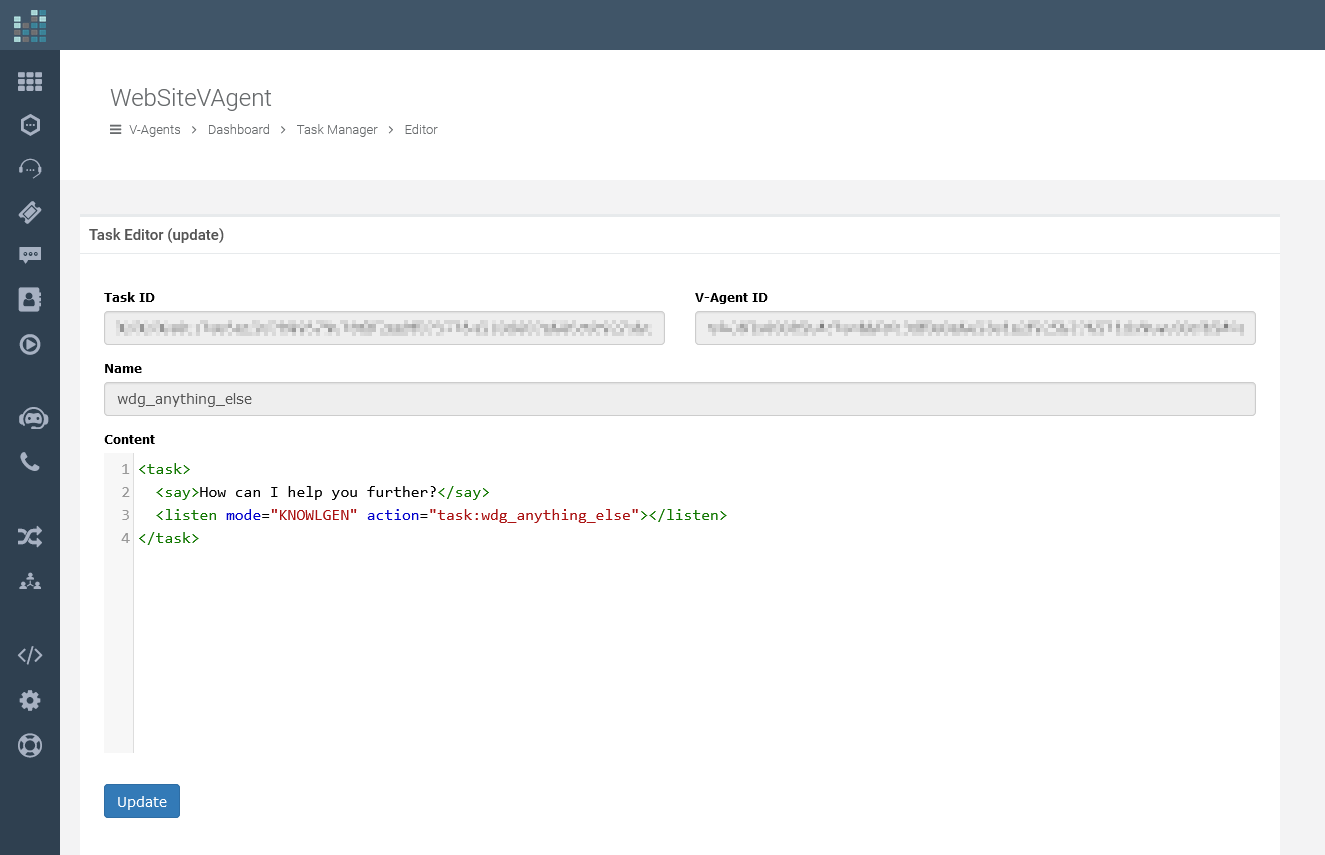
The wdg_anything_else task prompts the V-Agent to inquire further from the user with "How can I help you further?" and then waits for user input using the 'listen' verb with mode="KNOWLGEN".
It loops back to the "wdg_anything_else" task as specified by the 'action' attribute.
Testing
If we've left the Widget Preview tab open, we're ready to begin testing the V-Agent. If the tab is closed, follow the previous steps to reopen the Preview tab. Click on "V-Agent" to start the conversation.
The V-Agent now takes over.
As you can see, the 'main' task is executed. Say something like "I would like to create a website for my restaurant. Can you help me?", as depicted in the image below:
Fantastic! Now, let's watch the V-Agent work its magic.
With just a couple of simple tasks and knowledge units, the V-Agent is already operational and ready to provide information and support to your customers.
Remember, this is just a basic example to get acquainted with the V-Agent. We've only scratched the surface of what the V-Agent is capable of.
There is potential to do much more, such as structuring more natural conversations using DML, providing menus, recommended options, and much more.
Deploy the chatbot on your website
Once you are satisfied with the testing, deploy the chatbot on your website by embedding the provided HTML code.
Make sure to replace "XXXXXXXX.....XXXXXXXX" with your actual Widget ID.
This code should be placed just before the '</body>' tag on your website.
This guide has walked you through creating a basic but functional V-Agent setup, illustrating just a fraction of the V-Agent's potential capabilities for enhancing customer interactions.
DataKnowl V-Agent, an Artificial Intelligence-based tool, is designed specifically for this purpose. It is part of DataKnowl, a platform dedicated to managing customer relationships.
This tutorial will guide you through creating a simple yet intelligent chatbot for your website, easily and quickly.
Create Your Account
If you don't have a DataKnowl account yet, create one—it's quick and easy.
Create a New V-Agent
- Click on the V-Agent icon
- Press the "+ Add new" button.
- Fill in the required fields to complete your new V-Agent setup, as in the following image

It's very simple to set up. Just provide:
- Name for Identification: Choose a unique name that easily identifies your V-Agent.
- Brief Description: Provide a concise description of your V-Agent's purpose or functionality.
- Default Language Selection: Select the primary language your V-Agent will operate in.
- Plan Selection: Choose a subscription plan that best fits your needs.
- AI Engine Preference: Indicate your preferred AI engine, such as Intellexere.
- Data Processing Location: Specify the data processing location, important for GDPR compliance.
After providing the required information, simply click on the 'Create' button to finalize your new V-Agent.
Dashboard Overview
Now that your V-Agent is set up, let's take a closer look at the dashboard. The dashboard provides a comprehensive view of your V-Agent's settings, performance metrics, and more. It's designed to help you manage and optimize your chatbot efficiently.

Knowledge Base
In DataKnowl, each "Knowl" represents a unit of knowledge, embodying specific objects, products, or services relevant to your business.
For instance, if your business operates as a Web Agency, you'll create various Knowls that encapsulate the different aspects of your services.
To begin, navigate to the Dashboard and select "Knowls" to start creating these knowledge units for your business.

Now, you have accessed the Knowls Manager. As depicted in the image below, the Knowledge Base is currently empty, without any Knowls.
To add a new Knowl, click the "+ Add" button.

Enter a Title for your Knowl, such as "Web Design Services," provide a summary, choose the status, and input detailed content about your web design services.
After filling in all the details, click "Insert".
Your new Knowl, titled "Web Design," will now be listed in the Knowls Manager, enriching your Knowledge Base.

Repeat this process to incorporate additional Knowls for other services you offer, like SEO, advertising, and hosting.
When you've finished populating your Knowledge Base, use the breadcrumb navigation (located just below the V-Agent's name) and click on "Dashboard" to return to the main dashboard view.
Tasks
Now, we've to implement the logic. In DataKnowl V-Agent, this is accomplished through Tasks.
Click on "Tasks" to access the Task Manager.
Here, the 'main' task is always present, as it is automatically created with your V-Agent. This task is executed first by default.

Simply click on "Edit" to open the Task Editor.

You will see the default content.
Before we modify the default DML, let's see how the V-Agent operates within the Web Widget.
Setting Up the Web Widget
Click on the "Channels" icon on the left bar.
Select "Widget".

and click on "Widgets".
Here you have all your "Widgets".

Click on the "+ Create new" button.
Provide a simple name and a brief description, as shown in the following image:

Click on "Create". The Widget is now created, and a WidgetID will be assignedto identify such widget. You'll have your Widget listed, as shown in the image below:

Now, click on the "VIEW" action in the row for the Widget we've just created.You can now edit the Widget configuration and preview how it behavesbefore installing it on your website.

In DataKnowl, a single web widget can host multiple applications. This time, we've to add a "V-Agent" application.Click on "+ Add" and select "V-Agent".

Select the V-Agent option. Then select which V-Agent you want to connect to the Widget. In this tutorial, we have only one V-Agent, so it is straightforward: just select the only V-Agent you have on the list and click "Confirm".

The 'V-Agent' application has been added to your Widget. By default, it is not enabled, so click on 'ENABLE' to activate it.

The V-Agent application is now enabled and linked to your V-Agent.

Previewing the Widget is very easy; just click on the Preview button.

A new tab will open, displaying a microsite with the widget enabled, allowing you to test your widget before actually adding it to your website.

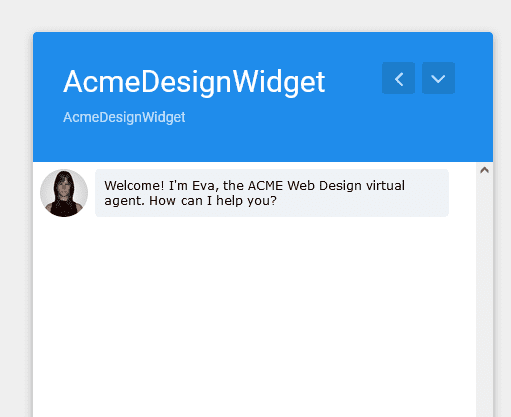
Here is your Widget in action:

Click on the V-Agent to start the conversation.

As it stands, the conversation is quite basic, with the V-Agent executing the 'main'task that simply says "Hello World".
But now we've configured the Widget, associated the V-Agent to it, and learnedhow to preview it.
Feel free to leave the preview tab open while you return to Tasks tomake our V-Agent smarter.
Customize DML
Return to Tasks by clicking on "Tasks" from your V-Agent Dashboard.
This is the most crucial part of the tutorial. Previously, we saw how to interact with the V-Agent interface to manage Knowls and Tasks.
Now, let's define the DML, which is the logic of the V-Agent.
First, edit the 'main' task as we did before.
Replace the default content with the following DML code:
<task>
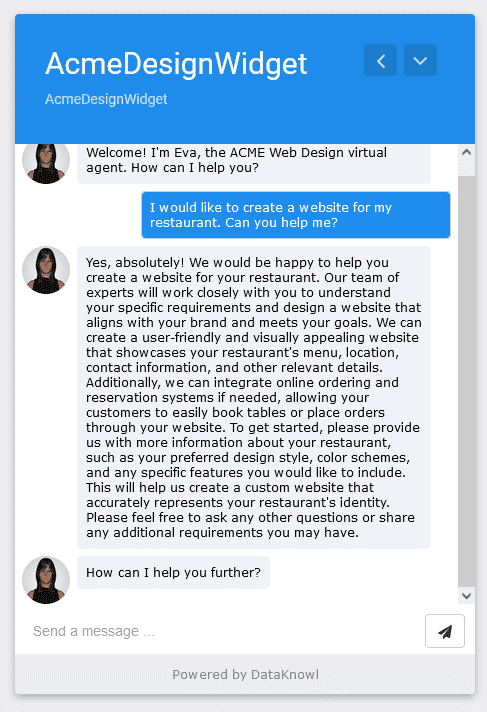
<say>Welcome! I'm Eva, the ACME Web Design virtual agent. How can I help you?</say>
<listen mode="KNOWLGEN" action="task:wdg_anything_else" />
</task>
Once done, click on "Update" to save the changes to the 'main' task.

Every task should start with the <task> tag and end with the </task> tag, as shown in the example.
The say verb instructs the V-Agent to communicate something to the user, which can be on the web or via phone. The listen verb prompts the V-Agent to await user input and to process this input according to the 'mode' attribute.
Here, mode="KNOWLGEN" tells the V-Agent to use Knowls and generative AI to formulate an appropriate response.
Lastly, action="task:wdg_anything_else" directs the V-Agent to execute this task after responding.
Now, create a new task named 'wdg_anything_else' by clicking the '+ Add' button in the Task Manager.

In the name field, type 'wdg_anything_else', which is the new task we're creating.
In the Content field, input the following DML code:
<task>
  <say>How can I help you further?</say>
  <listen mode="KNOWLGEN" action="task:wdg_anything_else" />
</task>
Then click the "Insert" button. Your setup should now look like this:

The wdg_anything_else task prompts the V-Agent to inquire further from the user with "How can I help you further?" and then waits for user input using the 'listen' verb with mode="KNOWLGEN".
It loops back to the "wdg_anything_else" task as specified by the 'action' attribute.
Testing
If we've left the Widget Preview tab open, we're ready to begin testing the V-Agent. If the tab is closed, follow the previous steps to reopen the Preview tab. Click on "V-Agent" to start the conversation.

The V-Agent now takes over.

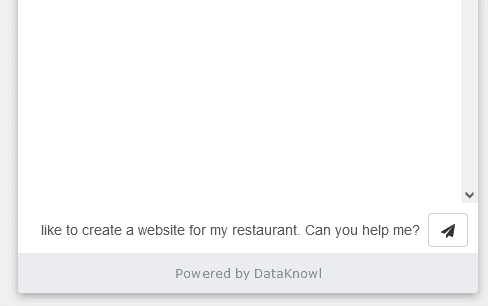
As you can see, the 'main' task is executed. Say something like "I would like to create a website for my restaurant. Can you help me?", as depicted in the image below:

Fantastic! Now, let's watch the V-Agent work its magic.

With just a couple of simple tasks and knowledge units, the V-Agent is already operational and ready to provide information and support to your customers.
Remember, this is just a basic example to get acquainted with the V-Agent. We've only scratched the surface of what the V-Agent is capable of.
There is potential to do much more, such as structuring more natural conversations using DML, providing menus, recommended options, and much more.
Deploy the chatbot on your website
Once you are satisfied with the testing, deploy the chatbot on your website by embedding the provided HTML code.
Make sure to replace "XXXXXXXX.....XXXXXXXX" with your actual Widget ID.
This code should be placed just before the '</body>' tag on your website.
<!-- Load the DataKnowl Widget -->
<script id="dkn-widget" type="text/javascript" src="https://cdn.dataknowl.cloud/sdk/js/widget/v1.0/widget.min.js" />
<script type="text/javascript">
   window.dataknowlWidget.init({
      wid: "XXXXXXXX.....XXXXXXXX"
   });
</script>
This guide has walked you through creating a basic but functional V-Agent setup, illustrating just a fraction of the V-Agent's potential capabilities for enhancing customer interactions.
© 2024 Complexity Intelligence, LLC