How to create an AI-powered phonebot to never miss a call again
Creating a chatbot for your business is crucial to provide information to potential
buyers about your products and services, thereby offering pre-sale information, generating
leads, and supporting existing customers.
On the telephone channel, this becomes even more important. Every missed call represents a missed opportunity. An unanswered call can lead to a missed sale or a service opportunity lost. Worse still, it could result in losing a customer.
Today, thanks to advancements in artificial intelligence, managing all incoming calls efficiently, even during busy times, has become possible. No more missed calls, and every opportunity is valued.
DataKnowl V-Agent is a tool specifically designed for this purpose. Utilizing Artificial Intelligence, it's part of the DataKnowl platform, which is dedicated to managing customer relationships.
In this tutorial, we'll demonstrate how to create a simple phonebot and connect it to your phone number within minutes.
Create your account
If you don’t already have a DataKnowl account, now is the time to create one. It's free, quick, and straightforward.
Create a new V-Agent
To create a new V-Agent, click on the icon and then select the "+ Add New" button.
Complete the form with the necessary information to configure your V-Agent:
- Name: Give your V-Agent a distinctive name.
- Description: Enter a concise description.
- Language: Choose the default language from the list.
- Plan: Select your preferred subscription plan.
- AI Engine: Pick 'Intellexere'.
- Location: Decide where data will be processed, such as for GDPR compliance.
Once you've entered all details, click the "Create" button. Your new V-Agent will be created.

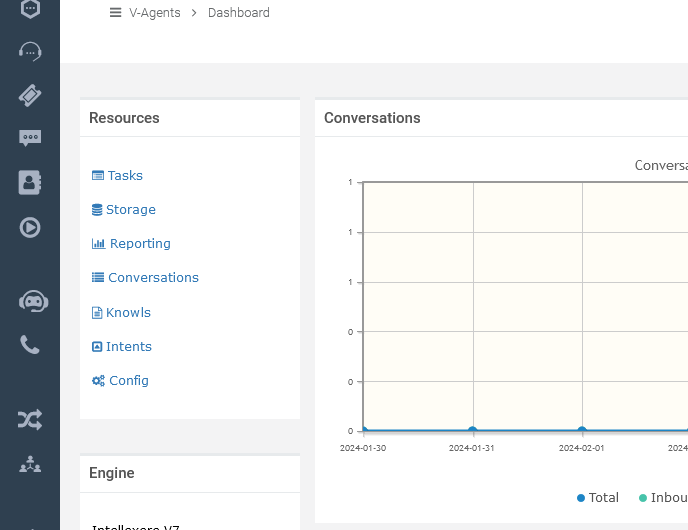
Dashboard Overview
Explore the dashboard of your newly created V-Agent below.

Knowledge Base
In DataKnowl, a "Knowl" represents a unit of knowledge, typically describing an object, product, or service. Essentially, a Knowl encapsulates a concept.
Suppose your business is a Web Agency. We'll create Knowls related to your services.
From the Dashboard, select "Knowls":
You will now be in the Knowls Manager. As depicted below, the Knowledge Base starts off empty, devoid of any Knowls.
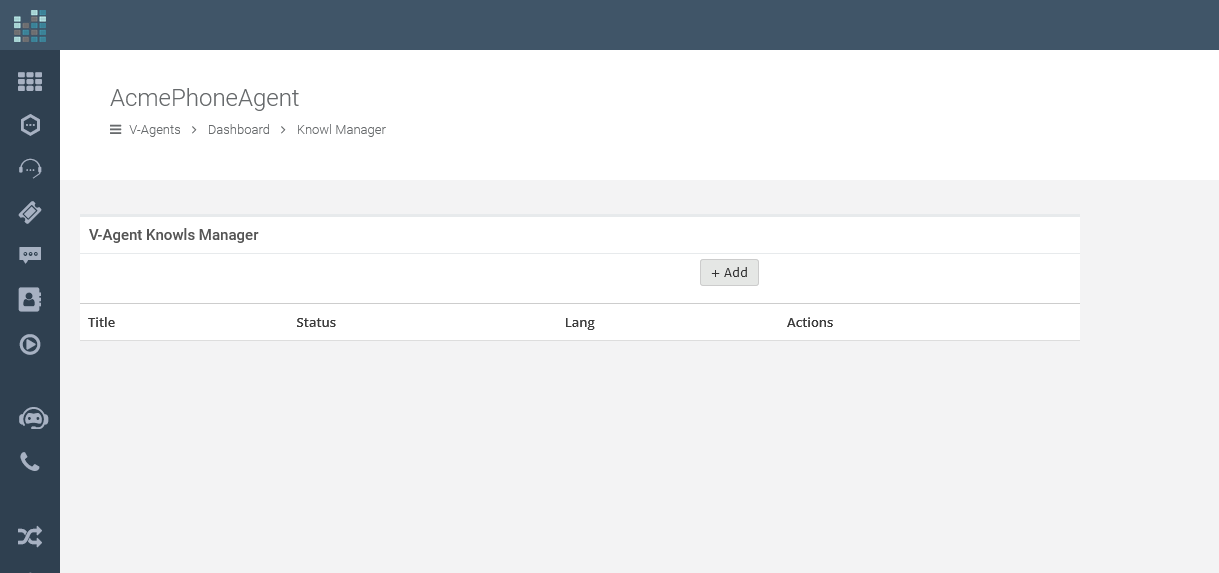
Click the '+ Add' button to create a new Knowl.
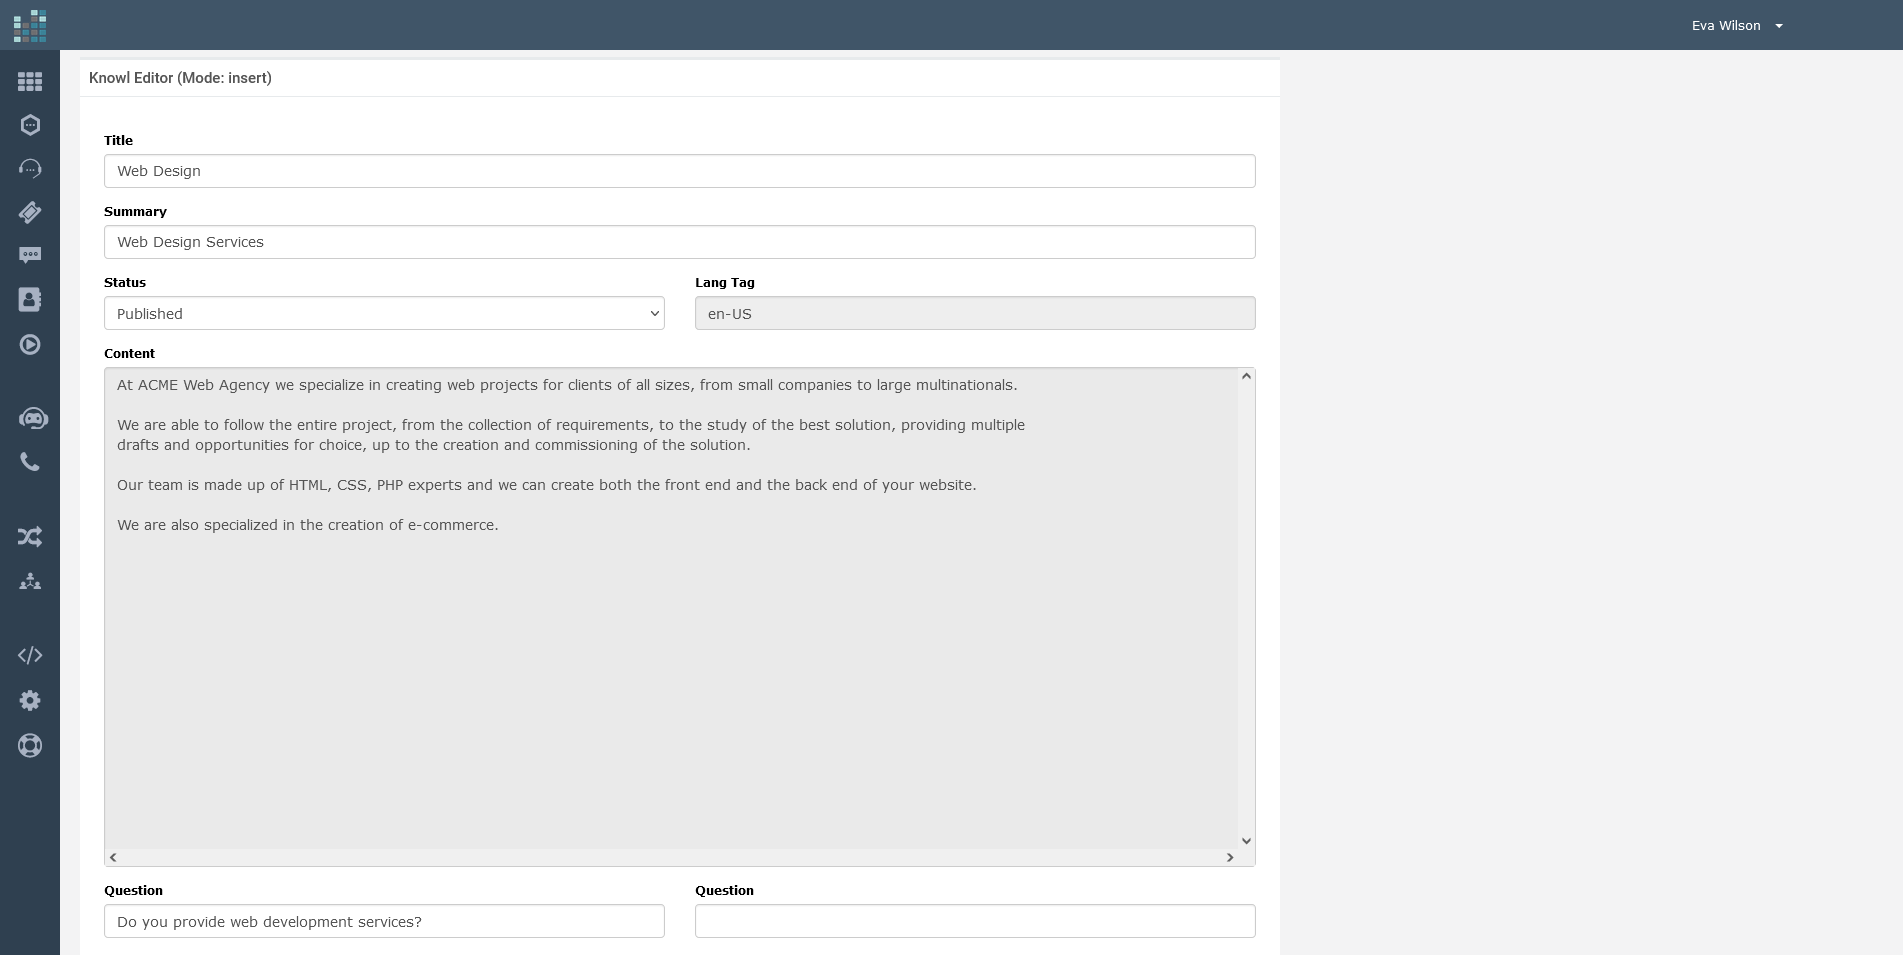
Provide a title, for example, "Web Design Services," add a summary, set the Knowl's status, and fill in the content section.
In this case, we're detailing the web design services offered by our fictional ACME Web Agency.
Once completed, click "Insert."
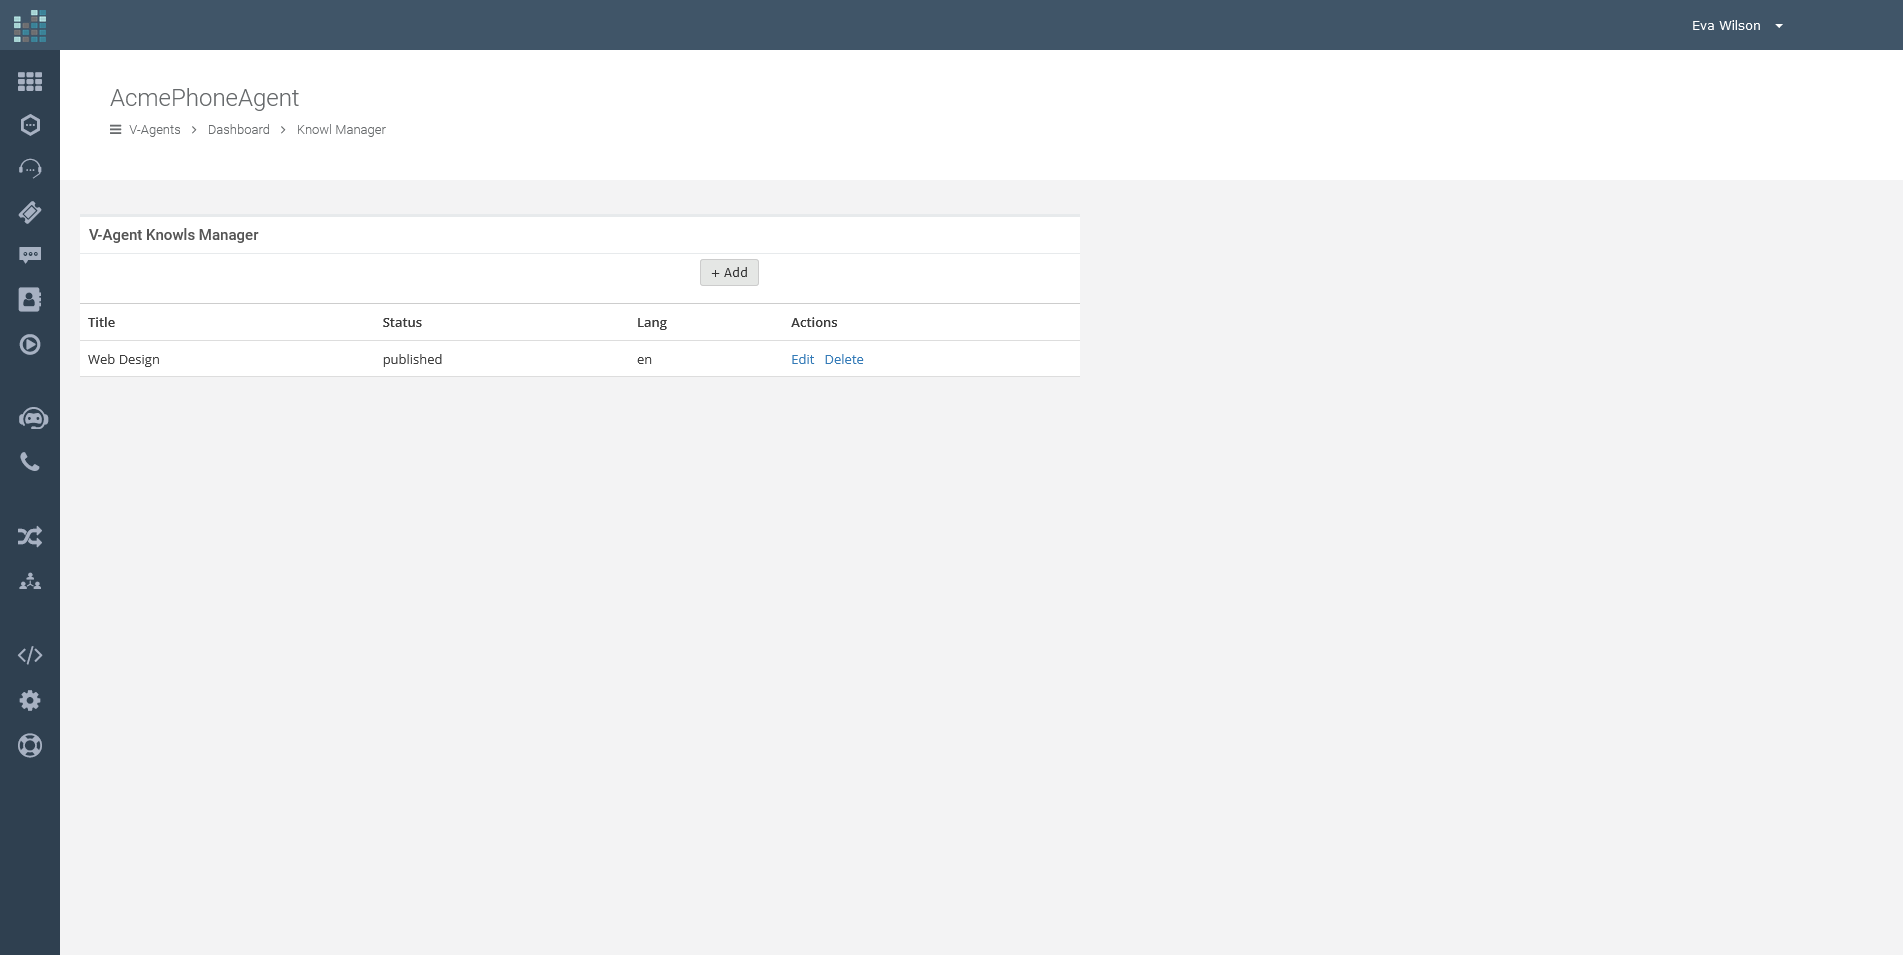
Your new Knowl, "Web Design," will now appear in the Knowls Manager and be included in the Knowledge Base.
Repeat the same process to add additional Knowls detailing other services offered by your web agency, such as SEO, advertising, hosting, and more.
Once you've completed updating your Knowledge Base, click on 'Dashboard' to return to the main dashboard.
Tasks
Now, let's implement the logic. In DataKnowl V-Agent, this is accomplished using Tasks.
From the Dashboard, click on "Tasks" to open the Tasks Manager.
Here, you will find the 'main' task, which is automatically created with the V-Agent. This task is executed first by default.
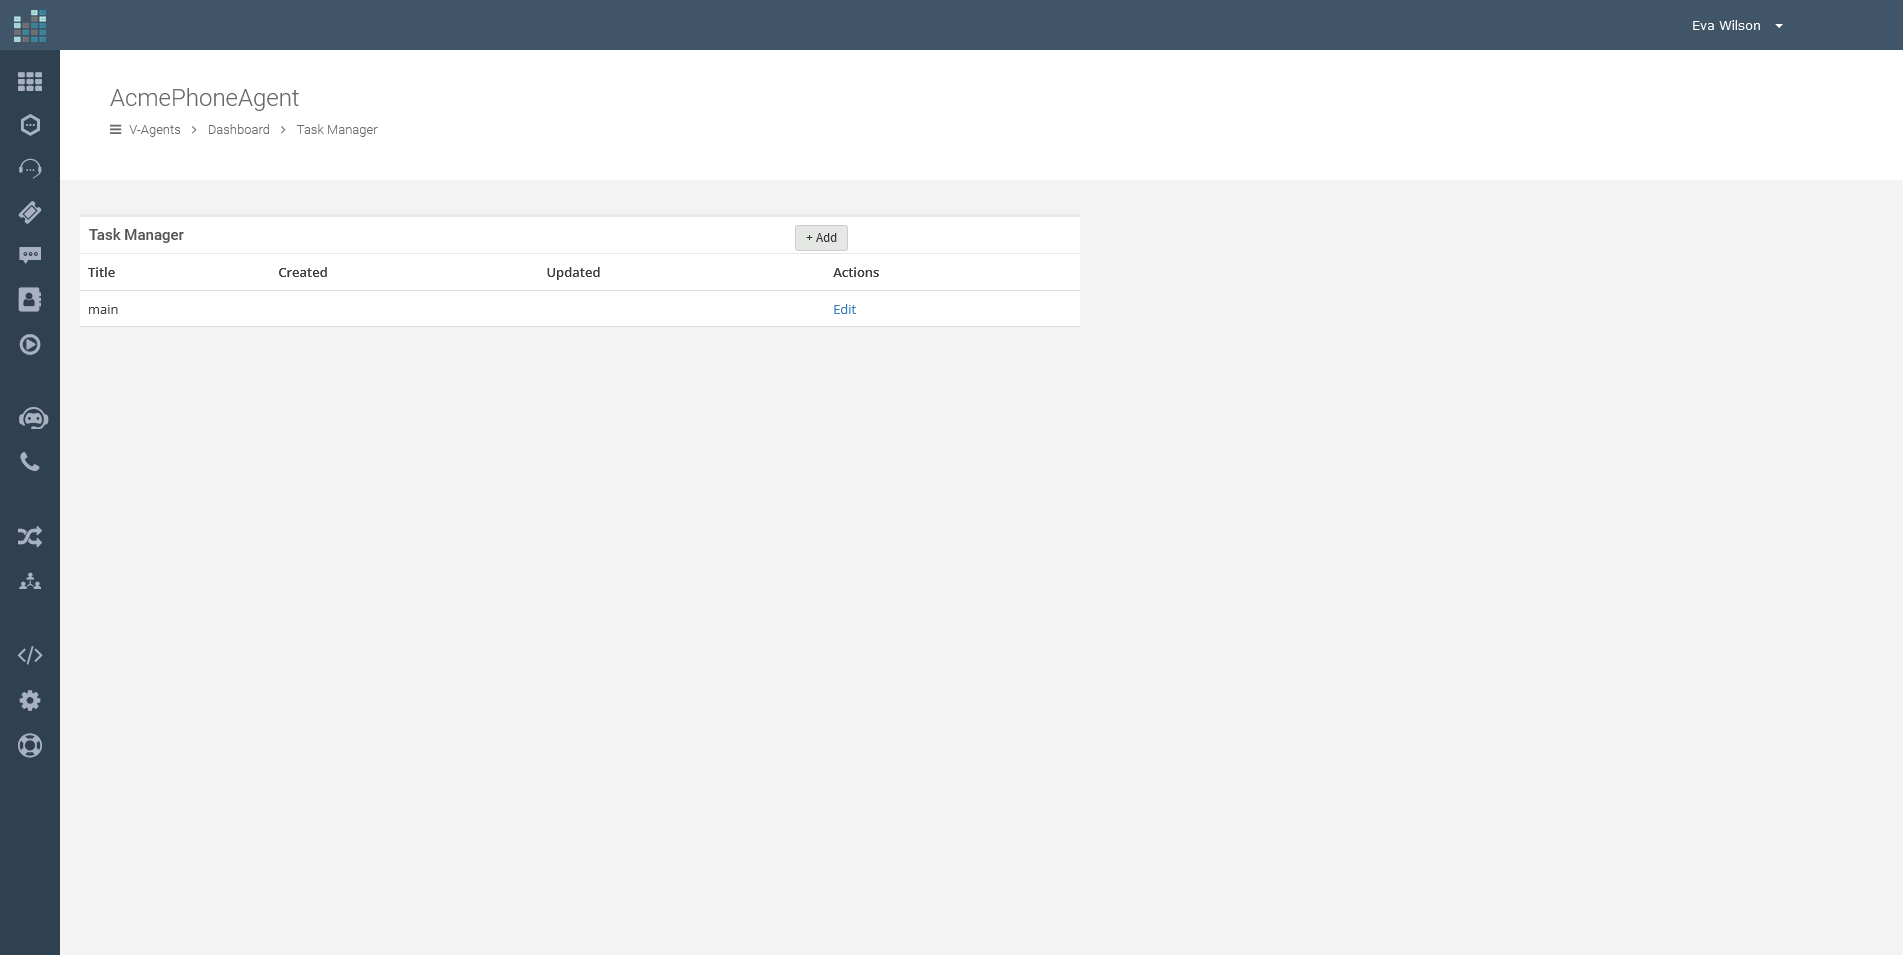
Simply click on 'Edit' to access the Task Editor.
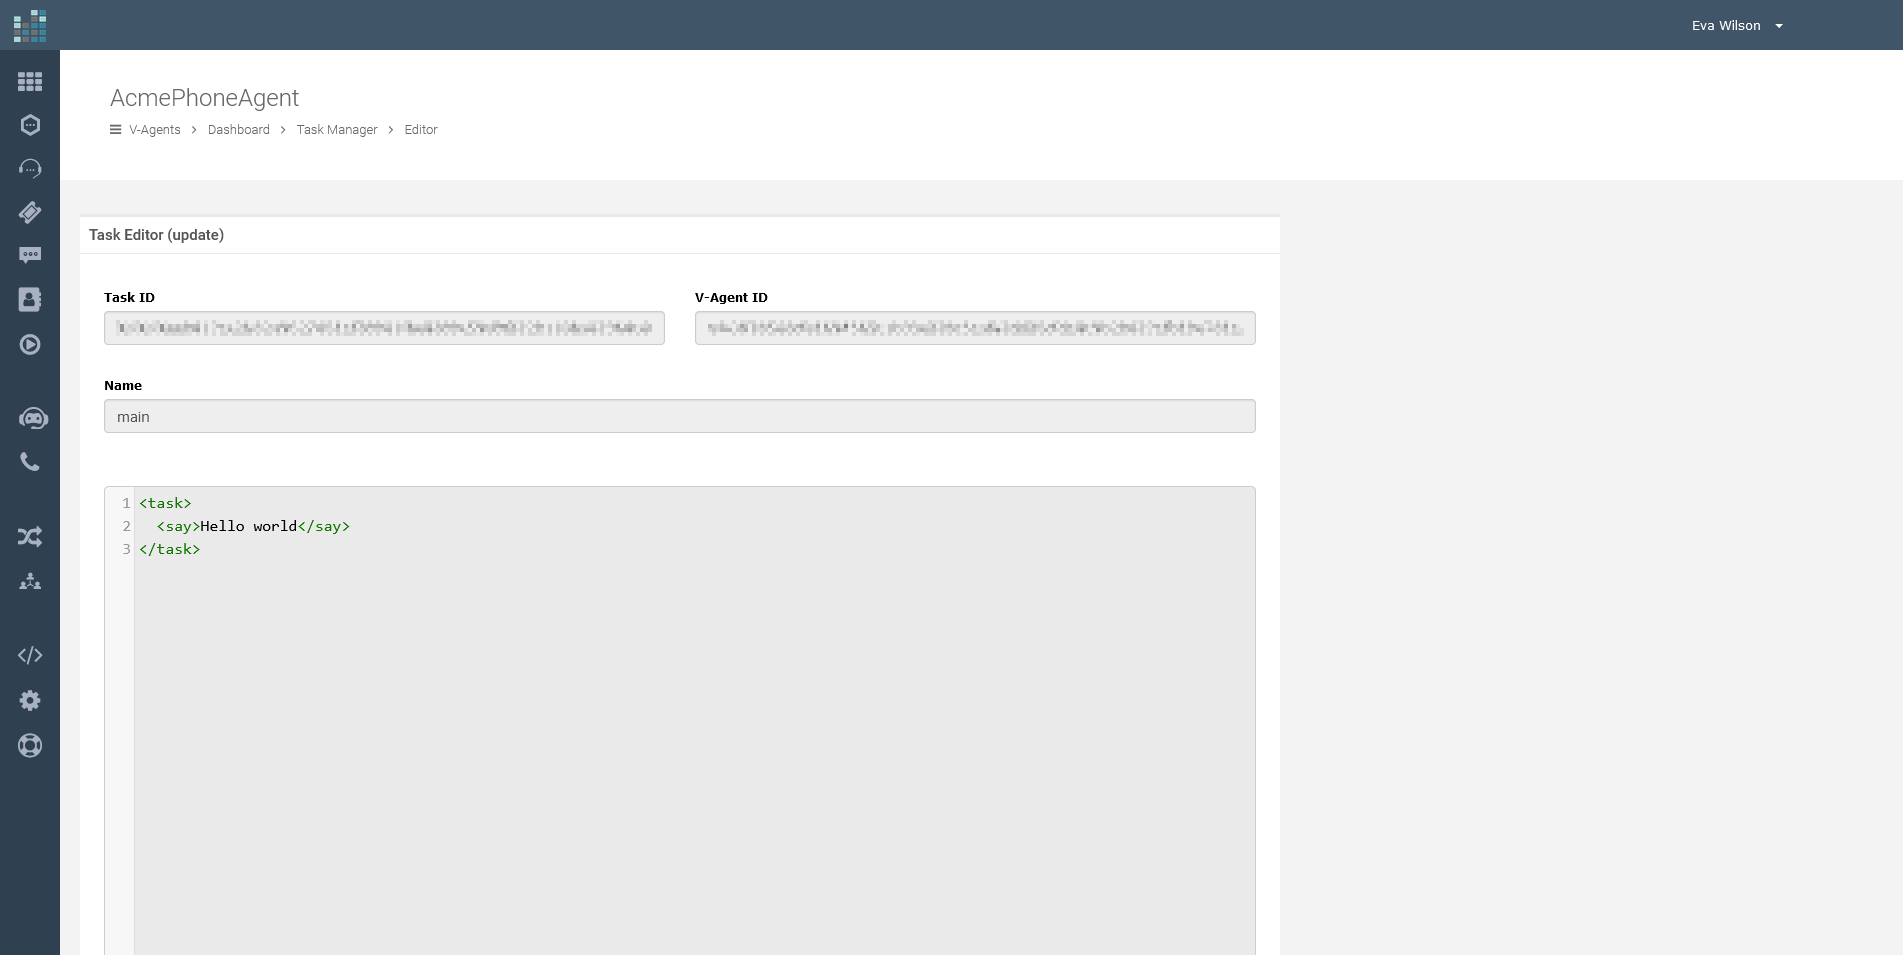
You will see the default content. Now, before making any changes to the default DML, let's learn how to connect the V-Agent to a phone number.
Phone Channel
Now let's connect a telephone number to the V-Agent, so that incoming calls on this number are managed by the V-Agent created previously.
For this tutorial we assume that you have already added a phone number to your account, if you have not, follow the tutorial to order a phone number.
Click on the "Channels" icon on the left bar.
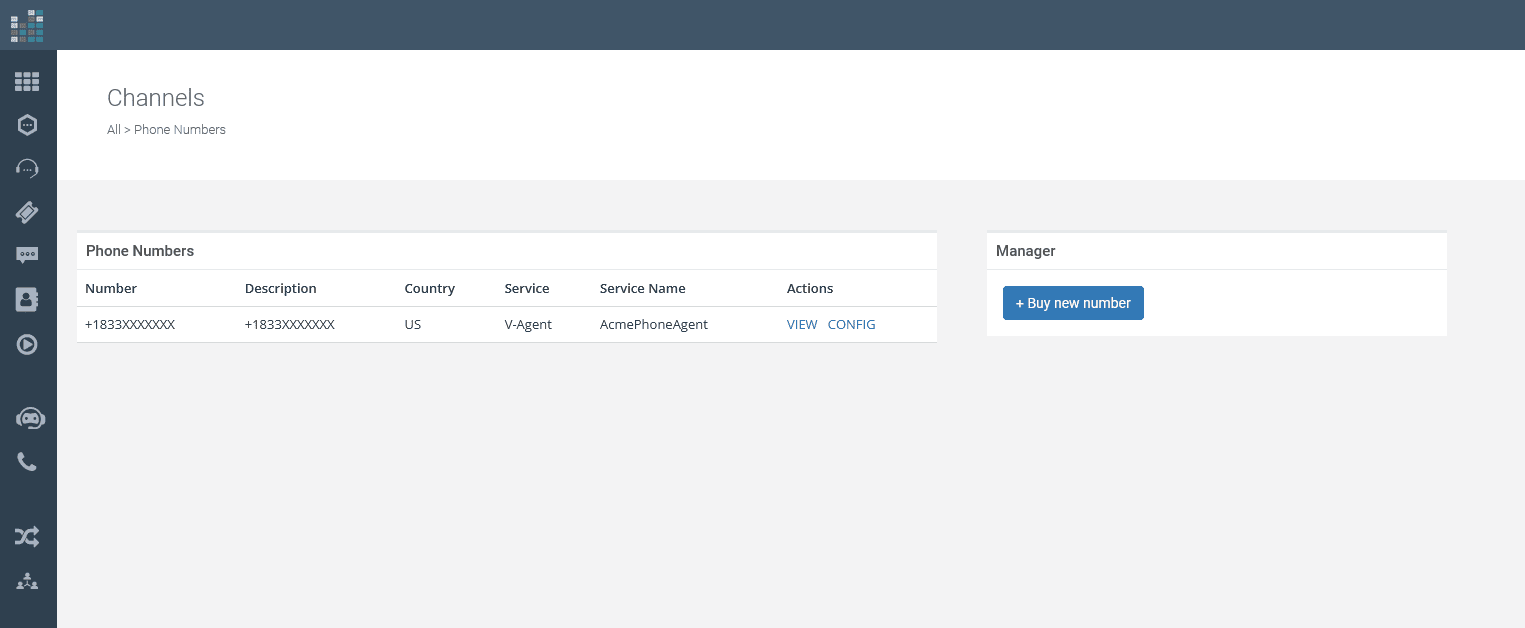
Select "Phone Numbers"

From this section you can see and manage your phone numbers, and order new ones.
In our case, we have already ordered and got a number in our account. Let's associate it with the newly created V-Agent by pressing the "Config" button.

Now, let's set the service to which to forward the calls received on the numbering we are configuring, selecting the V-Agent, as per the following screen, by pressing "Update":

Great, we have now associated the phone number with the V-Agent. In the telephone number manager we will see how the service associated with the number is now "V-Agent" and in particular "AcmePhoneAgent" which is the name of the newly created V-Agent.
You can now call your phone number, and the call will be answered by the V-Agent. For now, it will simply run the 'main' task by default, and then you will hear "Hello World".
Customize DML
Return to 'Tasks' by clicking on 'Tasks' from your V-Agent Dashboard.
This section is the most critical part of the tutorial. In the previous steps, we've learned how to interact with the V-Agent interface to manage Knowls and Tasks.
Now, let's define the DML, which is the logic of the V-Agent.
Firstly, edit the 'main' task as we did before.
This time, replace the default content with the following DML code:
This DML code configures a sophisticated AI-driven conversational agent that allows callers to interact in a flexible and intuitive manner. When the task initiates, the caller is greeted with a message from ACME and provided with guidance on how to proceed:
The caller can use the dial pad for a traditional IVR-like interaction, pressing keys to select options such as '1' for sales, '2' for billing, or '3' for technical support.
Alternatively, the caller can engage in a more dynamic conversation, using voice commands to directly invoke the same options by saying "sales," "billing," or "support."
Beyond predefined commands, the system invites the caller to pose direct questions or make requests in natural language.
For example, a caller might inquire, "Do your agency can help me with SEO and backlinking?" showcasing the system's capacity for understanding and responding to complex queries.
The listen element, with its mode parameter set to "INTENT_KNOWLGEN" instructs the V-Agent to utilize both the intent recognition and the generative AI capabilities powered by the Knowledge Base. This dual approach enables the agent to draw upon the provided Knowls for contextually relevant information and generate responses that are not strictly pre-scripted.
By integrating KNOWLGEN (Knowledge Source and Generative AI), the V-Agent goes beyond the limitations of traditional IVR systems.
It uses knowledge articles and generative AI to deduce answers, providing a service akin to conversing with a knowledgeable human agent.
This advanced setup ensures that the V-Agent can handle a wide range of interactions, from straightforward requests to complex inquiries, delivering a more human-like, conversational experience that leverages a comprehensive Knowledge Base to provide the best possible answers to callers.
Let's now create the 'catch_all' task. From the dashboard, select "Tasks", then "+ Add" at the top right.
In the name field, we insert 'catch_all', while the DML code is as follows:
Once the caller has interacted with the initial menu, they may reach a point where they need further assistance. This is where the "catch_all" task comes into play. It serves as a safety net for callers who haven't found what they're looking for in the previous options or for those who have additional questions.
When activated, the V-Agent gently prompts the caller, asking, "How can we help you further?" This open-ended question invites the caller to articulate any specific inquiries they may have, offering the full breadth of the V-Agent's capabilities for a personalized response.
For those who wish to return to the main menu and perhaps take a different path through the options, they are given a straightforward instruction: press the number one. This simple action seamlessly redirects them to the beginning of the interaction without any hassle.
The V-Agent's intelligent listening mode is particularly noteworthy here. When a direct question is posed, the system utilizes its advanced INTENT and KNOWLGEN modes to understand and process the request. This dual-mode approach ensures that even the most complex questions are considered thoughtfully, with the V-Agent drawing upon its extensive knowledge base to generate a coherent and relevant response. Callers are reminded to pause for a brief moment following their question, allowing the system the few seconds it needs to deliberate and formulate the best possible answer.
What's more, should the caller express their request in a manner that doesn't match predefined commands, the system's generative AI comes to the forefront, crafting responses that feel natural and human-like. This capability demonstrates the V-Agent's flexibility and depth, standing by to assist with a diverse array of inquiries, ensuring callers are well-supported no matter their need.
In essence, the "catch_all" task embodies the V-Agent's commitment to providing a comprehensive and accessible customer service experience, ensuring that every call is an opportunity to deliver satisfaction and support.
In the main menu, direct options have been added for sales, billing and technical support.
Respectively, these options are associated with the tasks: 'sales_main', 'billing_main' and 'techsupport_main'.
We also implement these tasks.
For billing, let's see how to direct calls to an administrative manager.
Let's create the 'billing_main' task, and define the behavior using the following DML:
Remember to enter a valid phone number.
The task will forward calls to the number you specified.
Implement tasks 'sales_main' and 'techsupport_main' as you wish. Thanks to the DML you have a flexible tool, with a thousand possibilities, to shape your ideal solution.
Testing
We are now ready to test our V-Agent's functionality. It's quite straightforward: simply call the phone number linked to our V-Agent and start interacting.
For instance, you might ask, "Do you develop websites?" or explore the predefined options using the numeric keypad. You can also use associated keywords for specific functions, like accessing technical support by pressing "3" or saying "support."
Conclusions
This tutorial offers a glimpse into the capabilities of V-Agent on the phone channel — a starting point for discovering how to leverage its features effectively.
On the telephone channel, this becomes even more important. Every missed call represents a missed opportunity. An unanswered call can lead to a missed sale or a service opportunity lost. Worse still, it could result in losing a customer.
Today, thanks to advancements in artificial intelligence, managing all incoming calls efficiently, even during busy times, has become possible. No more missed calls, and every opportunity is valued.
DataKnowl V-Agent is a tool specifically designed for this purpose. Utilizing Artificial Intelligence, it's part of the DataKnowl platform, which is dedicated to managing customer relationships.
In this tutorial, we'll demonstrate how to create a simple phonebot and connect it to your phone number within minutes.
Create your account
If you don’t already have a DataKnowl account, now is the time to create one. It's free, quick, and straightforward.
Create a new V-Agent
To create a new V-Agent, click on the
Complete the form with the necessary information to configure your V-Agent:
- Name: Give your V-Agent a distinctive name.
- Description: Enter a concise description.
- Language: Choose the default language from the list.
- Plan: Select your preferred subscription plan.
- AI Engine: Pick 'Intellexere'.
- Location: Decide where data will be processed, such as for GDPR compliance.
Once you've entered all details, click the "Create" button. Your new V-Agent will be created.

Dashboard Overview
Explore the dashboard of your newly created V-Agent below.

Knowledge Base
In DataKnowl, a "Knowl" represents a unit of knowledge, typically describing an object, product, or service. Essentially, a Knowl encapsulates a concept.
Suppose your business is a Web Agency. We'll create Knowls related to your services.
From the Dashboard, select "Knowls":

You will now be in the Knowls Manager. As depicted below, the Knowledge Base starts off empty, devoid of any Knowls.

Click the '+ Add' button to create a new Knowl.

Provide a title, for example, "Web Design Services," add a summary, set the Knowl's status, and fill in the content section.
In this case, we're detailing the web design services offered by our fictional ACME Web Agency.
Once completed, click "Insert."
Your new Knowl, "Web Design," will now appear in the Knowls Manager and be included in the Knowledge Base.

Repeat the same process to add additional Knowls detailing other services offered by your web agency, such as SEO, advertising, hosting, and more.
Once you've completed updating your Knowledge Base, click on 'Dashboard' to return to the main dashboard.
Tasks
Now, let's implement the logic. In DataKnowl V-Agent, this is accomplished using Tasks.
From the Dashboard, click on "Tasks" to open the Tasks Manager.
Here, you will find the 'main' task, which is automatically created with the V-Agent. This task is executed first by default.

Simply click on 'Edit' to access the Task Editor.

You will see the default content. Now, before making any changes to the default DML, let's learn how to connect the V-Agent to a phone number.
Phone Channel
Now let's connect a telephone number to the V-Agent, so that incoming calls on this number are managed by the V-Agent created previously.
For this tutorial we assume that you have already added a phone number to your account, if you have not, follow the tutorial to order a phone number.
Click on the "Channels" icon
Select "Phone Numbers"

From this section you can see and manage your phone numbers, and order new ones.
In our case, we have already ordered and got a number in our account. Let's associate it with the newly created V-Agent by pressing the "Config" button.

Now, let's set the service to which to forward the calls received on the numbering we are configuring, selecting the V-Agent, as per the following screen, by pressing "Update":

Great, we have now associated the phone number with the V-Agent. In the telephone number manager we will see how the service associated with the number is now "V-Agent" and in particular "AcmePhoneAgent" which is the name of the newly created V-Agent.

You can now call your phone number, and the call will be answered by the V-Agent. For now, it will simply run the 'main' task by default, and then you will hear "Hello World".
Customize DML
Return to 'Tasks' by clicking on 'Tasks' from your V-Agent Dashboard.
This section is the most critical part of the tutorial. In the previous steps, we've learned how to interact with the V-Agent interface to manage Knowls and Tasks.
Now, let's define the DML, which is the logic of the V-Agent.
Firstly, edit the 'main' task as we did before.
This time, replace the default content with the following DML code:
<task>
  <say>Thank you for calling ACME. </say>
  <say>Please select one of the following options, or formulate a request directly, and wait a few seconds for processing. Thank you.</say>
  <listen action="task:catch_all" mode="INTENT_KNOWLGEN">
    <say>For sales, please press 1 or say sales.
		For billing, please press 2 or say billing.
		For technical support, please press 3, or say support.
    	You can also formulate a question or request directly after the end of this menu. In this case,
        please wait a few seconds for processing. Thank you.</say>
    <hints>
      <option action="task:sales_main" dtmf="1" speech="sales" />
      <option action="task:billing_main" dtmf="2" speech="billing" />
      <option action="task:techsupport_main" dtmf="3" speech="support" />
    </hints>
  </listen>
</task>
This DML code configures a sophisticated AI-driven conversational agent that allows callers to interact in a flexible and intuitive manner. When the task initiates, the caller is greeted with a message from ACME and provided with guidance on how to proceed:
The caller can use the dial pad for a traditional IVR-like interaction, pressing keys to select options such as '1' for sales, '2' for billing, or '3' for technical support.
Alternatively, the caller can engage in a more dynamic conversation, using voice commands to directly invoke the same options by saying "sales," "billing," or "support."
Beyond predefined commands, the system invites the caller to pose direct questions or make requests in natural language.
For example, a caller might inquire, "Do your agency can help me with SEO and backlinking?" showcasing the system's capacity for understanding and responding to complex queries.
The listen element, with its mode parameter set to "INTENT_KNOWLGEN" instructs the V-Agent to utilize both the intent recognition and the generative AI capabilities powered by the Knowledge Base. This dual approach enables the agent to draw upon the provided Knowls for contextually relevant information and generate responses that are not strictly pre-scripted.
By integrating KNOWLGEN (Knowledge Source and Generative AI), the V-Agent goes beyond the limitations of traditional IVR systems.
It uses knowledge articles and generative AI to deduce answers, providing a service akin to conversing with a knowledgeable human agent.
This advanced setup ensures that the V-Agent can handle a wide range of interactions, from straightforward requests to complex inquiries, delivering a more human-like, conversational experience that leverages a comprehensive Knowledge Base to provide the best possible answers to callers.
Let's now create the 'catch_all' task. From the dashboard, select "Tasks", then "+ Add" at the top right.
In the name field, we insert 'catch_all', while the DML code is as follows:
<task>
  <listen action="task:catch_all" mode="INTENT_KNOWLGEN">
    <say>How can we help you further? You can formulate a direct question,
        or press key one to return to the main menu. If a direct request
        is made, please wait a few seconds for processing.
        Thank you.
    </say>
    <hints>
      <option action="task:main" dtmf="1" />
    </hints>
  </listen>
</task>
Once the caller has interacted with the initial menu, they may reach a point where they need further assistance. This is where the "catch_all" task comes into play. It serves as a safety net for callers who haven't found what they're looking for in the previous options or for those who have additional questions.
When activated, the V-Agent gently prompts the caller, asking, "How can we help you further?" This open-ended question invites the caller to articulate any specific inquiries they may have, offering the full breadth of the V-Agent's capabilities for a personalized response.
For those who wish to return to the main menu and perhaps take a different path through the options, they are given a straightforward instruction: press the number one. This simple action seamlessly redirects them to the beginning of the interaction without any hassle.
The V-Agent's intelligent listening mode is particularly noteworthy here. When a direct question is posed, the system utilizes its advanced INTENT and KNOWLGEN modes to understand and process the request. This dual-mode approach ensures that even the most complex questions are considered thoughtfully, with the V-Agent drawing upon its extensive knowledge base to generate a coherent and relevant response. Callers are reminded to pause for a brief moment following their question, allowing the system the few seconds it needs to deliberate and formulate the best possible answer.
What's more, should the caller express their request in a manner that doesn't match predefined commands, the system's generative AI comes to the forefront, crafting responses that feel natural and human-like. This capability demonstrates the V-Agent's flexibility and depth, standing by to assist with a diverse array of inquiries, ensuring callers are well-supported no matter their need.
In essence, the "catch_all" task embodies the V-Agent's commitment to providing a comprehensive and accessible customer service experience, ensuring that every call is an opportunity to deliver satisfaction and support.
In the main menu, direct options have been added for sales, billing and technical support.
Respectively, these options are associated with the tasks: 'sales_main', 'billing_main' and 'techsupport_main'.
We also implement these tasks.
For billing, let's see how to direct calls to an administrative manager.
Let's create the 'billing_main' task, and define the behavior using the following DML:
<task>
  <connect>
     <number>+16500000000</number>
  </connect>
</task>
Remember to enter a valid phone number.
The task will forward calls to the number you specified.
Implement tasks 'sales_main' and 'techsupport_main' as you wish. Thanks to the DML you have a flexible tool, with a thousand possibilities, to shape your ideal solution.
Testing
We are now ready to test our V-Agent's functionality. It's quite straightforward: simply call the phone number linked to our V-Agent and start interacting.
For instance, you might ask, "Do you develop websites?" or explore the predefined options using the numeric keypad. You can also use associated keywords for specific functions, like accessing technical support by pressing "3" or saying "support."
Conclusions
This tutorial offers a glimpse into the capabilities of V-Agent on the phone channel — a starting point for discovering how to leverage its features effectively.
© 2024 Complexity Intelligence, LLC